Acadify EDU ERP – School Management System (Website, Admin Panel & Student/Teacher App)
Install & Update on a VPS
Ubuntu 22.04 or 24.04 over SSH, with nginx or Apache, PHP-FPM, Supervisor and Certbot
Before You Start
This guide sets up Acadify on a fresh Ubuntu 22.04 or 24.04 server (any provider: DigitalOcean, Hetzner, AWS Lightsail, Contabo and so on) that you reach over SSH. It also sets up real-time live chat with Laravel Reverb. Updating is covered in the second half of this page.
You need
- A server with at least 1 CPU, 2 GB RAM and 20 GB disk, and a user with
sudo. - A domain or subdomain whose DNS A record points to the server’s IP (needed for SSL in step 9).
- The download from CodeCanyon on your computer (
Main_Files/WebSourceCode, about 265 MB; about 150 MB as a ZIP).
Placeholders: school.example.com is your domain, /var/www/acadify the site folder, acadify the database and its user. Every command runs on the server unless it says “on your computer”.
Run artisan as the web server user. On Ubuntu that is www-data, so every Laravel command in this guide is written as sudo -u www-data php artisan ….
If you run php artisan as root or as your own user, it can create cache and log folders that PHP-FPM cannot write to, and the site answers with a 500 error.
Fix it with sudo chown -R www-data:www-data /var/www/acadify/storage /var/www/acadify/bootstrap/cache.
Step 1 — Install the Server Packages
Acadify needs PHP 8.2 or newer. This guide uses PHP 8.3, the default on Ubuntu 24.04; on PHP 8.2 use the same commands with 8.2 instead of 8.3.
Ubuntu 24.04
PHP 8.3 is the default version, so no extra repository is needed.
Ubuntu 22.04
Ubuntu 22.04 ships PHP 8.1. Add the widely used PHP repository first:
sudo apt update
sudo apt install -y software-properties-common
sudo add-apt-repository -y ppa:ondrej/php
Both versions
sudo apt update && sudo apt upgrade -y

# PHP 8.3 with the extensions Acadify needs (ctype, fileinfo, tokenizer, openssl and json are built in)
sudo apt install -y php8.3-fpm php8.3-cli php8.3-mysql php8.3-mbstring php8.3-xml \
  php8.3-curl php8.3-zip php8.3-gd php8.3-bcmath php8.3-intl

# database: MySQL 8 ...
sudo apt install -y mysql-server
# ... or MariaDB instead: sudo apt install -y mariadb-server

# web server: nginx (step 7a) ...
sudo apt install -y nginx
# ... or Apache instead (step 7b): sudo apt install -y apache2

# tools: unzip and rsync for uploads and updates, Supervisor for Reverb, Certbot for SSL, Composer (optional)
sudo apt install -y unzip rsync supervisor certbot composer
Composer is optional: vendor/ (the PHP packages) is already in the download. You only need it if you add your own PHP packages.
Check: php -v shows 8.3, and php -m lists bcmath curl dom gd mbstring mysqli pdo_mysql zip.
Step 2 — PHP Settings
Edit /etc/php/8.3/fpm/php.ini (for example sudo nano /etc/php/8.3/fpm/php.ini) and set:
allow_url_fopen = On
date.timezone = "Asia/Dhaka"      ; your own time zone, e.g. "Europe/London"
max_execution_time = 300
max_input_time = 300
memory_limit = 256M
upload_max_filesize = 256M        ; System Update uploads the release ZIP (about 150 MB)
post_max_size = 256M
Set date.timezone in /etc/php/8.3/cli/php.ini too, then apply:
sudo systemctl restart php8.3-fpmThe installer stops while allow_url_fopen is off or date.timezone is empty.
Step 3 — Create the Database and User
sudo mysql_secure_installation      # optional on a new server: remove test data, set root login
sudo mysql
In the MySQL (or MariaDB) prompt, with your own strong password:
CREATE DATABASE acadify CHARACTER SET utf8mb4 COLLATE utf8mb4_unicode_ci;
CREATE USER 'acadify'@'localhost' IDENTIFIED BY 'a-strong-password';
CREATE USER 'acadify'@'127.0.0.1' IDENTIFIED BY 'a-strong-password';
GRANT ALL PRIVILEGES ON acadify.* TO 'acadify'@'localhost';
GRANT ALL PRIVILEGES ON acadify.* TO 'acadify'@'127.0.0.1';
FLUSH PRIVILEGES;
EXIT;
The installer connects to 127.0.0.1; the two users cover both ways MySQL may see that connection.
Give the installer this new, empty database. It deletes every table it finds in the database you give it.
Step 4 — Upload the Files to /var/www/acadify
On your computer, ZIP the Main_Files/WebSourceCode folder and copy it to the server (or use an SFTP program such as FileZilla):
scp WebSourceCode.zip you@your-server-ip:~/On the server:
cd ~
unzip -q WebSourceCode.zip                  # creates ~/WebSourceCode
sudo mkdir -p /var/www
sudo mv ~/WebSourceCode /var/www/acadify
rm ~/WebSourceCode.zip
ls -a /var/www/acadify                      # artisan, .env.example, acadify-update.json, app/, public/, vendor/ ...
The web server will serve only /var/www/acadify/public. Everything else (.env, storage/, the source code) stays outside the web root.
Step 5 — Ownership and Permissions
PHP-FPM runs as www-data. The installer writes .env, the site writes logs, caches and uploads, and the System Update page replaces the application folders, so www-data owns the site:
sudo chown -R www-data:www-data /var/www/acadify
sudo find /var/www/acadify -type d -exec chmod 755 {} \;
sudo find /var/www/acadify -type f -exec chmod 644 {} \;
sudo chmod -R 775 /var/www/acadify/storage /var/www/acadify/bootstrap/cache /var/www/acadify/public/uploads
To edit files as your own user, add yourself to the group (sudo usermod -aG www-data $USER, then log in again), or prefix commands with sudo -u www-data.
Stricter alternative: keep the code owned by your deploy user and give www-data write access only to storage/, bootstrap/cache/, public/uploads/ and .env.
The site works the same, but the System Update page cannot replace files then (its Server check shows Writable folders in red), so you update from the command line.
The web installer also needs routes/, resources/ and public/ writable while it runs.
Step 6 — Create .env and the Keys
cd /var/www/acadify
sudo -u www-data cp .env.example .env
sudo -u www-data php artisan key:generate      # application key
sudo -u www-data php artisan jwt:secret        # signs the mobile app's login tokens
sudo chmod 640 .env
Then sudo -u www-data nano .env and set APP_URL=https://school.example.com. Leave APP_DEMO=false, APP_DEBUG=false and the DB_ lines as they are: the installer fills them in.
jwt:secret asks whether to override the (still empty) secret and invalidate existing tokens: answer yes.
Step 7a — nginx Site
Skip this if you use Apache (step 7b). Create /etc/nginx/sites-available/acadify (sudo nano /etc/nginx/sites-available/acadify):
server {
    listen 80;
    server_name school.example.com;
    root /var/www/acadify/public;
    index index.php;

    client_max_body_size 256M;     # System Update uploads the release ZIP (about 150 MB)
    charset utf-8;

    location / {
        try_files $uri $uri/ /index.php?$query_string;
    }

    # Live chat: Reverb WebSockets (browsers)
    location /app/ {
        proxy_http_version 1.1;
        proxy_set_header Host $http_host;
        proxy_set_header Scheme $scheme;
        proxy_set_header SERVER_PORT $server_port;
        proxy_set_header REMOTE_ADDR $remote_addr;
        proxy_set_header X-Forwarded-For $proxy_add_x_forwarded_for;
        proxy_set_header Upgrade $http_upgrade;
        proxy_set_header Connection "Upgrade";
        proxy_read_timeout 120s;
        proxy_pass http://127.0.0.1:8080;
    }

    # Live chat: Laravel -> Reverb HTTP API (broadcasts)
    location /apps/ {
        proxy_set_header Host $http_host;
        proxy_pass http://127.0.0.1:8080;
    }

    location ~ \.php$ {
        fastcgi_pass unix:/run/php/php8.3-fpm.sock;
        fastcgi_param SCRIPT_FILENAME $realpath_root$fastcgi_script_name;
        include fastcgi_params;
        fastcgi_read_timeout 300;
    }

    location ~ /\.(?!well-known).* {
        deny all;
    }
}
Enable it and remove the default site:
sudo ln -s /etc/nginx/sites-available/acadify /etc/nginx/sites-enabled/
sudo rm -f /etc/nginx/sites-enabled/default
sudo nginx -t
sudo systemctl reload nginx
The /app/ and /apps/ blocks are for real-time chat (step 12). They do no harm before Reverb runs.
Step 7b — Apache Site
Skip this if you use nginx. Turn on PHP-FPM and the modules Acadify needs (routing, and the WebSocket proxy for live chat):
sudo a2enmod rewrite proxy proxy_fcgi proxy_http proxy_wstunnel setenvif
sudo a2enconf php8.3-fpm
sudo a2dissite 000-default
Create /etc/apache2/sites-available/acadify.conf:
<VirtualHost *:80>
    ServerName school.example.com
    DocumentRoot /var/www/acadify/public

    <Directory /var/www/acadify/public>
        AllowOverride All
        Require all granted
    </Directory>

    # Live chat: Reverb WebSockets and HTTP API (step 12)
    ProxyPreserveHost On
    ProxyPass        /app/  ws://127.0.0.1:8080/app/
    ProxyPassReverse /app/  ws://127.0.0.1:8080/app/
    ProxyPass        /apps/ http://127.0.0.1:8080/apps/
    ProxyPassReverse /apps/ http://127.0.0.1:8080/apps/

    ErrorLog ${APACHE_LOG_DIR}/acadify-error.log
    CustomLog ${APACHE_LOG_DIR}/acadify-access.log combined
</VirtualHost>
sudo a2ensite acadify
sudo apache2ctl configtest
sudo systemctl reload apache2public/.htaccess (shipped) does the routing, which is why AllowOverride All is required. Certbot copies this whole block, proxy lines included, into the HTTPS site in step 9.
Step 8 — Firewall
sudo ufw allow OpenSSH
sudo ufw allow 'Nginx Full'        # or: sudo ufw allow 'Apache Full'
sudo ufw enable
sudo ufw status
Only SSH, HTTP (80) and HTTPS (443) are open. Do not open 3306 (MySQL) or 8080 (Reverb): both are reached through 127.0.0.1 on the server itself.
Also allow 80 and 443 in your provider’s cloud firewall if it has one.
Step 9 — SSL with Certbot
# nginx
sudo apt install -y python3-certbot-nginx
sudo certbot --nginx -d school.example.com

# Apache
sudo apt install -y python3-certbot-apache
sudo certbot --apache -d school.example.com
Enter your email, accept the terms and choose to redirect HTTP to HTTPS. Certbot renews the certificate automatically (sudo certbot renew --dry-run tests that).
Make sure APP_URL in .env starts with https://. The mobile app needs the HTTPS address, and real-time chat over wss:// needs it too.
Step 10 — Run the Web Installer
Open https://school.example.com. A site that is not installed yet sends you to /install (“Welcome To Acadify ERP”):
- Requirements: PHP version, MySQLi, cURL, GD,
allow_url_fopen,date.timezone, the extensions and the writable folders (routes,resources,public,storage,.env). Fix anything red and reload. - Database: host
127.0.0.1, useracadify, its password, databaseacadify. - Administrator: first name, last name, email and password. Click Finish.
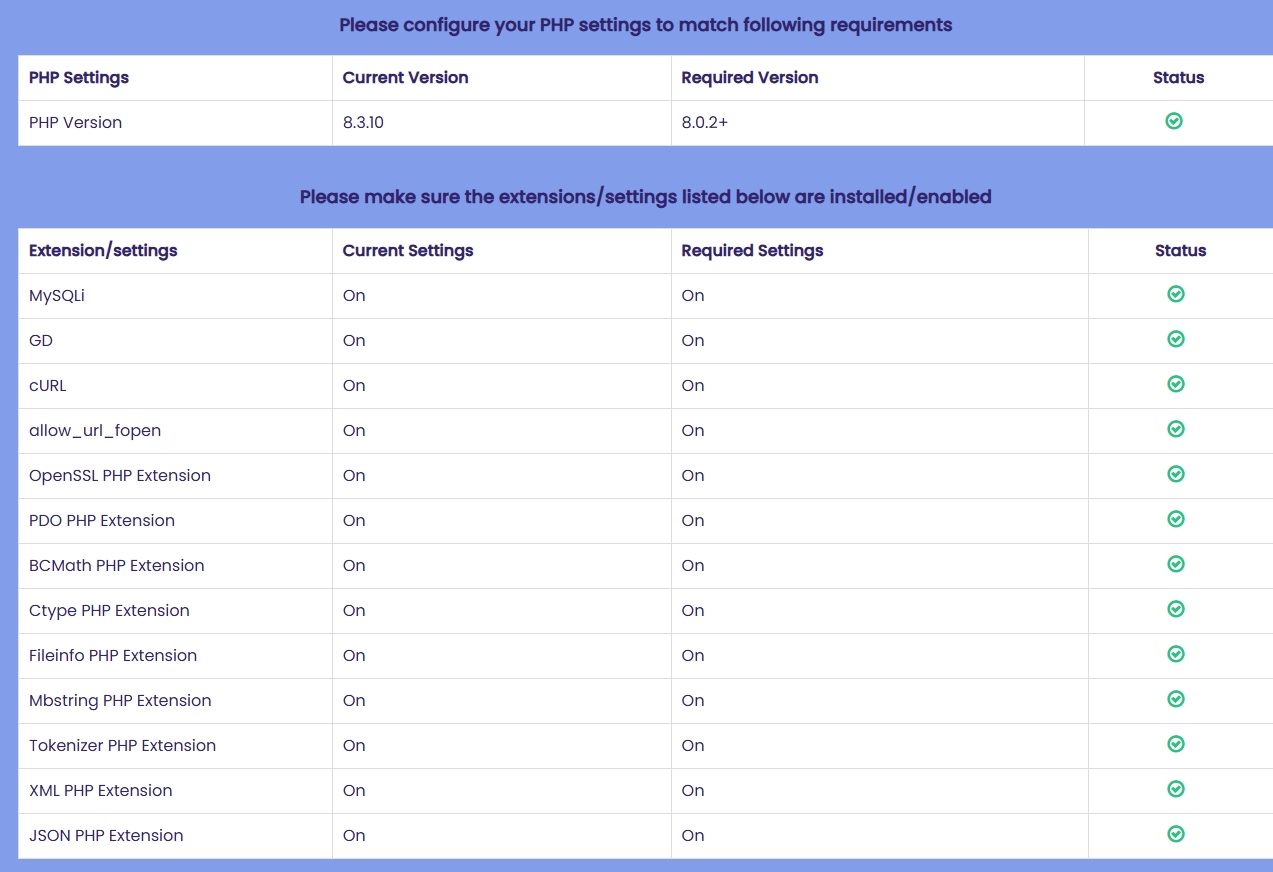
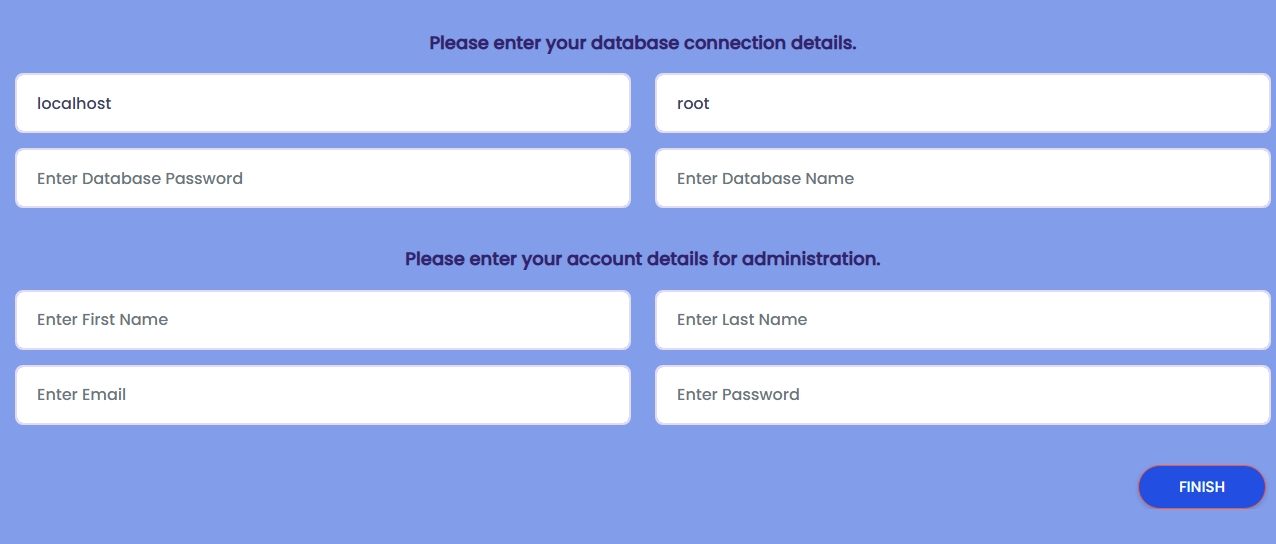
The installer tests the connection, writes the database values to .env, creates a new application key, builds the tables and default data, makes your administrator and sets APP_INSTALLED=yes.
It takes one to two minutes. Then sign in at /login. A fresh installation has no demo students, teachers or classes.
Never run the installer again, or php artisan db:seed, on a site with real data: both rebuild the database.
Step 11 — Storage Link and Cron
cd /var/www/acadify
sudo -u www-data php artisan storage:link
Uploads are saved in public/uploads; the public/storage link is the standard Laravel link and does no harm.
Add the scheduler to the www-data crontab, so its cache files belong to the right user:
sudo crontab -u www-data -e* * * * * cd /var/www/acadify && php artisan schedule:run >> /dev/null 2>&1It runs exam:result-generate every night. Check it with sudo -u www-data php artisan schedule:list. The admin panel shows the tasks under .
Queue
The package uses QUEUE_CONNECTION=sync: one-time codes and emails are sent during the request, so no queue worker is needed. Keep it that way unless you add a worker (php artisan queue:work) under Supervisor.
Step 12 — Live Chat in Real Time: Reverb and Supervisor
The website chat works without this step (it refreshes every 10 seconds). For instant messages, run Laravel Reverb, the WebSocket server included in the download.
1. .env
sudo -u www-data nano /var/www/acadify/.env, replace the BROADCAST_DRIVER line and the REVERB_ block (pick your own ID, key and secret):
BROADCAST_DRIVER=reverb

REVERB_APP_ID=123456
REVERB_APP_KEY=acadify-key
REVERB_APP_SECRET=change-me

# what browsers AND Laravel connect to
REVERB_HOST=school.example.com
REVERB_PORT=443
REVERB_SCHEME=https

# where the Reverb process listens (behind nginx or Apache)
REVERB_SERVER_HOST=127.0.0.1
REVERB_SERVER_PORT=8080
sudo -u www-data php artisan optimize:clear2. Supervisor keeps Reverb running
Create /etc/supervisor/conf.d/acadify-reverb.conf:
[program:acadify-reverb]
command=php /var/www/acadify/artisan reverb:start --host=127.0.0.1 --port=8080
directory=/var/www/acadify
user=www-data
autostart=true
autorestart=true
stopasgroup=true
killasgroup=true
stdout_logfile=/var/www/acadify/storage/logs/reverb.log
minfds=10000
sudo supervisorctl reread
sudo supervisorctl update
sudo supervisorctl status acadify-reverb # RUNNING3. WebSocket proxy
Already in the site from step 7a (nginx location /app/ and /apps/) or 7b (Apache ProxyPass lines).
4. Turn the chat on
→ Show live chat. The box under the switch says “Realtime (Reverb) is on”, and the inbox in shows Live instead of Auto-refresh.
After every .env change or update: sudo -u www-data php artisan optimize:clear and sudo supervisorctl restart acadify-reverb.
Step 13 — Mail and the Mobile App
Mail (SMTP)
Password-reset codes are sent by email. In enter your SMTP provider (port 587 with tls, or 465 with ssl), the from address and name.
Many VPS providers block outgoing port 25, so use a mail service (your domain’s mailbox, Amazon SES, Mailgun, Brevo…) on 587 or 465. Test with
and . More: Mail.
Mobile app
Point the app at https://school.example.com/api/v1: change the default in lib/utils/end_points.dart of Main_Files/AppSourceCode, or build with
--dart-define=API_BASE_URL=https://school.example.com/api/v1. Package ID, icons and signing: Mobile App.
Final Check
https://school.example.comshows the website with a valid certificate;https://school.example.com/.envis not readable (404 or 403).sudo -u www-data php artisan aboutshows Environment production, Debug Mode OFF.- The cron job is in
sudo crontab -u www-data -l;sudo supervisorctl statusshowsacadify-reverb RUNNING(if you use real-time chat). - A test email arrives; the app signs in with a student or teacher account.
- Next: set up the school with the Admin Guide and go through the Go-Live Checklist.
Updating on a VPS: Which Method?
From 1.2.0 on, every release is the same complete WebSourceCode folder you installed from, with a version file acadify-update.json. Apply it in one of two ways:
| System Update page | Command line | |
|---|---|---|
| How | : upload the ZIP, click Install update | Copy the files with rsync, run php artisan acadify:upgrade |
| Needs | Upload limits above the ZIP size (step 2 and client_max_body_size), www-data owns the code | SSH |
| Phrases edited under Language | Kept; new phrases are added | Replaced by the release’s files (back up lang/) |
PHP packages (vendor/) | Not replaced; the update stops before changing anything if the release needs a package your vendor/ lacks | Copied from the release, so they always match |
Both run the same finishing steps: database migrations, new permissions for the Super admin, new default settings and languages, the storage link, clearing caches, and recording the version.
Never overwritten: .env, storage/ and public/uploads/. System Update is blocked on a site in demo mode (APP_DEMO=true); the command line still works there.
Back Up First
mkdir -p ~/backups
sudo mysqldump --single-transaction acadify | gzip > ~/backups/acadify-db-$(date +%F).sql.gz
sudo tar -czf ~/backups/acadify-files-$(date +%F).tar.gz -C /var/www acadify
To roll back: stop the site (sudo -u www-data php artisan down), restore the folder from the tarball and the database with
gunzip < ~/backups/acadify-db-DATE.sql.gz | sudo mysql acadify, then sudo -u www-data php artisan up. Keep regular backups too (Backups).
Update from the System Update Page (ZIP)
- Make sure the limits fit the ZIP (about 150 MB):
upload_max_filesizeandpost_max_size256M,max_execution_timeandmax_input_time300 in/etc/php/8.3/fpm/php.ini(step 2);client_max_body_size 256M;andfastcgi_read_timeout 300;in the nginx site (step 7a). Apache needs no change. Reload withsudo systemctl restart php8.3-fpmandsudo systemctl reload nginx. - Back up the database (the page backs up the replaced folders to
storage/app/updates/backups/, not the database). - On your computer, ZIP the new
WebSourceCodefolder (the folder itself or its contents; both work). - Open as super admin. The Server check must show no red item; Writable folders red means the code is not owned by
www-data(step 5). - Under Automatic update choose the file in WebSourceCode ZIP file and click Install update. Keep the page open; the site is in maintenance mode while it runs.
- “Updated to 1.x.x.” and the list “What this update applied” appear; Installed version shows the new number.
- Restart the long-running processes so they load the new code:
sudo systemctl reload php8.3-fpm
sudo supervisorctl restart acadify-reverb       # if you use Reverb
If the page times out, wait a minute and reload: the update keeps running on the server. If it says “Nothing was changed”, read the reason (ZIP too large, older version, missing package) and fix it, or use the command line.
Update from the Command Line
Upload the new WebSourceCode.zip to your home folder (as in step 4), then:
# 1. back up (see above), then unpack the new release next to the site
cd ~ && rm -rf ~/acadify-new && mkdir ~/acadify-new
unzip -q WebSourceCode.zip -d ~/acadify-new        # gives ~/acadify-new/WebSourceCode/

# 2. maintenance mode
cd /var/www/acadify
sudo -u www-data php artisan down

# 3. copy the release over the site; .env, storage, uploads and caches stay
sudo rsync -a --chown=www-data:www-data \
  --exclude='/.env' --exclude='/storage' --exclude='/public/uploads' \
  --exclude='/public/storage' --exclude='/bootstrap/cache' \
  ~/acadify-new/WebSourceCode/ /var/www/acadify/

# 4. drop compiled package lists (rebuilt automatically), then finish the update
sudo rm -f /var/www/acadify/bootstrap/cache/*.php
sudo -u www-data php artisan acadify:upgrade
sudo -u www-data php artisan up

# 5. restart the long-running processes
sudo systemctl reload php8.3-fpm
sudo supervisorctl restart acadify-reverb          # if you use Reverb

rm -rf ~/acadify-new ~/WebSourceCode.zip
acadify:upgrade prints what it applied (“Migrations: n applied.”, permissions, settings, “Version set to 1.x.x.”) and ends with “Done. Installed version: 1.x.x.”.
With nothing newer pending it only re-syncs migrations, permissions and defaults, so running it twice is safe.
This copies vendor/ from the release, so the PHP packages always match the new code. The rsync line on the System Update screen leaves vendor/ out; use that line only if you manage
vendor/ yourself with Composer, and run sudo -u www-data composer install --no-dev --optimize-autoloader after it.
Edited phrases: this replaces lang/ with the release’s files. Back up lang/ first, or use the System Update page, which keeps your phrases.
Upgrading an Existing Site from 1.0.0 to 1.2.0
Version 1.0.0 has no System Update page, so the first upgrade is done on the command line. After that you can use either method.
- Install PHP 8.3 with the extensions from step 1 and point PHP-FPM (the
fastcgi_passsocket in nginx, ora2enconf php8.3-fpmin Apache) to it. - Back up the database and the site folder.
- Follow Update from the command line, steps 1 to 5. Your
.env,storage/andpublic/uploads/stay;vendor/gets the 1.2.0 packages (including Laravel Reverb).acadify:upgradetreats a site without a stored version as 1.0.0 and applies everything up to 1.2.0 (php artisan migrate --forceapplies the database part alone). - Optional, for real-time chat: add
BROADCAST_DRIVER=reverband theREVERB_block to your.envand set up step 12.
The 1.2.0 migrations add the class-teacher and live-chat tables and the new permissions. Migration 2026_11_08_000001_backfill_teacher_panel_permissions gives your existing teachers the teacher-panel permissions
and super admins the class-teacher permissions, so the teacher panel works for existing accounts.
Do not run php artisan db:seed or any demo seeder on a live site: they reset data and create demo accounts with a known password.
Then build the 1.2.0 app from AppSourceCode (Mobile App).
Troubleshooting on a VPS
First look at the logs: sudo tail -n 50 /var/www/acadify/storage/logs/laravel.log, sudo tail -n 50 /var/log/nginx/error.log (Apache: /var/log/apache2/acadify-error.log).
| Problem | Fix |
|---|---|
500 error, log says “Permission denied” or “failed to open stream” in storage/ or bootstrap/cache/ | A command ran as another user. sudo chown -R www-data:www-data /var/www/acadify/storage /var/www/acadify/bootstrap/cache, and use sudo -u www-data php artisan … from now on. |
| “Composer detected issues in your platform … >= 8.2.0” | nginx or Apache uses an older PHP-FPM (below 8.2). Install PHP 8.3 (step 1) and use php8.3-fpm.sock. |
| 502 Bad Gateway | PHP-FPM is not running or the socket path is wrong: sudo systemctl status php8.3-fpm, compare with ls /run/php/. |
Every page sends you to /install | Database not reachable or APP_INSTALLED is not yes. Check the DB_ lines, then sudo -u www-data php artisan optimize:clear. |
| 413 Request Entity Too Large on System Update | Raise client_max_body_size in nginx and the PHP upload limits (step 2), or use the command line. |
| Chat says Auto-refresh instead of Live | BROADCAST_DRIVER=reverb, the REVERB_ values, sudo supervisorctl status acadify-reverb, the /app/ proxy, and tail storage/logs/reverb.log. The chat still works by polling. |
| Admin pages fail right after copying new files | Run sudo -u www-data php artisan acadify:upgrade (or click Finalize manual update on ). |
Changed .env or settings do not apply | sudo -u www-data php artisan optimize:clear, or Clear cache in the admin top bar. |
More answers: Troubleshooting. Still stuck? Email [email protected] with your purchase code, your site address and the last lines of laravel.log.