Getting Started
Introduction
Thank you so much for purchasing our item from CodeCanyon.
ACADIFY EDU ERP is a complete, modern, and powerful Education Management System designed for schools, colleges, polytechnic institutes, universities, and kindergartens.
Built using Flutter and Laravel, it provides an elegant and efficient platform for students to access their academic information anytime, anywhere.
This Student App allows learners to view their class schedules, homework, exam results, attendance, fees, and notices — all from one unified interface.
With a beautiful UI, real-time API integration, and multilingual support, ACADIFY ensures a seamless and engaging digital learning experience.
Whether you manage a small institute or a large university, ACADIFY EDU ERP simplifies communication between students, teachers, and administrators — making education management smarter, faster, and more accessible.
Version: V1.0
Author: BugBuild Labs
Website: www.bugbuild.com
Skype: bablu_300
WhatsApp: +8801811843300
Requirements
- Flutter (Channel stable, 3.35.5, on macOS 14.5 23F79 darwin-x64, locale en-US)
- Flutter version 3.35.5
- Upstream repository https://github.com/flutter/flutter.git
- Framework revision ac4e799d23 (10 days ago) • 2025-09-26 12:05:09 -0700
- Engine revision 0274ead41f6265309f36e9d74bc8c559becd5345 (revision d3d45dcf25) • 2025-09-26 16:45:18 UTC
- Dart version 3.9.2
- DevTools version 2.48.0
Installation
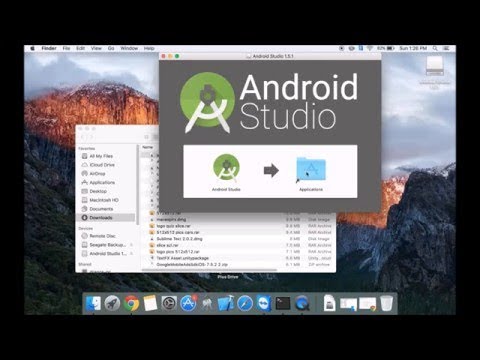
Android Studio Installation (Windows)

▶ Watch on YouTube: https://www.youtube.com/watch?v=0zx_eFyHRU0
Flutter Environment


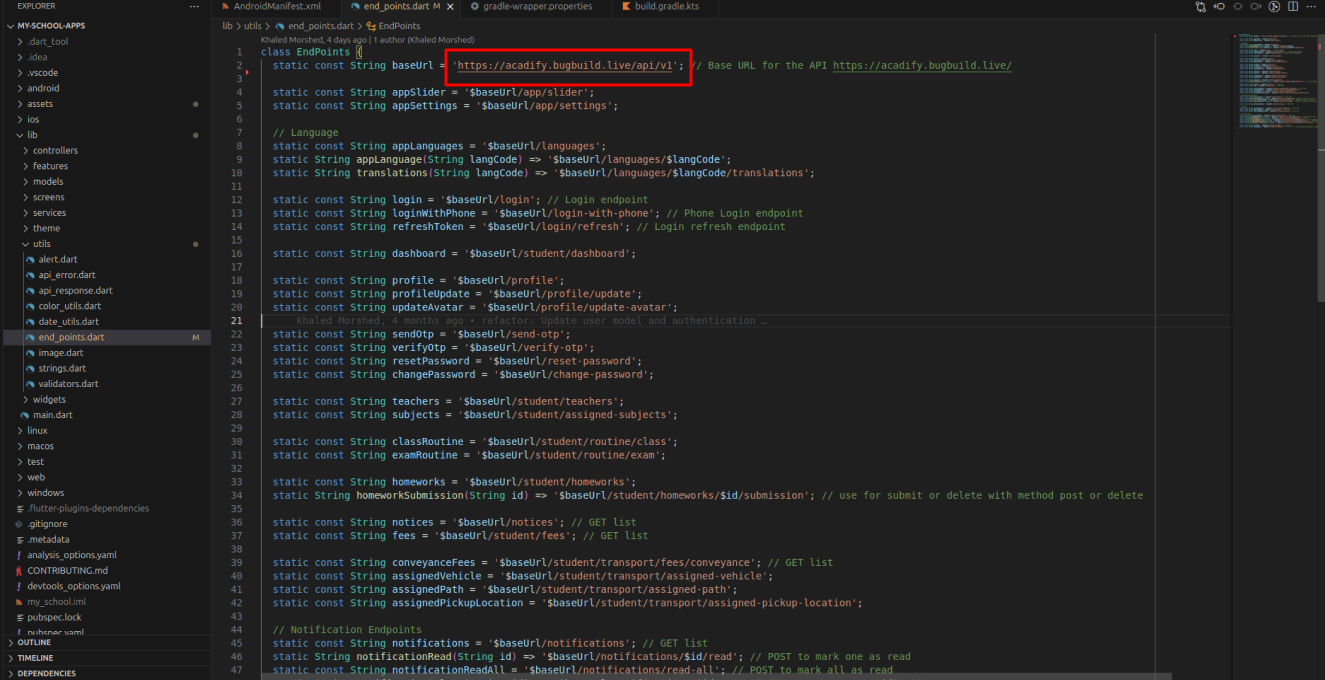
Change API Endpoint
- Download and unzip the downloaded file.
- Then go to the unziped folder & use your preferred IDE (Android Studio / Visual Code / IntelliJ) to open the source_code folder for project.
- project/lib/services/urls.dart and change the _baseUrl to connect your mobile app with your admin panel & website
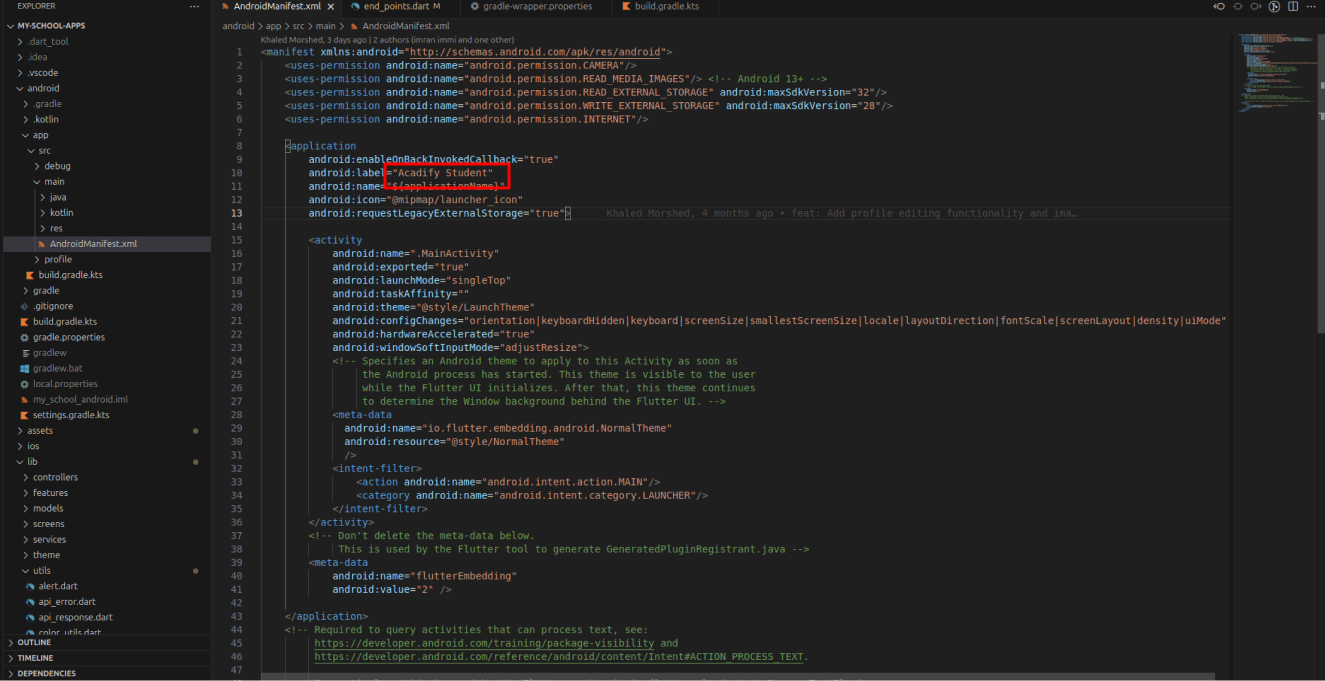
Android Configuration
Change App Name
- Select Project > go to android > app > src > main > AndroidManifest.xml then change the android:label name
Change android luncher icon
-
For Flutter Android & iOS launcher icons,
prepare an app icon image with a size of 1024 × 1024 px in PNG format. -
Then run the command:
flutter pub run flutter_launcher_icons
This will automatically generate all required launcher icon sizes for Android and iOS.
Get Dependencies
- And just run the following command
flutter pub get
Change Package Name
If you want to change the package name following the next steps
-
Open /android/app/build.gradle and change the package name
android {
                        defaultConfig {
                            // Specify the unique package name (e.g., com.example.myapp)
                            applicationId "com.example.myapp"

                            // Minimum Android version your app supports
                            minSdkVersion 21

                            // Target Android version for which your app is optimized
                            targetSdkVersion 32

                            // Version code for your app (used for versioning in the Play Store)
                            versionCode flutterVersionCode.toInteger()

                            // Version name for your app (visible to users in the Play Store)
                            versionName flutterVersionName

                            // Instrumentation runner for testing (used in Android UI tests)
                            testInstrumentationRunner "androidx.test.runner.AndroidJUnitRunner"
                        }
                    }
flutter pub get
Generate Debug APK
- open terminal then write command flutter build apk --debug
- An APK will be build
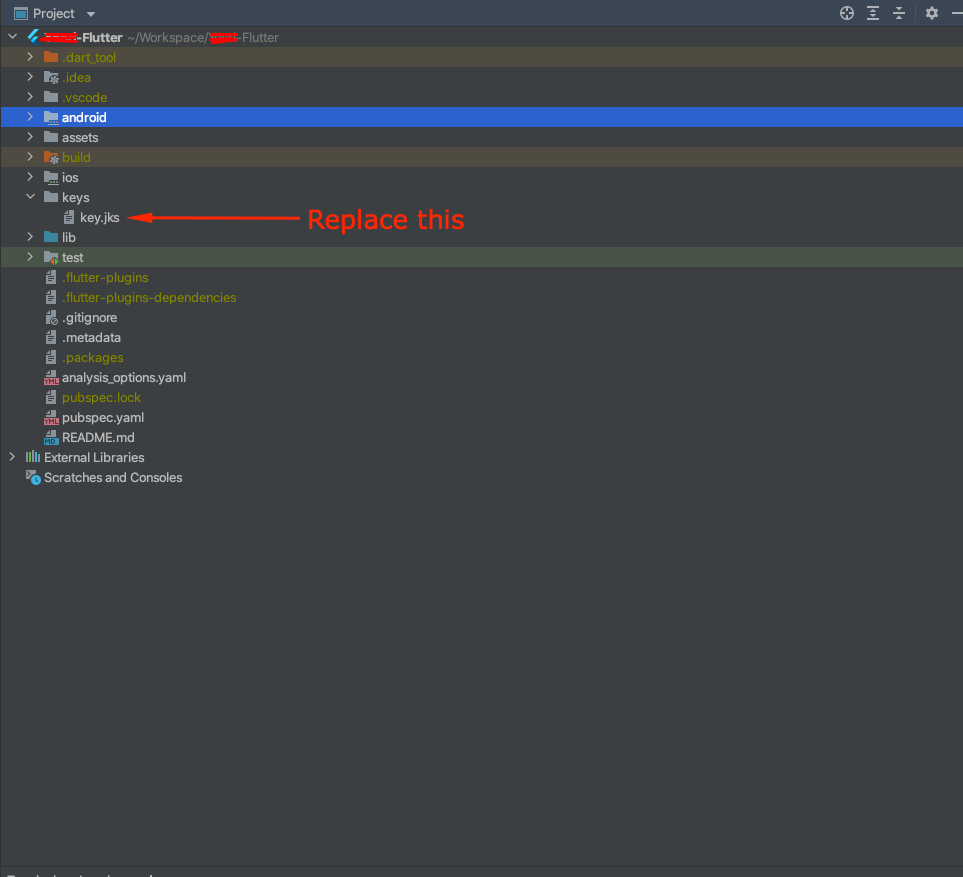
Generate Signed APK
- First create a key-store file by this link Click
- Then Copy your key.jks file to Project » keys » key.jks
-
User Guide
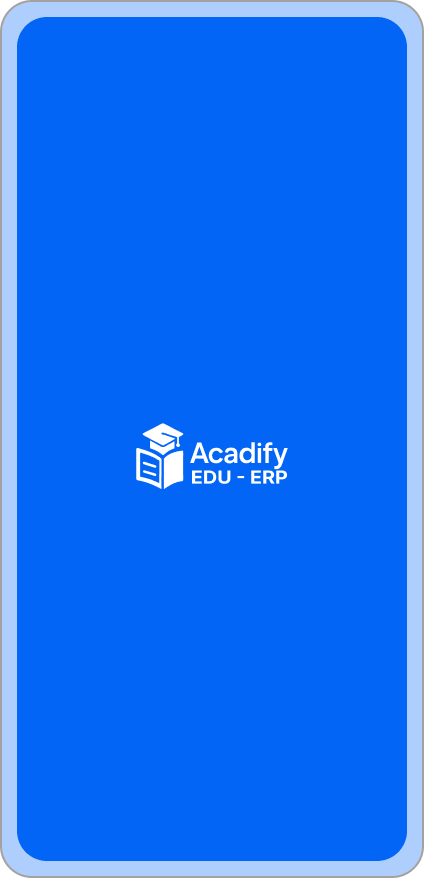
Splash
When the app launches, students are greeted by the Acadify splash screen that displays the official logo and theme colors. During this time, the app initializes essential services such as user session checks, data caching, and configuration loading. This ensures a smooth transition into the system and confirms that the app is properly connected to the backend.
Onboarding
The onboarding section introduces new users to Acadify’s key features such as homework, attendance, exams, and fees management. It helps students understand how to use the app effectively before logging in. All slides are fully dynamic — admins can update onboarding texts and images from the admin panel anytime.

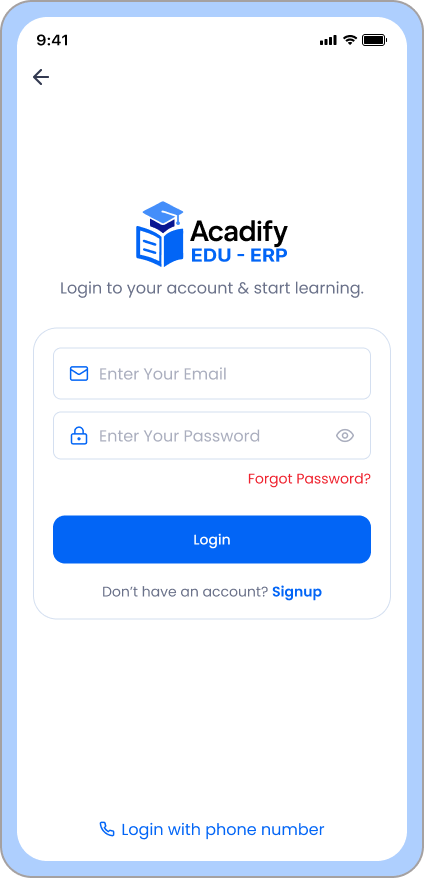
Login
The login screen allows students to securely sign in using their email, phone number, or student ID. Credentials and permissions are validated through the backend API, and each student’s data is protected with token-based authentication. Admins manage all login access from the backend.
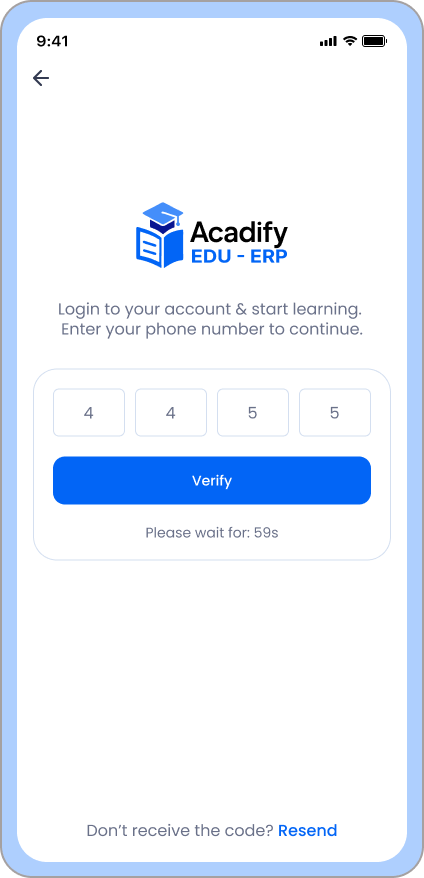
OTP Verification
For secure authentication and password recovery, the OTP Verification screen allows students to confirm their identity using a One-Time Password. The OTP is sent to the student’s registered phone or email, and validation is handled dynamically from the admin configuration.
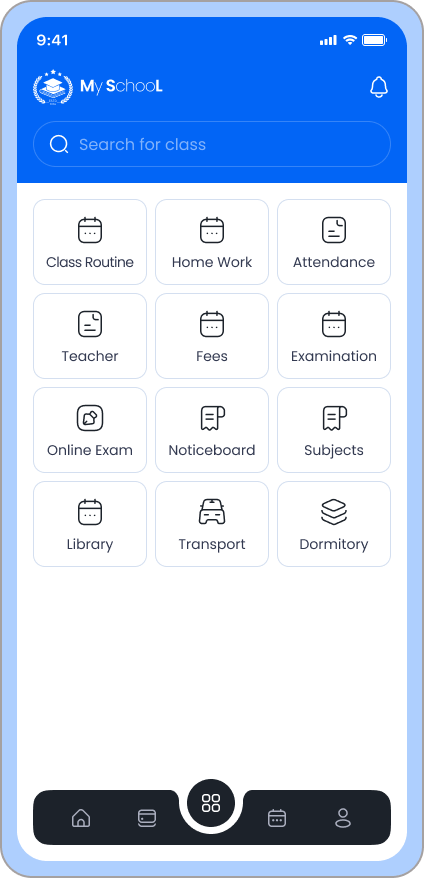
Home
The Home Dashboard shows key academic insights at a glance — recent classes, notices, attendance stats, and upcoming exams. All content here is dynamically fetched from the backend, ensuring real-time updates for each logged-in student.
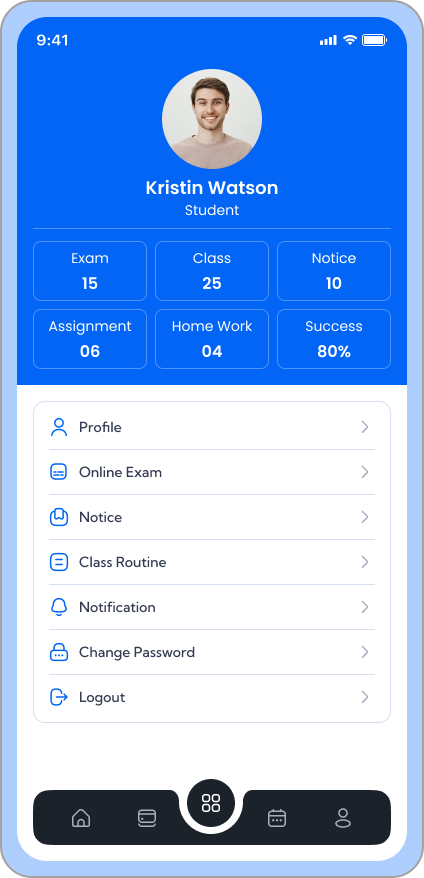
Profile
Displays the student’s personal and academic information including roll number, class, section, guardian details, and contact info. Data is fetched directly from the admin database and automatically synchronized whenever changes occur.
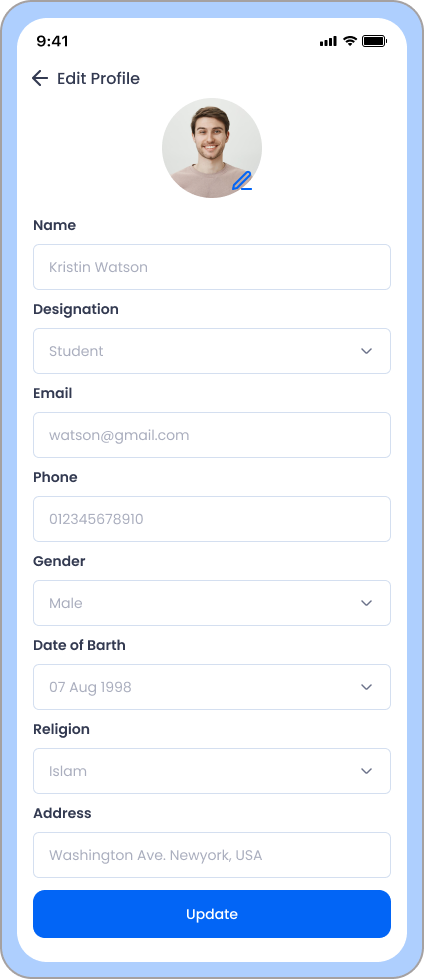
Edit Profile
Students can update selected information like photo, address, or phone number directly from the app. Edits are submitted through the API and synced with the backend admin panel for approval.
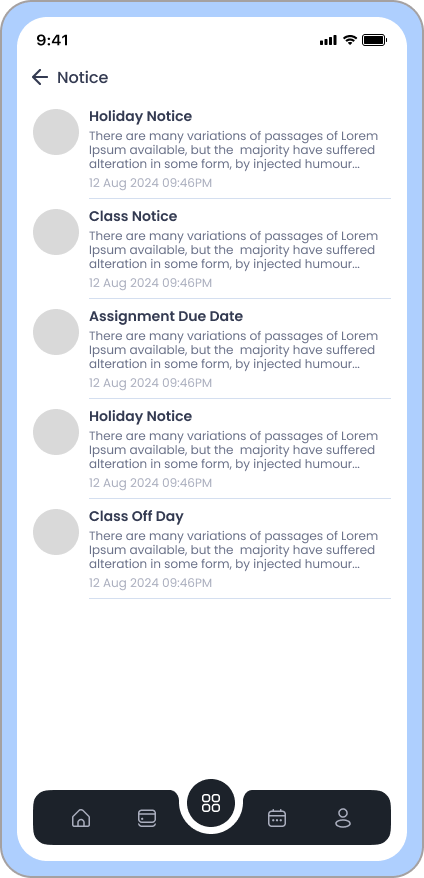
Notice
Displays important announcements and updates published by school administrators or teachers. Each notice includes title, description, and date, fetched dynamically from the admin panel.
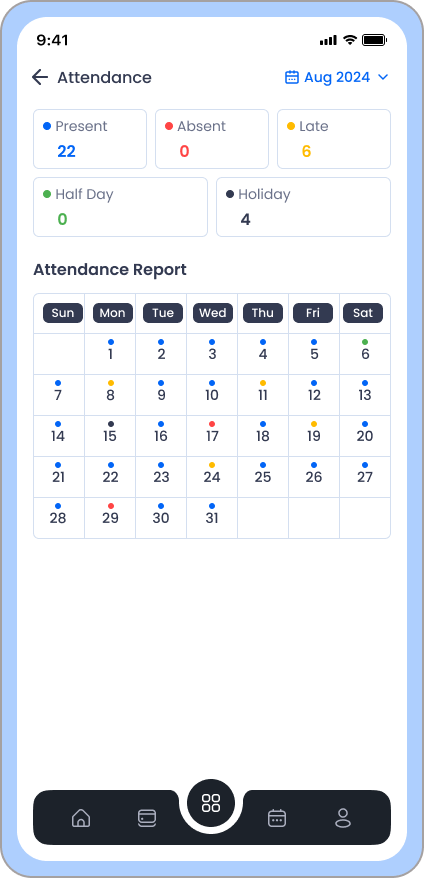
Attendance
Shows the student’s attendance status day by day and month by month. Real-time attendance is synced with the admin system, using color-coded visuals for Present, Absent, or Late.
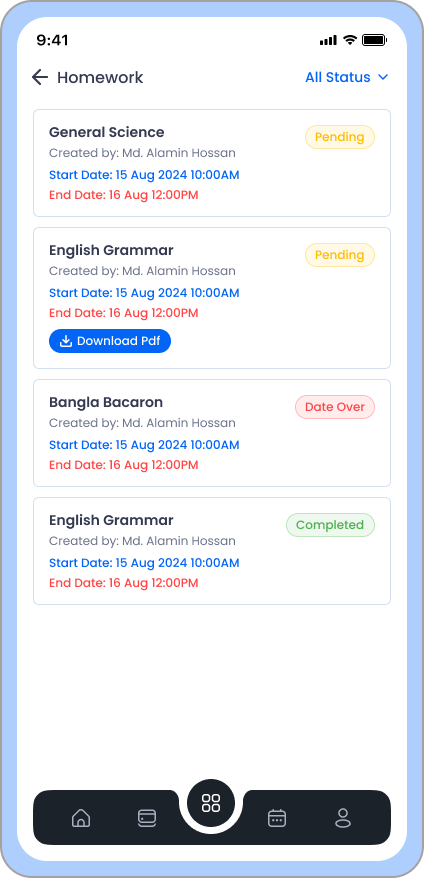
Homework
Lists all assigned homeworks with subject, due date, and submission status. Homework data comes directly from teachers’ submissions through the admin portal, allowing real-time updates in the student app.
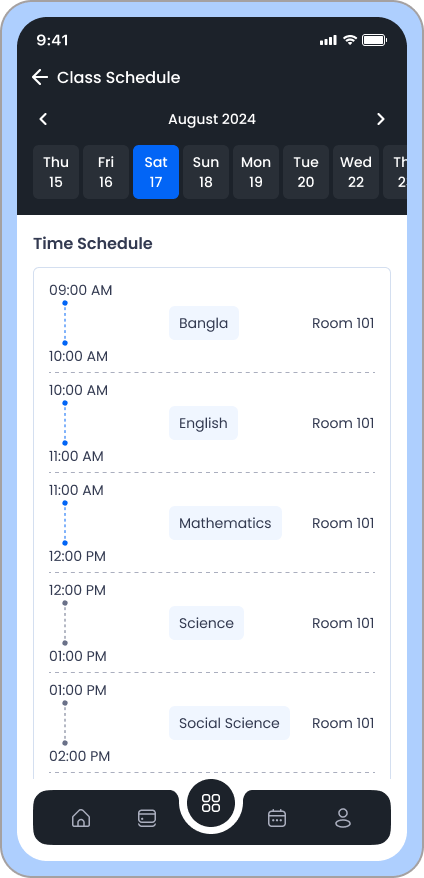
Class Routine
Displays the complete daily class schedule including subjects, teachers, and time slots. All data is configured by the school from the admin panel, updating dynamically in the app.
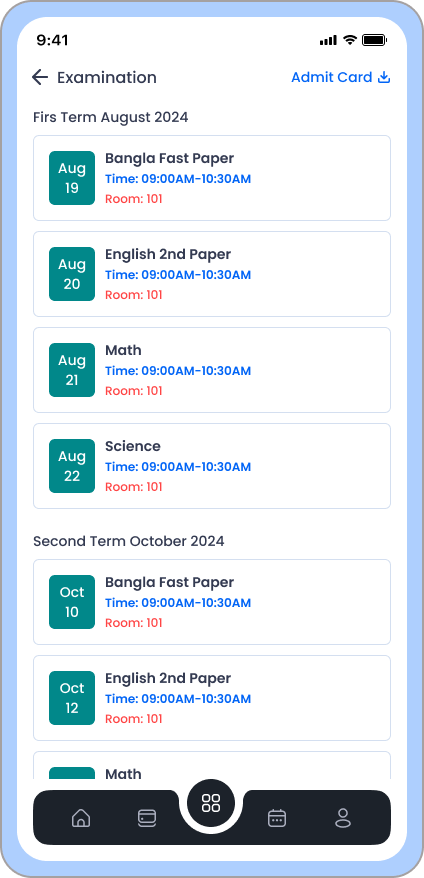
Exam
Students can view their exam list, marks, and results. This module integrates directly with the school’s grading system and provides subject-wise marks with overall grades.
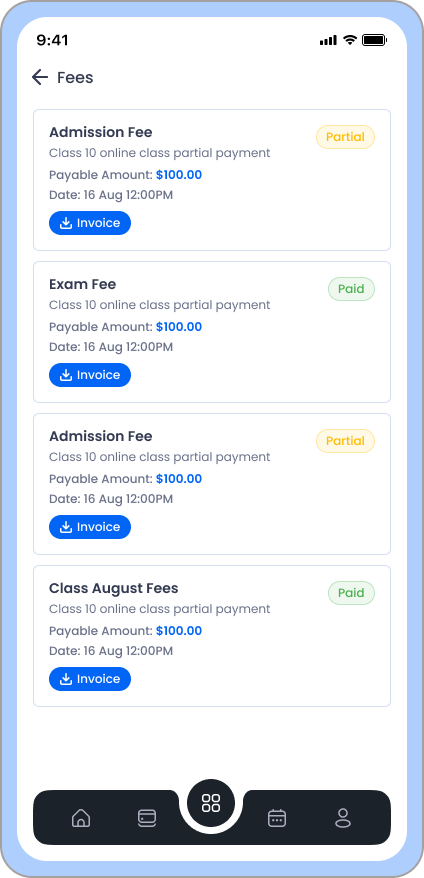
Fees
Displays detailed information about all payable fees, payment history, and due balances. Students can track their payment status and upcoming installments dynamically updated from the backend.
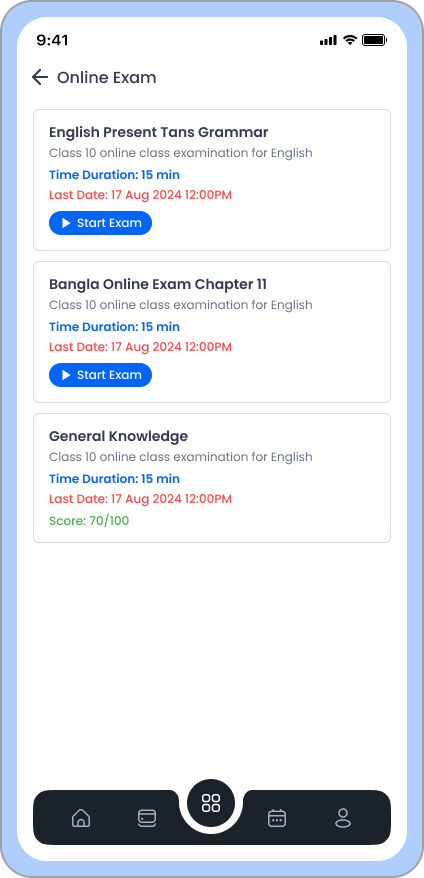
Online Exam
Shows available online exams that the student can participate in. Exam titles, start time, duration, and marks are managed from the admin panel.
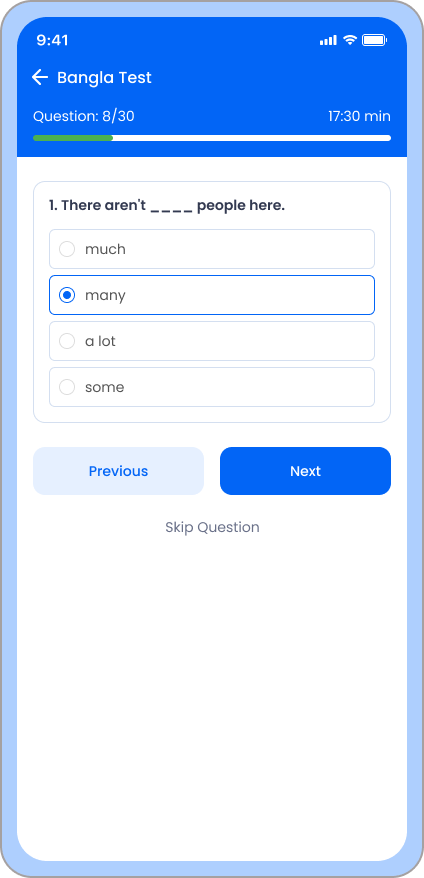
Start Online Exam
Students can start answering multiple-choice questions directly from this screen. The questions, timer, and progress tracking are all dynamic — configured from the admin exam system.
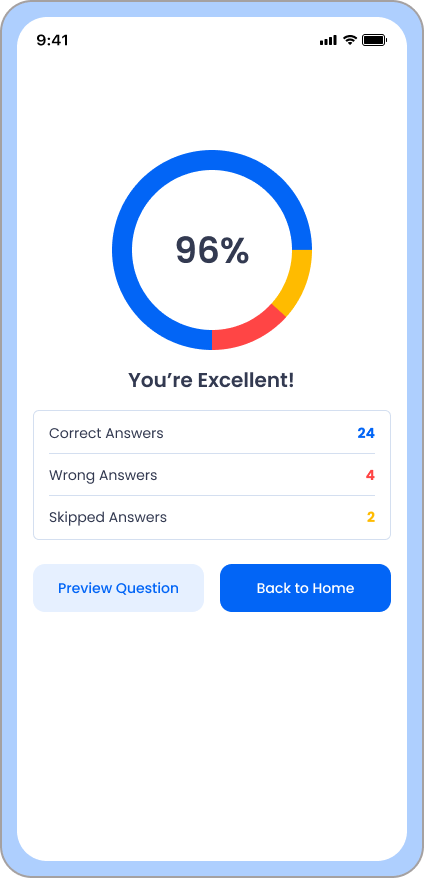
Submit Online Exam
After completing the exam, students can review their answers and submit them. The system securely saves responses to the backend, and results can be published instantly or later depending on admin settings.
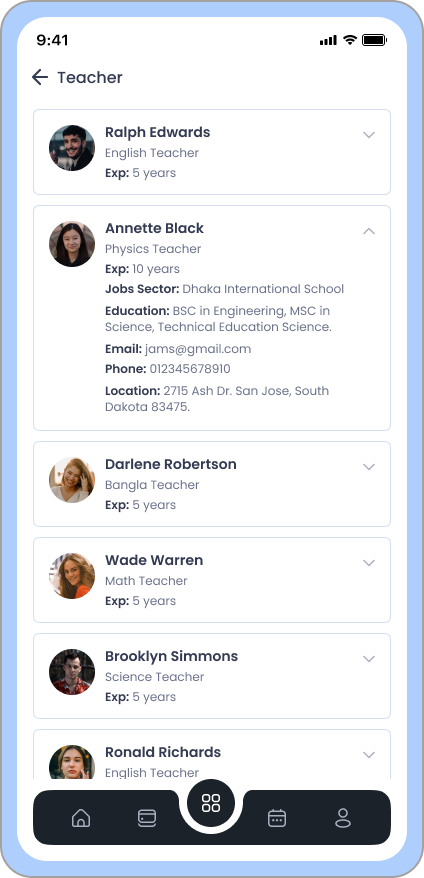
Teacher List
Displays all active teachers with subjects and contact details. The teacher directory is dynamically generated from the admin panel and helps students easily reach their subject teachers.
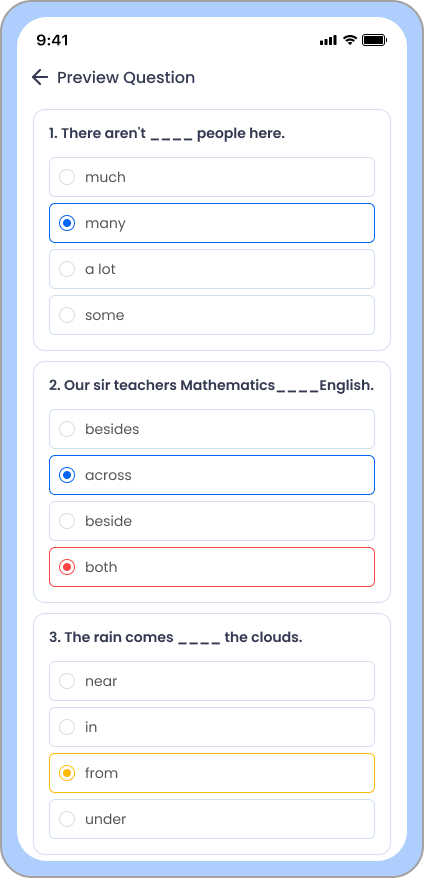
Preview Online Exam
Allows students to review previously submitted exams, view correct answers, and check grading feedback. All data is fetched dynamically to ensure accuracy and transparency in student assessment.
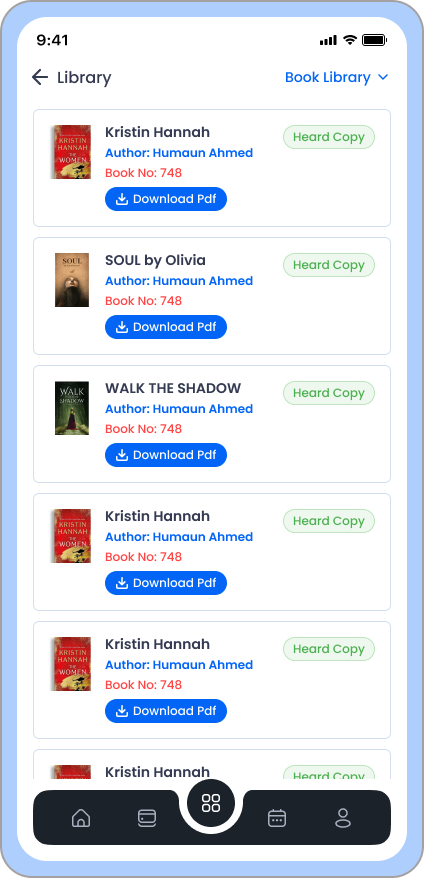
Library
Displays issued library books, return deadlines, and available catalog. Library data syncs directly with the institution’s library management module for real-time tracking.
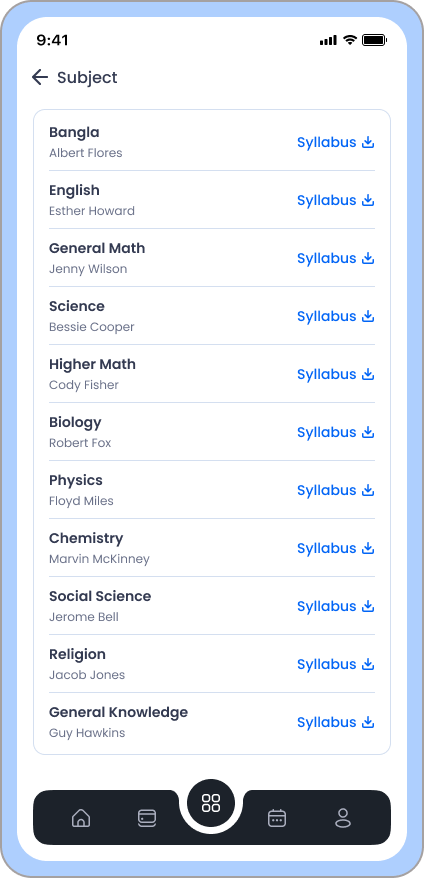
Subjects
Lists all subjects assigned to the student’s class with teacher names and subject codes. Subjects are configured by the admin and automatically loaded for each student login session.
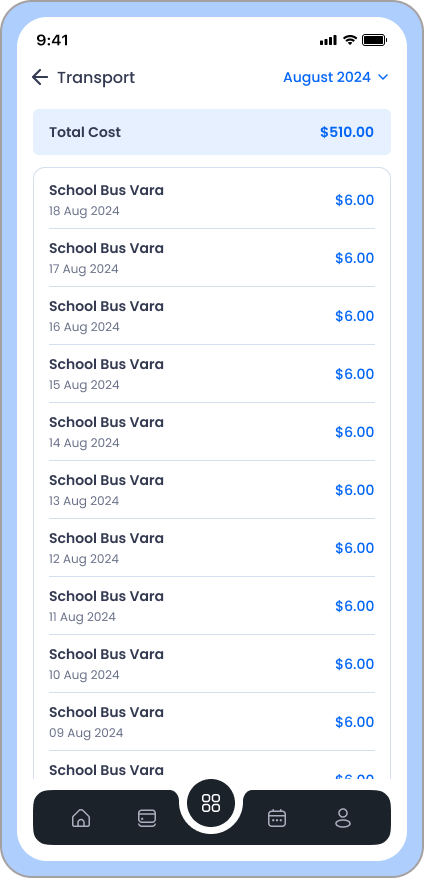
Transportation
Displays transport details including route name, vehicle number, and driver contact. The information is pulled dynamically from the admin’s transportation module for each student’s assigned route.
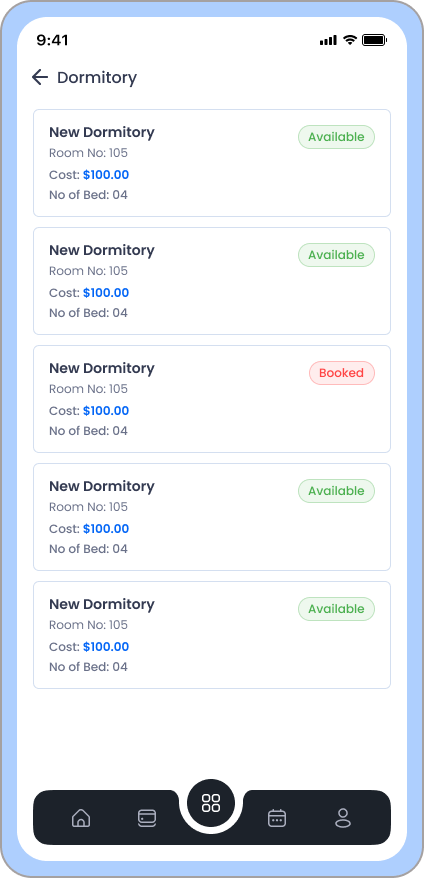
Dormitory
Shows student dormitory allocation including building name, room number, and available facilities. This section also lists roommates and assigned wardens — all managed dynamically from the admin panel.
Run & Build
Run Android Application
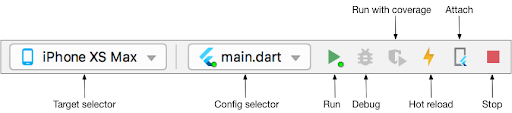
- In the target selector, select an Android device for running the app. If none are listed as available, select Tools> Android > AVD Manager and create one there. For details, see Managing AVDs. Click the run icon in the toolbar, or invoke the menu item Run > Run. Locate the main Android Studio toolbar:
- If you don't use Android Studio or IntelliJ you can use the command line to run your application using the following command
flutter run
Build And Install App
- After you make all your changes and customizations save all your project, Open the console, navigate to your project folder and execute the following command to build your app flutter build apk --release
- If you are deploying the app to the Play Store, it's recommended to use app bundles or split the APK to reduce the APK size.
-
To generate an app bundle, run: flutter build appbundle --target-platform
android-arm,android-arm64,android-x64
Learn more on https://developer.android.com/guide/app-bundle -
To split the APKs per ABI, run: flutter build apk --target-platform
android-arm,android-arm64,android-x64 --split-per-abi
Learn more on https://developer.android.com/studio/build/configure-apk-splits#configure-abi-split - You should get the APK file in the build/output/apk folder, to install your application on your connected device run the following command