Acadify EDU ERP – School Management System (Website, Admin Panel & Student/Teacher App)
Install & Update on cPanel
Shared hosting with cPanel, File Manager only. No SSH and no Terminal needed.
Before You Start
This guide installs Acadify on shared hosting that you manage through cPanel, using only cPanel tools: MultiPHP Manager (or Select PHP Version),
MySQL Database Wizard, File Manager, Domains, Cron Jobs and SSL/TLS Status. You never type a command on the server.
The PHP packages (vendor/) are already in the download, so Composer is not needed. Updating is covered in the second half of this page.
Check your hosting plan
| You need | Where to check in cPanel |
|---|---|
| PHP 8.3 for the domain (see the note below) | MultiPHP Manager or Select PHP Version |
| MySQL 8 or MariaDB 10.6+ | cPanel home, right column (General Information → Server Information), or ask your host |
| A domain or subdomain whose document root you can set | Domains |
| Cron jobs | Cron Jobs |
| About 600 MB free disk space (site, a backup and one update) | Disk Usage |
Choose PHP 8.2 or newer (8.3 recommended). Acadify 1.2.0 runs on Laravel 12 with PHP 8.2+; older PHP versions show a “Composer detected issues in your platform” error.
Placeholders used below: USERNAME is your cPanel user name (shown in the cPanel right column, and in File Manager as /home/USERNAME),
school.example.com is your site address and acadify is the folder the site lives in. Replace them with your own.
Time needed: about 30 minutes, most of it uploading.
Step 1 — PHP Version, Extensions and Settings
PHP version
- Open MultiPHP Manager, tick the domain you will use for Acadify, choose PHP 8.3 (ea-php83) in the PHP Version list and click Apply. On CloudLinux servers the tool is called Select PHP Version: choose 8.3 as the Current PHP version and click Set as current.
- Do this before you create the domain’s files, and check it again after every update (an update replaces
public/.htaccess, where MultiPHP Manager keeps the version on many servers; see Troubleshooting).
Extensions
On MultiPHP (EasyApache) servers the common extensions are usually already installed; your host adds missing ones. In Select PHP Version → Extensions (CloudLinux) tick:
bcmath ctype curl dom fileinfo gd json mbstring mysqli openssl pdo_mysql tokenizer xml zip
The installer checks MySQLi, cURL, GD, bcmath, ctype, fileinfo, mbstring, tokenizer, xml and json and shows anything missing in red. zip is needed for System Update.
PHP settings
Open MultiPHP INI Editor, choose the domain under Basic Mode and set the values below, then click Apply. date.timezone is not in Basic Mode:
switch to Editor Mode, choose the same domain and add the line yourself. (CloudLinux: Select PHP Version → Options.)
allow_url_fopen = On
max_execution_time = 300
max_input_time = 300
memory_limit = 256M
upload_max_filesize = 128M        ; as high as your host allows
post_max_size = 128M              ; same as upload_max_filesize or higher
date.timezone = "Asia/Dhaka"      ; your own time zone, e.g. "Europe/London"
The installer stops while allow_url_fopen is off or date.timezone is empty, so set both now.
Step 2 — Create the Database
- cPanel home → Databases → MySQL® Database Wizard.
- Step 1: Create A Database: type a name, for example
acadify, and click Next Step. cPanel adds your account prefix, so the full name becomesUSERNAME_acadify. - Step 2: Create Database Users: user name (for example
acadify, full nameUSERNAME_acadify) and a strong password (use Password Generator). Click Create User. - Step 3: Add User to the Database: tick ALL PRIVILEGES and click Next Step.
- Write down the full database name, the full user name and the password. You type them into the installer in step 8.
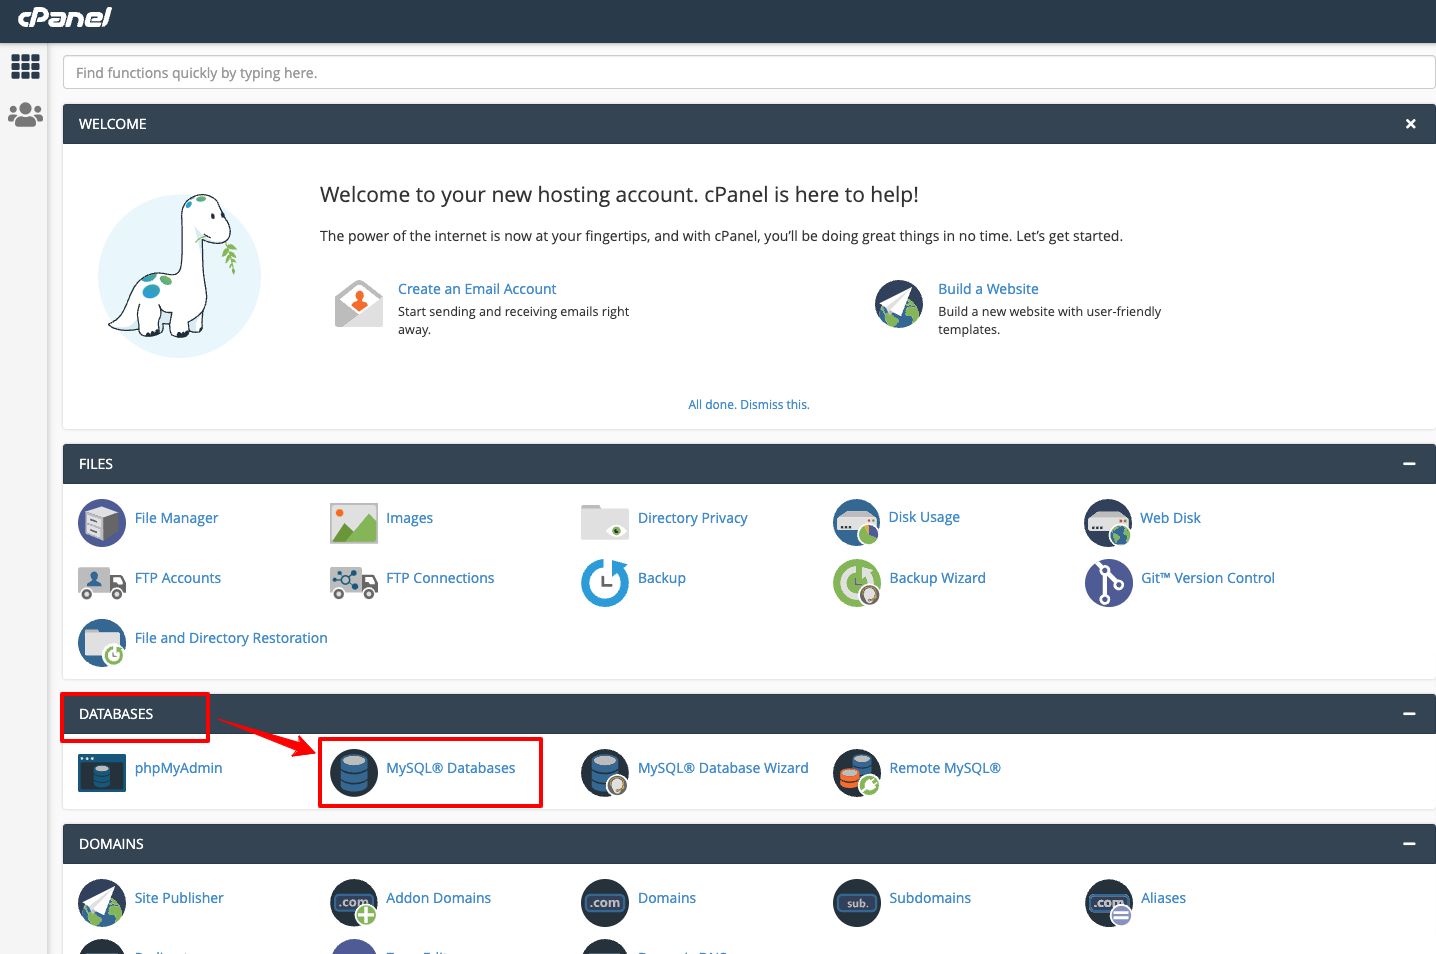
Use a new, empty database only for Acadify. The installer deletes every table it finds in the database you give it.
Step 3 — Upload and Extract the Files
The website is the folder Main_Files/WebSourceCode in your download (about 265 MB unpacked, about 150 MB as a ZIP). It goes in its own folder next to public_html, not inside it.
- On your computer, unzip the download from CodeCanyon and find
Main_Files/WebSourceCode. - Make a ZIP of the WebSourceCode folder itself: Windows: right-click it → Send to → Compressed (zipped) folder; macOS: right-click → Compress “WebSourceCode”. You get
WebSourceCode.zip. - cPanel → File Manager. Click Settings (top right), tick Show Hidden Files (dotfiles) and click Save. You need this to see
.envand.htaccess. - Open your home folder
/home/USERNAME(the Home icon at the top left), click Upload, chooseWebSourceCode.zipand wait until the bar shows 100%. Click Go Back to “/home/USERNAME”. - Right-click
WebSourceCode.zip→ Extract → keep/home/USERNAMEas the target → Extract File(s). You now have/home/USERNAME/WebSourceCode. - Right-click the
WebSourceCodefolder → Rename →acadify. Then deleteWebSourceCode.zip. - Open
acadifyand check thatartisan,composer.json,.env.example,acadify-update.jsonand the foldersapp,public,storageandvendorare directly inside it.
/home/USERNAME/
├── acadify/                 ← the whole project (private)
│   ├── app/  bootstrap/  config/  database/  lang/  Modules/  resources/  routes/
│   ├── storage/  vendor/
│   ├── public/              ← the only folder visitors may reach
│   ├── .env.example  artisan  composer.json  acadify-update.json
└── public_html/             ← leave it as it is
If File Manager refuses a file this big, upload WebSourceCode.zip with an FTP program (for example FileZilla, using an account from FTP Accounts) into /home/USERNAME, then extract it in File Manager as above.
Step 4 — Point the Domain at the public/ Folder
Visitors must only reach acadify/public. The project folder holds .env (database password, keys), storage/ and the source code, and must never be reachable from the web.
The download has no index.php or .htaccess in the project root that would forward visitors to public/, on purpose: the domain’s document root has to be acadify/public.
Option A (recommended): a subdomain or an extra domain
- cPanel → Domains → Create A New Domain.
- Domain:
school.example.com(a subdomain of your main domain) or a separate domain you own. - Untick Share document root (/home/USERNAME/public_html) with “your-main-domain”.
- Document Root:
acadify/public. Click Submit.
Older cPanel versions have separate Subdomains and Addon Domains pages; both have a Document Root field where you enter acadify/public.
For a domain that already exists: Domains → Manage next to it → set the document root to acadify/public → Update.
Option B: the main domain (public_html)
On most servers cPanel does not let you change the main domain’s document root yourself. Choose one of these:
- Ask your host to set the document root of
your-domain.comto/home/USERNAME/acadify/public. Hosts do this in WHM in a minute; it is the cleanest solution. - Replace public_html with a link to acadify/public. Only if
public_htmlholds nothing you need (move any old site and its email-verification files away first). Run once with a one-off cron job (Cron Jobs, Once Per Minute, delete the job after 2 minutes):
It only acts once (the first part skips it when the link already exists). Afterwards[ -L /home/USERNAME/public_html ] || { mv /home/USERNAME/public_html /home/USERNAME/public_html_old && ln -s /home/USERNAME/acadify/public /home/USERNAME/public_html; }public_htmlshows as a link in File Manager and your old files are inpublic_html_old. Delete the cron job.
Never upload the whole project into public_html, and never copy the contents of public/ into public_html. The first exposes .env and your source code to anyone;
the second breaks uploaded images and updates, because Acadify stores uploads in acadify/public/uploads.
Step 5 — The .env File (Created for You)
Acadify reads its settings from a file named .env in the project folder. You normally do not create it: the first time you open your domain, Acadify copies .env.example to .env and writes a new application key, then shows the installer. The installer writes the database settings and the key that signs the mobile app’s logins (JWT_SECRET).
- After installation, open
.envin File Manager (Edit) and setAPP_URL=https://school.example.comto your real address (used in emails and links). - Leave
APP_DEMO=falseandAPP_DEBUG=falseon a live site.
Only if your domain shows a 500 error instead of the installer
That means Acadify could not write .env (the acadify folder is not writable, see step 6). Fix the permissions, or create the file by hand:
- In File Manager open
/home/USERNAME/acadify. Right-click.env.example→ Copy, type/acadify/.envas the destination and click Copy File(s). If your File Manager only accepts a folder there, use + File instead: create a file named.env, open.env.examplewith Edit, copy everything and paste it into.env. - Right-click
.env→ Edit (confirm the encoding dialog with Edit). - Change these lines and click Save Changes:
APP_URL=https://school.example.com
APP_KEY=32 random letters and digits
JWT_SECRET=64 random letters and digits
Make the two values here (they are created in your browser and never sent anywhere). Copy each line into .env:
Use a password generator to make the two values (letters and digits only, no spaces or symbols): 32 characters for APP_KEY and 64 characters for JWT_SECRET.
The HTML version of this page (offline-documentation/install-cpanel.html) has a generator.
- Leave
APP_DEMO=false,APP_DEBUG=false,APP_INSTALLED=noand theDB_lines as they are: the installer fills in the database values. - The installer replaces
APP_KEYwith a newly generated key (and writes aJWT_SECRETif yours is empty). That is expected; your value only has to exist so the installer page can open. - Keep
JWT_SECRETonce the app is in use: changing it signs every app user out. - Use letters and digits only. A
#or a space would cut the value short.
Your cPanel has Terminal (Advanced section)? Then you can do this step with commands instead:
cd ~/acadify && cp .env.example .env && php artisan key:generate && php artisan jwt:secret (answer yes when jwt:secret asks), and set APP_URL by hand. If php -v in Terminal shows a version below 8.2, use the full path from step 9 instead of php.
Step 6 — Permissions
On cPanel, PHP runs as your own user, so files you upload are already writable by the site. Normal values are 755 for folders and 644 for files. Check these in File Manager (right-click → Change Permissions):
| Path (inside acadify/) | Permission | Why |
|---|---|---|
storage/, bootstrap/cache/ | 755 | Logs, sessions, caches |
public/uploads/ | 755 | Logos, photos and documents uploaded in the admin panel |
public/, routes/, resources/ | 755 | Checked by the installer |
.env | 644 (600 also works) | The installer writes the database values into it |
If the installer still marks a folder red, set that folder to 775. Never use 777: many cPanel servers refuse to run PHP from a folder anyone can write to and show a 500 error.
Step 7 — SSL with AutoSSL
- Make sure the domain or subdomain already points at your hosting (its DNS A record shows the server’s IP).
- cPanel → SSL/TLS Status → tick the domain (and its
www.name) → Run AutoSSL. A green lock appears after a few minutes. - If your host offers it, turn on Force HTTPS Redirect for the domain in Domains.
Use the https:// address everywhere from now on: in APP_URL and in the mobile app. The app expects an HTTPS address.
Step 8 — Run the Web Installer
Open https://school.example.com. A site that is not installed yet sends you to /install (“Welcome To Acadify ERP”). The page has three parts:
- Requirements: PHP version, MySQLi, cURL, GD,
allow_url_fopen,date.timezone, the extensions and the writable folders (routes,resources,public,storage,.env). Fix anything red in cPanel (steps 1 and 6) and reload. - Database: host
127.0.0.1(if that fails,localhost), then the full user name, password and full database name from step 2. - Administrator: first name, last name, email and password. Click Finish.
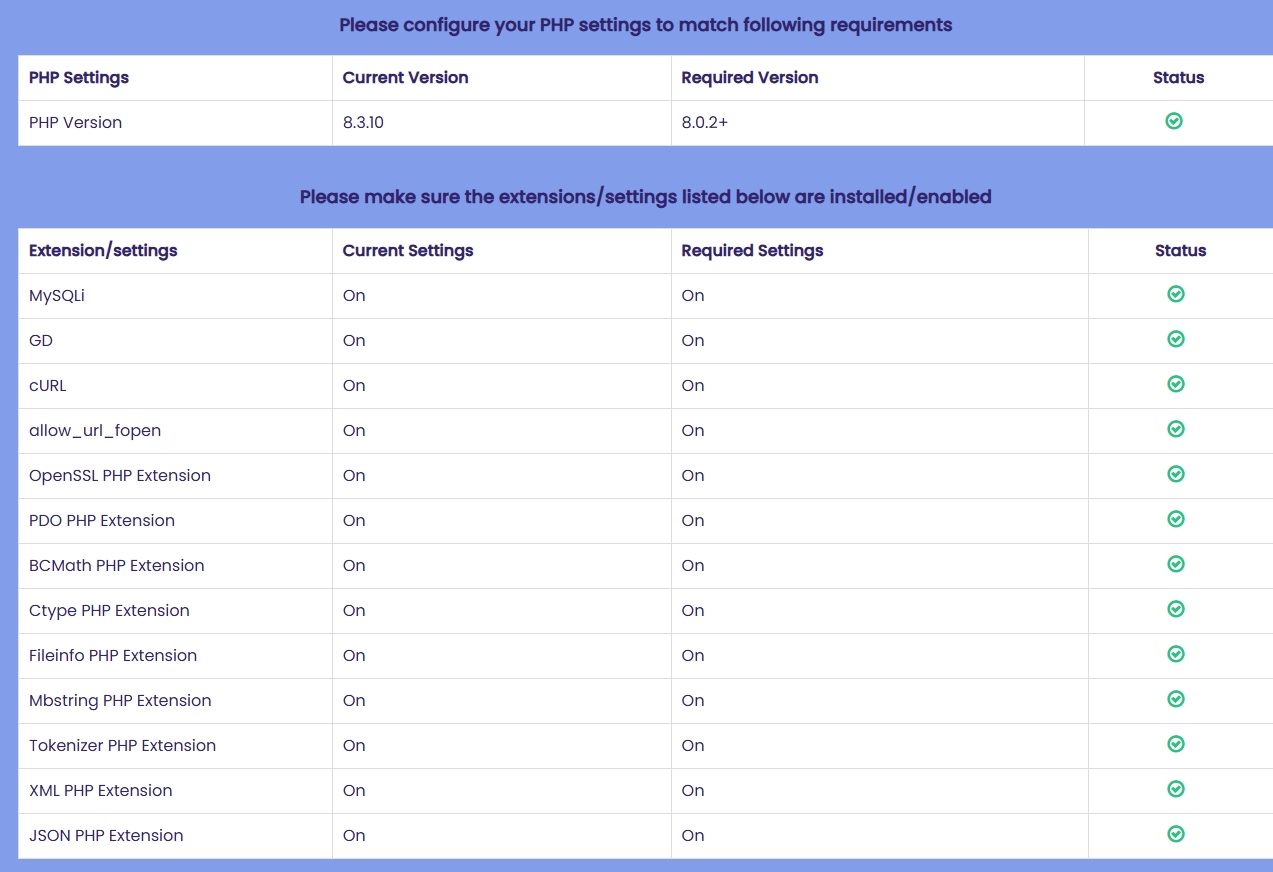
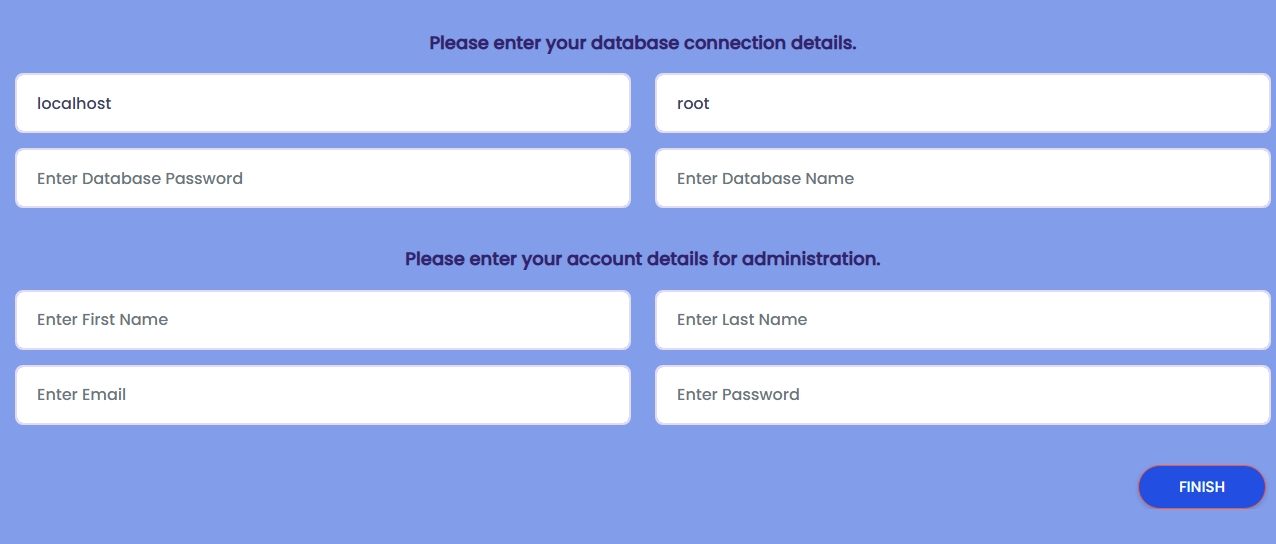
The installer tests the connection, writes the database values to .env, creates a new application key, builds the tables and default data (roles and permissions, languages, settings, website sections),
makes your administrator account and sets APP_INSTALLED=yes. This takes one to two minutes; keep the page open. Then sign in at https://school.example.com/login.
A fresh installation has no demo students, teachers or classes. Never run the installer again on a site with real data.
Step 9 — Cron Job
The scheduler generates exam results every night. It needs one cron job that runs every minute.
- cPanel → Cron Jobs. Under Cron Email you may enter an address; the command below sends no output, so you will not get a mail every minute.
- Add New Cron Job → Common Settings: Once Per Minute (* * * * *).
- Command (one line, with your user name and the PHP path for your server from the table below):
/opt/cpanel/ea-php83/root/usr/bin/php /home/USERNAME/acadify/artisan schedule:run >> /dev/null 2>&1 - Click Add New Cron Job.
| Your server | PHP 8.3 command-line path |
|---|---|
| cPanel with MultiPHP Manager (EasyApache 4) | /opt/cpanel/ea-php83/root/usr/bin/php |
| CloudLinux with Select PHP Version | /opt/alt/php83/usr/bin/php (or /usr/local/bin/php, which follows the version you selected) |
| Not sure | Ask your host for “the PHP 8.3 CLI path for cron jobs” |
Why not just php or /usr/local/bin/php? On MultiPHP servers those often run the server’s default PHP version, not the 8.3 you chose for the domain, and Acadify will not start on an older PHP.
Check that it works: change the end of the command from >> /dev/null 2>&1 to >> /home/USERNAME/acadify/storage/logs/cron.log 2>&1, wait two minutes and open that file in File Manager.
“No scheduled commands are ready to run.” means the cron job works; a PHP or “Composer detected issues” message means the PHP path is wrong. Change the command back afterwards.
The admin panel lists the scheduled tasks under .
Step 10 — Storage Link (Optional)
Laravel sites usually need a link public/storage, normally made with php artisan storage:link over SSH. Acadify does not depend on it: every logo, photo and document is saved in public/uploads.
You can skip this step. To create the link anyway without SSH:
- Sign in as the administrator and open .
- Click Run database sync (in the Manual update box). It applies pending migrations, permissions and default settings without changing anything you set, and creates
public/storageif it is missing. - The green box “What this update applied” lists “Storage link: created public/storage.”. If it says “WARNING storage link: could not create public/storage”, your host blocks links; you can ignore it.
Step 11 — Mail (SMTP)
Password-reset codes for the website and the app are sent by email, so set this up early.
- cPanel → Email Accounts → Create an address on your domain, for example
[email protected]. Click Connect Devices next to it to see the SMTP server name and port. - Admin panel → : mail driver SMTP, host (often
mail.your-domain.com), port465with encryptionssl(or587withtls), the full email address as user name, its password, the from address and from name. Save. - Send a test with and check .
The MAIL_ lines in .env are only defaults; the values saved in are the ones used. More: Mail.
Step 12 — Live Chat on Shared Hosting
Real-time chat uses Laravel Reverb, a WebSocket server that has to run all the time. Shared hosting does not allow that, and you do not need it:
with the default BROADCAST_DRIVER=log in .env, the visitor chat widget and the admin inbox refresh every 10 seconds. Nothing to install.
- Turn the chat on in : Show live chat, the chat title and the greeting. Press Save.
- Answer visitors in . The inbox header says Auto-refresh on shared hosting (on a VPS with Reverb it says Live).
Leave BROADCAST_DRIVER=log. Setting it to reverb without a running Reverb server does not make the chat faster. Feature details: Live chat.
Step 13 — Connect the Mobile App
The app talks to your site at https://school.example.com/api/v1. In Main_Files/AppSourceCode either change the default in lib/utils/end_points.dart:
static const String baseUrl = String.fromEnvironment(
  'API_BASE_URL',
  defaultValue: 'https://school.example.com/api/v1',
);
or pass it when you build: flutter build apk --release --dart-define=API_BASE_URL=https://school.example.com/api/v1.
Sign in with a student or teacher account from your site. Package ID, name, icons and signing: Mobile App.
Final Check
https://school.example.comshows the website with a lock icon;https://school.example.com/.envshows “Not Found” (if it shows your settings, the document root is wrong: go back to step 4).- You can sign in at
/login; has your school name, logo, time zone and currency. - A test email arrives; the cron log test in step 9 worked.
- In
.env:APP_DEBUG=false,APP_DEMO=false,APP_INSTALLED=yes,APP_URLwith https. - Next: set up the school (academic year, classes, subjects, teachers) with the Admin Guide, then the Go-Live Checklist.
Updating on cPanel: Which Method?
From 1.2.0 on, Acadify has a page (super admin only). Every release is the same complete WebSourceCode folder you installed from,
with a version file acadify-update.json. There are two ways to apply it on cPanel:
| Manual update (recommended on cPanel) | Automatic update | |
|---|---|---|
| How | Upload the files with File Manager, then click Finalize manual update | Upload the ZIP on the System Update page and click Install update |
| Upload limit | None from PHP (File Manager or FTP) | PHP’s upload_max_filesize and post_max_size must be larger than the ZIP (about 150 MB) |
| Phrases you edited under Language | Replaced by the release’s files (back up lang/ first) | Kept; only new phrases are added |
| Backup of replaced folders | Your own (see below) | Also made automatically in storage/app/updates/backups/ |
Most shared hosts limit uploads to 50–128 MB, so the automatic upload of a full release usually fails there. Look at → Server check: the line Maximum upload size and the note “This server accepts ZIP files up to …” tell you whether the ZIP fits. If it does not, use the manual update.
Never overwritten by either method: .env, storage/ (logs, sessions) and public/uploads/ (your logos, photos and documents). System Update is blocked on a site in demo mode (APP_DEMO=true).
Back Up First
- Database: cPanel → Backup → under Download a MySQL Database Backup click your database (
USERNAME_acadify.sql.gz). Or phpMyAdmin → select the database → Export → Go. - Files: File Manager → right-click
acadify→ Compress → Zip Archive → Compress File(s), then right-click the new ZIP → Download. Delete the ZIP from the server afterwards. - If you edited phrases under Language, the files are in
acadify/lang/; they are inside the files backup.
To undo an update, put the files back with File Manager (Upload, Extract) and import the database in phpMyAdmin (Import).
Manual Update (Recommended on cPanel)
You copy the new files over the site with File Manager, then let Acadify update the database from the System Update page.
1Make the update ZIP on your computer
- Unzip the new download and open
Main_Files/WebSourceCode. - Select everything inside the folder (Ctrl+A / Cmd+A) and compress it: Windows Send to → Compressed (zipped) folder, macOS Compress. Name it
acadify-update.zip(about 150 MB). - The ZIP must have
acadify-update.json,app/,public/,vendor/and so on at its top level, not aWebSourceCode/folder.
2Upload and extract over the site
- File Manager → open
/home/USERNAME/acadify→ Upload → chooseacadify-update.zip→ wait for 100% → go back. - Right-click
acadify-update.zip→ Extract → target/home/USERNAME/acadify→ Extract File(s). Files with the same name are replaced. - Check: there must be no new folder
acadify/WebSourceCode. If there is, you zipped the folder instead of its contents: deleteacadify/WebSourceCodeand redo part 1. - Delete
acadify-update.zip.
What this keeps: the ZIP contains no .env, and its storage/ and public/uploads/ folders only hold empty placeholder files, so your settings, logs and uploaded files stay.
It replaces vendor/ together with composer.json and composer.lock, so the PHP packages always match the new code.
(The System Update screen says not to replace vendor: that is for people who copy selected folders over FTP and install their own PHP packages with Composer. Extracting the complete official ZIP is fine.)
3Clear the compiled files and check PHP
- In File Manager open
acadify/bootstrap/cacheand delete every.phpfile in it (for examplepackages.php,services.php,config.php). Laravel rebuilds them; old copies can break the site after the packages changed. - Open MultiPHP Manager and check that the domain still shows PHP 8.3. If it shows another version or “inherit”, choose PHP 8.3 again and click Apply (the update replaced
public/.htaccess, where the setting is stored on many servers).
4Finalize in the admin panel
- Sign in as super admin. Every admin page now sends you to , with the yellow notice “The files for 1.x.x are installed, but the database is still on …”.
- In the Manual update box, Detected new version shows the new number. Click Finalize manual update right away; until it runs, pages that use new database columns can fail.
- The site is in maintenance mode for a moment. Then a green box “What this update applied” lists the migrations, permissions and settings, and “Update to 1.x.x finalized.” appears. Installed version at the top shows the new number.
If the page times out, wait a minute and reload. Finalize can safely be clicked again: the version is only recorded at the very end.
Edited phrases: a manual update replaces lang/ with the release’s files. Re-enter your changes under Language, or use the automatic update, which keeps them.
Automatic Update (ZIP Upload)
Use this when the Server check on shows no red items and the upload limit is larger than the ZIP.
- Raise the limits in MultiPHP INI Editor if your host allows:
upload_max_filesize = 256M,post_max_size = 256M,max_execution_time = 300,max_input_time = 300,memory_limit = 256M. Reload the System Update page and read the Server check again. - Back up the database (the automatic update backs up the replaced folders, not the database).
- ZIP the new
WebSourceCodefolder (the folder itself or its contents; both work here). - In Automatic update choose the file in WebSourceCode ZIP file and click Install update. Keep the page open; it can take a few minutes.
- When it ends you see “Updated to 1.x.x.” and the list of what was applied. Then check MultiPHP Manager as in part 3 of the manual update.
Before anything is replaced, the updater checks the ZIP and the server and stops with “Nothing was changed” if something is wrong (too large, wrong ZIP, older version). Then use the manual update.
Upgrading an Existing Site from 1.0.0 to 1.2.0
Version 1.0.0 has no System Update page, so the first upgrade is always the manual one. After that you can use either method.
- In MultiPHP Manager switch the domain to PHP 8.3 if it runs an older version.
- Back up the database and the whole site folder.
- Follow the manual update parts 1 to 3: extract the 1.2.0 files over your site. Your
.env,storage/andpublic/uploads/stay. - Sign in as super admin. You are sent to , which now exists. A site without a stored version is treated as 1.0.0; Detected new version shows 1.2.0.
Click Finalize manual update. (This does the same as
php artisan acadify:upgradeover SSH.)
The 1.2.0 database changes add the class-teacher and live-chat tables and the new permissions. Migration 2026_11_08_000001_backfill_teacher_panel_permissions gives your existing teachers
the teacher-panel permissions and super admins the class-teacher permissions, so the teacher panel works for existing accounts without editing anyone.
Never run the installer, db:seed or any demo seeder on a live site: they rebuild the database or create demo accounts with a known password.
Then update the mobile app as well: build it from the 1.2.0 AppSourceCode (Mobile App).
Troubleshooting on cPanel
The error details are in acadify/storage/logs/laravel.log: open it in File Manager (View) and read the last lines.
| Problem | Fix |
|---|---|
| 500 error and the log or the page says “Composer detected issues in your platform” | The domain runs an older PHP. MultiPHP Manager → PHP 8.3 → Apply. After an update this happens when public/.htaccess was replaced; set the version again. |
| 500 error, log says “No application encryption key has been specified” | APP_KEY in .env is empty or not 32 characters (step 5). |
You see a list of files, a 403, or the text of index.php | The document root is not acadify/public (step 4), or PHP is not enabled for the domain. |
Every page sends you to /install | The database cannot be reached or APP_INSTALLED is not yes. Check the DB_ lines in .env (full names with the prefix). |
| Installer: “Please use 127.0.0.1 as host” or “Please input valid database information” | Host 127.0.0.1; full database and user names; the user has ALL PRIVILEGES on the database (MySQL Databases → Add User To Database). |
| Installer shows red items | Set date.timezone and allow_url_fopen (step 1), enable the missing extension, set folder permissions (step 6). |
| Installer stops halfway or the page times out | Raise max_execution_time to 300 and reload. If tables were already created, empty the database in phpMyAdmin first. |
| Images or logos do not show | Check APP_URL (https, no trailing slash) and that public/uploads is 755. |
| Cron does nothing | Use the full PHP 8.3 path (step 9) and test with the log file. |
| System Update: “The ZIP is larger than this server accepts” | Use the manual update. |
| After copying files, admin pages show errors | Click Finalize manual update on . If even that page fails, delete the .php files in bootstrap/cache and check the PHP version. |
| Changed settings do not appear | Press Clear cache in the admin top bar. |
More answers: Troubleshooting. Still stuck? Email [email protected] with your purchase code, your site address and the last lines of laravel.log.