Getting Started
- ✅ All-in-one ERP with student, employee, and academic modules
- 📊 Powerful reporting, payroll, and inventory systems
- 🔐 Dynamic role & permission system with SMS/email notifications
- 🌐 Multilingual support and clean, extendable Laravel structure
Welcome to Acadify – Education ERP
Thank you for choosing Acadify — a modern, powerful, and fully-featured Education ERP system built with Laravel.
Acadify is a comprehensive Education Management System that enables schools, colleges, and universities to manage their operations efficiently.
It empowers administrators to handle academics, human resources, payroll, and communication within a single integrated system.
This documentation guides administrators, developers, and institutional managers through every core and advanced feature.
From student management to payroll automation, inventory control to report generation — each module is designed to simplify workflows and improve productivity.
With a clean Laravel codebase, Acadify ensures stability, security, and scalability — making it ideal for both small and large educational organizations.
Let’s begin your journey toward a smarter, more efficient, and digitally connected institution with Acadify.
Name:ACADIFY EDU ERP - The Education Management System
Version: V1.x
Author: BugBuild Labs
Email: [email protected]
WhatsApp: +8801811843300
Website: www.bugbuild.com
License: Commercial – Single or Extended Use
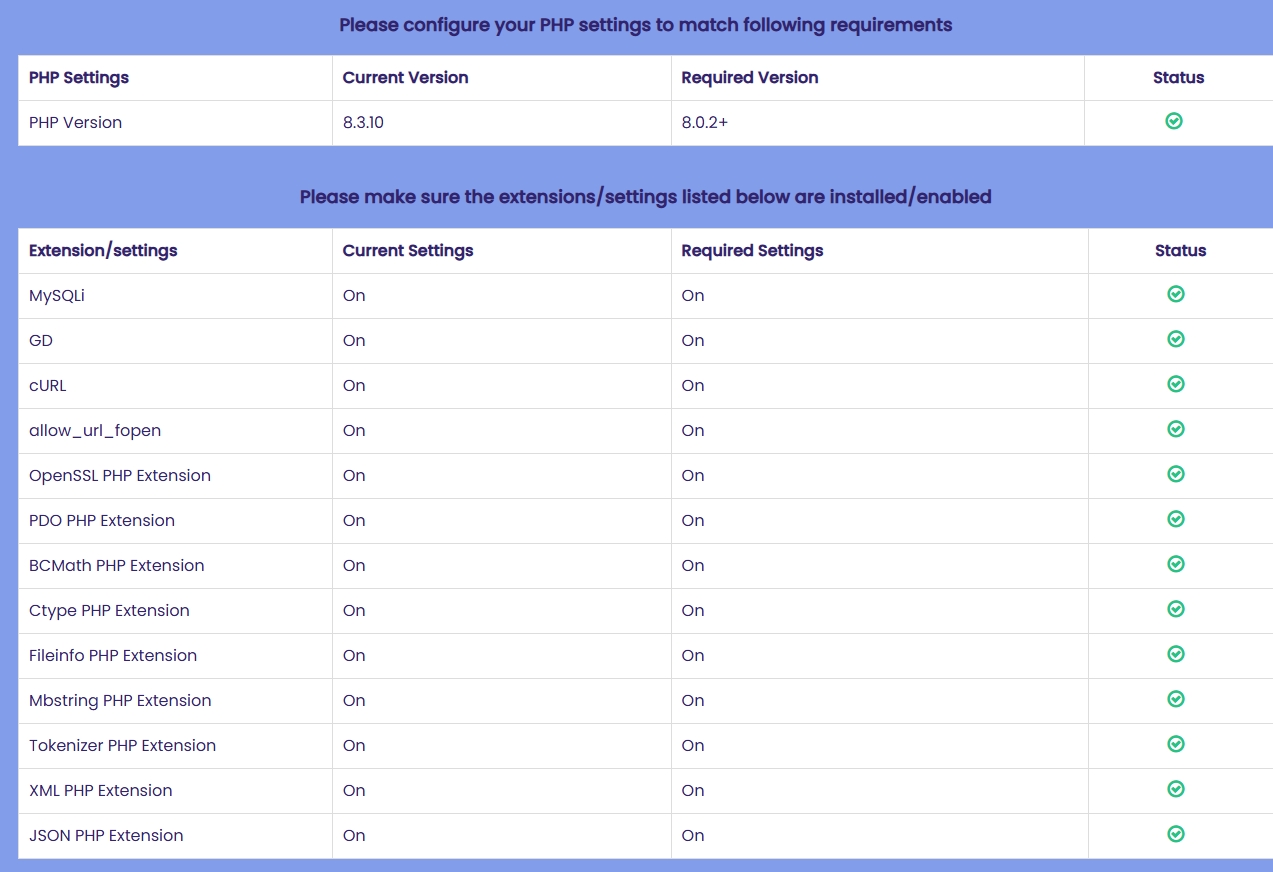
Requirements
Ensure your server meets the following requirements before installing ACADIFY EDU ERP - The Education Management System.
PHP Settings:
- PHP Version: 8.1 or higher
Required PHP Extensions:
- MySQLi
- GD
- cURL
- allow_url_fopen
- OpenSSL
- PDO
- BCMath
- Ctype
- Fileinfo
- Mbstring
- Tokenizer
- XML
- JSON
Database Setup (via cPanel)
Use the following steps to create a database using cPanel.
Step 1 – Login to cPanel:
Access your hosting account’s cPanel (usually at https://yourdomain.com/cpanel).
Step 2 – Open MySQL® Database Wizard:
From the cPanel dashboard, search for and open MySQL® Database Wizard.
Step 3 – Create Database:
Enter a name for your new database and click Next Step.
Step 4 – Create Database User:
Enter a username and a strong password. Click Create User and save these credentials securely.
Step 5 – Add User to Database:
Select All Privileges to give full access to the database, then click Next Step to finish.
✅ You should now have these ready:
- Database Name
- Database Username
- Password
Upload Files & Set Permissions
Step 1 – Upload Application:
Download Main_Files.zip. Extract it locally. Inside SourceCode, zip the contents and upload to public_html or www. Extract the contents on the server.
Step 2 – Set Writable Permissions:
Ensure the following folders and files are writable by the web server:
./routes./resources./public./storage./.env
Command (Linux): chmod -R 775 storage routes resources public .env
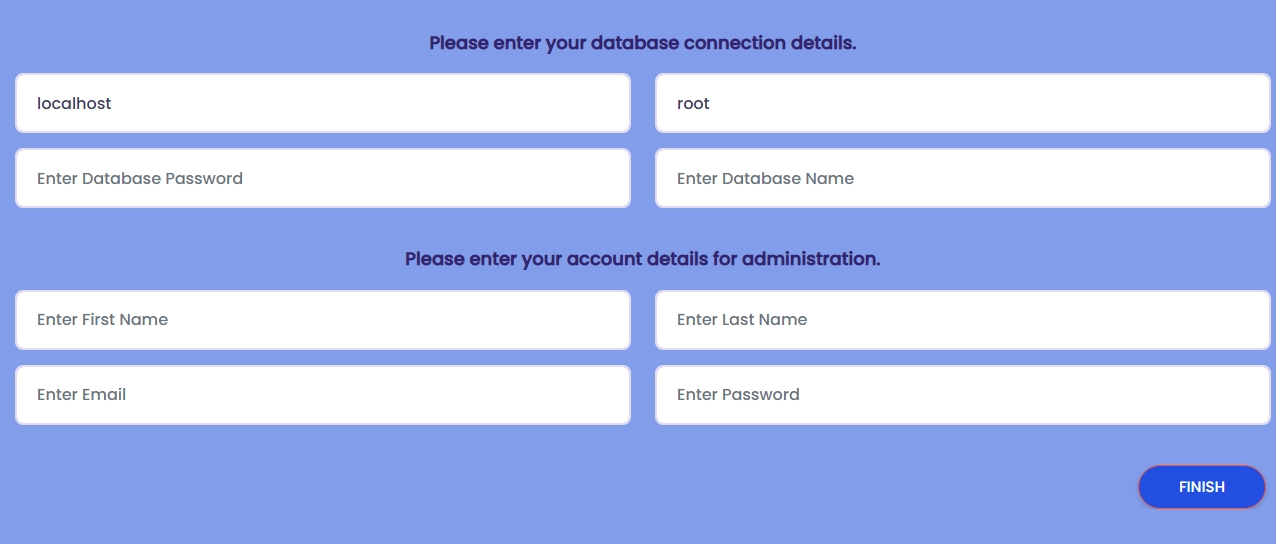
Installation
To install the ACADIFY EDU ERP - The Education Management System, follow these steps carefully:
1. Launch the Installer:
Visit your domain (e.g., https://yourdomain.com) in a browser. This will open the installation wizard.
2. Enter Database Configuration:
Enter the database host as localhost, set the username, enter your database password, and provide the name of the database where the application will be installed.
3. Setup Admin Account:
Provide administrator credentials to access the backend of the system. These details will be used to log in after installation is complete.
first name, last name, email, and a secure password
4. Complete Installation: After filling out all required fields and ensuring proper permissions, click the FINISH button to finalize the installation process.
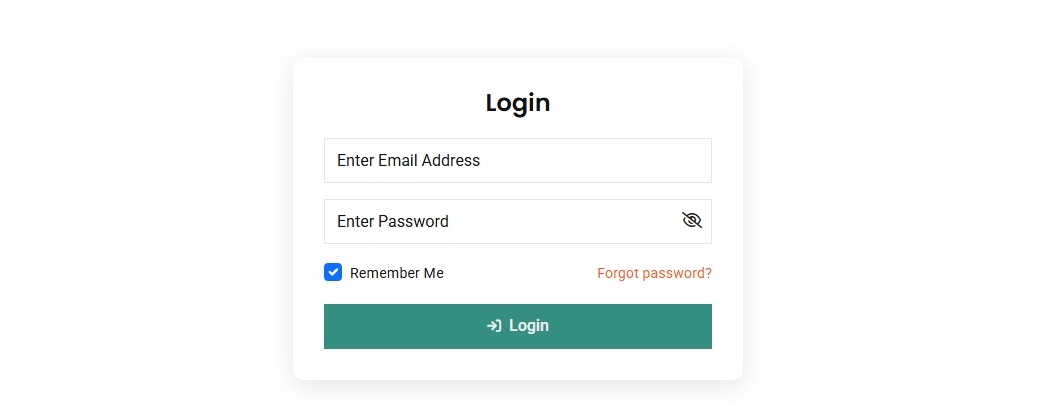
Login
To access the system, navigate to the login page and enter your credentials.
Step 1: Enter your registered Email Address in the email field.
Step 2: Type your Password into the password field. You can click the eye icon to toggle password visibility.
Step 3: Optionally, check the Remember me box to stay logged in across sessions.
Step 4: Click the Login button to proceed into the application.
If you forgot your password, click the Forgot Password? link to start the reset process.
If you do not have an account yet, click the Sign Up link at the bottom to create a new one.
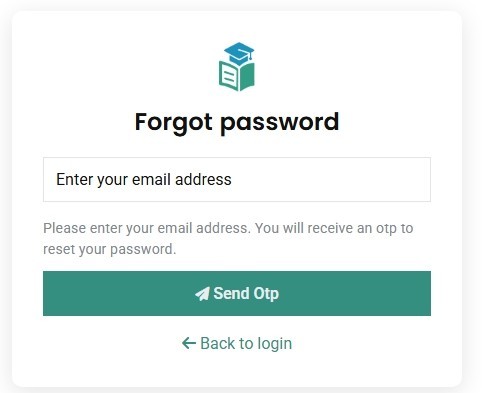
Forget Password
If a user forgets their password, they can securely reset it using the "Forgot Password" feature. This process includes three simple steps to verify identity and update login credentials.
Step 1 – Request Token:
The user starts by entering their registered email address on the Forgot Password page and clicking Send Token. This triggers a verification code to be sent to their email inbox.
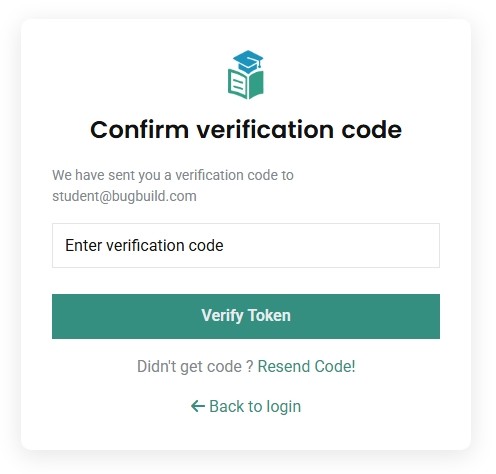
Step 2 – Verify Code:
On the Confirm Verification Code screen, the user enters the code received via email and clicks Verify. There is an option to resend the code if it wasn't received.
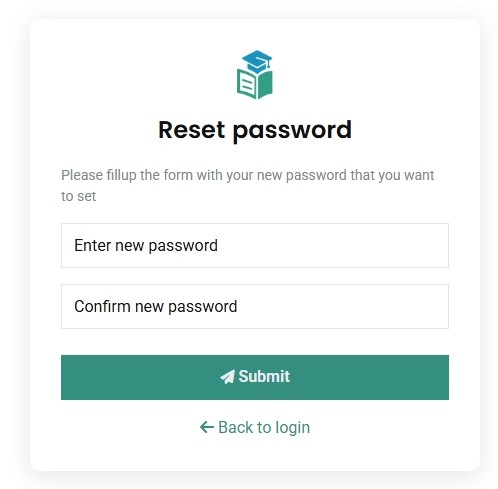
Step 3 – Reset Password:
Once the code is verified, the user is redirected to the Reset Password page, where they can enter a new password and confirm it. On successful submission, the password is updated and the user can log in with the new credentials.
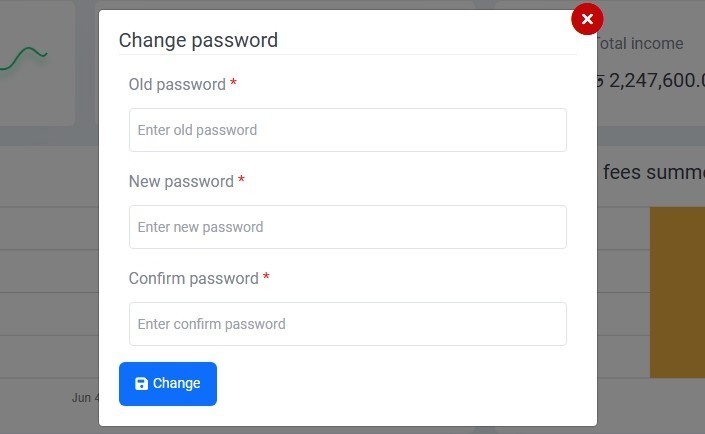
Change Password
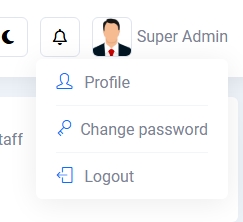
Users can securely update their account password at any time through the Change Password option available in the user dropdown menu.
Step 1: Click the user avatar on the top right corner of the navigation bar and select Change Password from the dropdown menu.
Step 2: A popup will appear to Change the Password. Enter your current password, then input a new password and confirm it in the corresponding fields.
Step 3: Click the Change button to update your password. A confirmation message will appear if the change is successful.
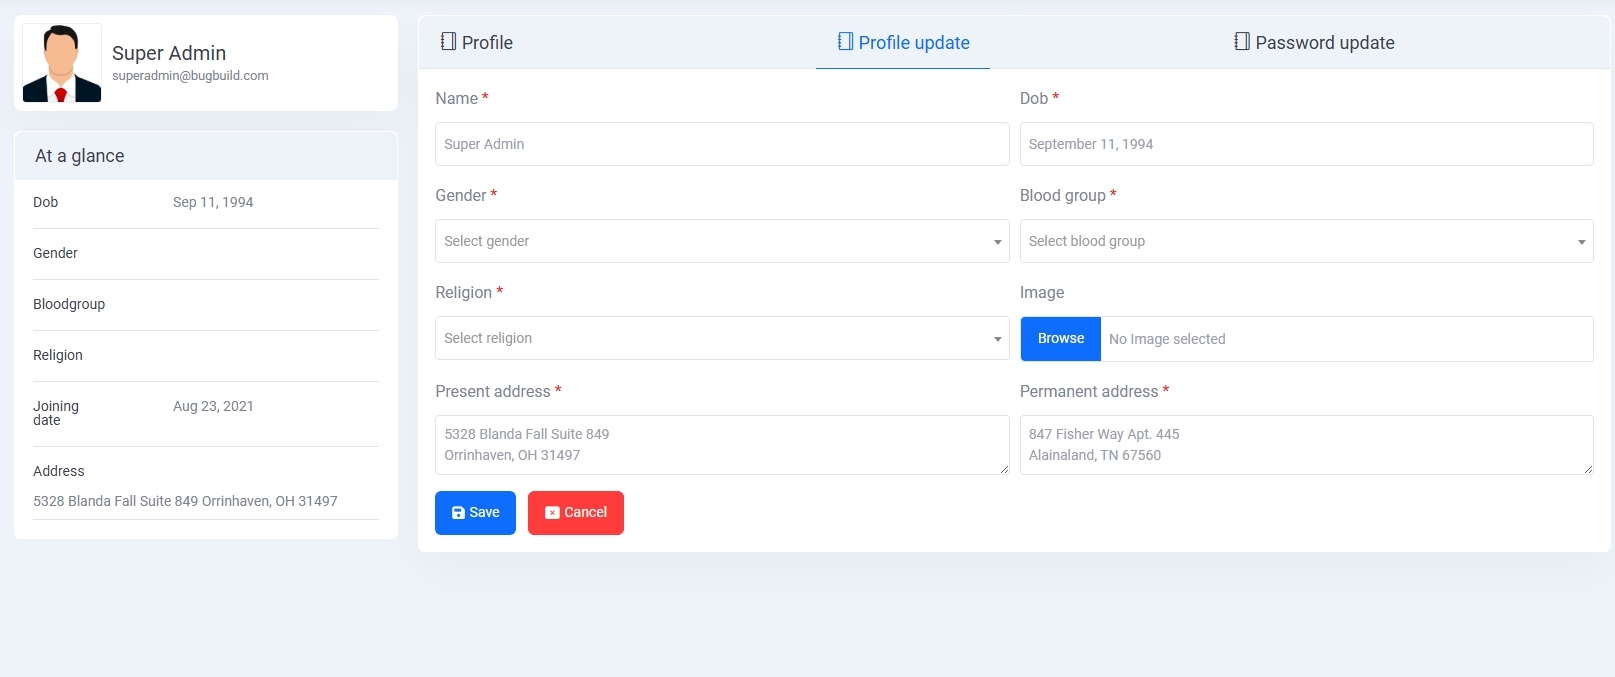
Profile Management
The Profile Management feature enables users to view, update, and manage their account and personal details. It is divided into multiple tabs for ease of navigation and user experience.
Tab 1 – Profile View:
Displays a snapshot of the user’s profile including email, phone number, role, and other read-only information. This screen helps users quickly verify their account details.
Tab 2 – Profile Update:
Allows users to edit personal details such as name, date of birth, gender, religion, blood group, profile image, and both present and permanent addresses. All required fields are marked with a red asterisk (*).
Tab 3 – Password Update:
In this section, users can securely change their account password by entering the current password followed by the new one. This ensures account safety and password hygiene.

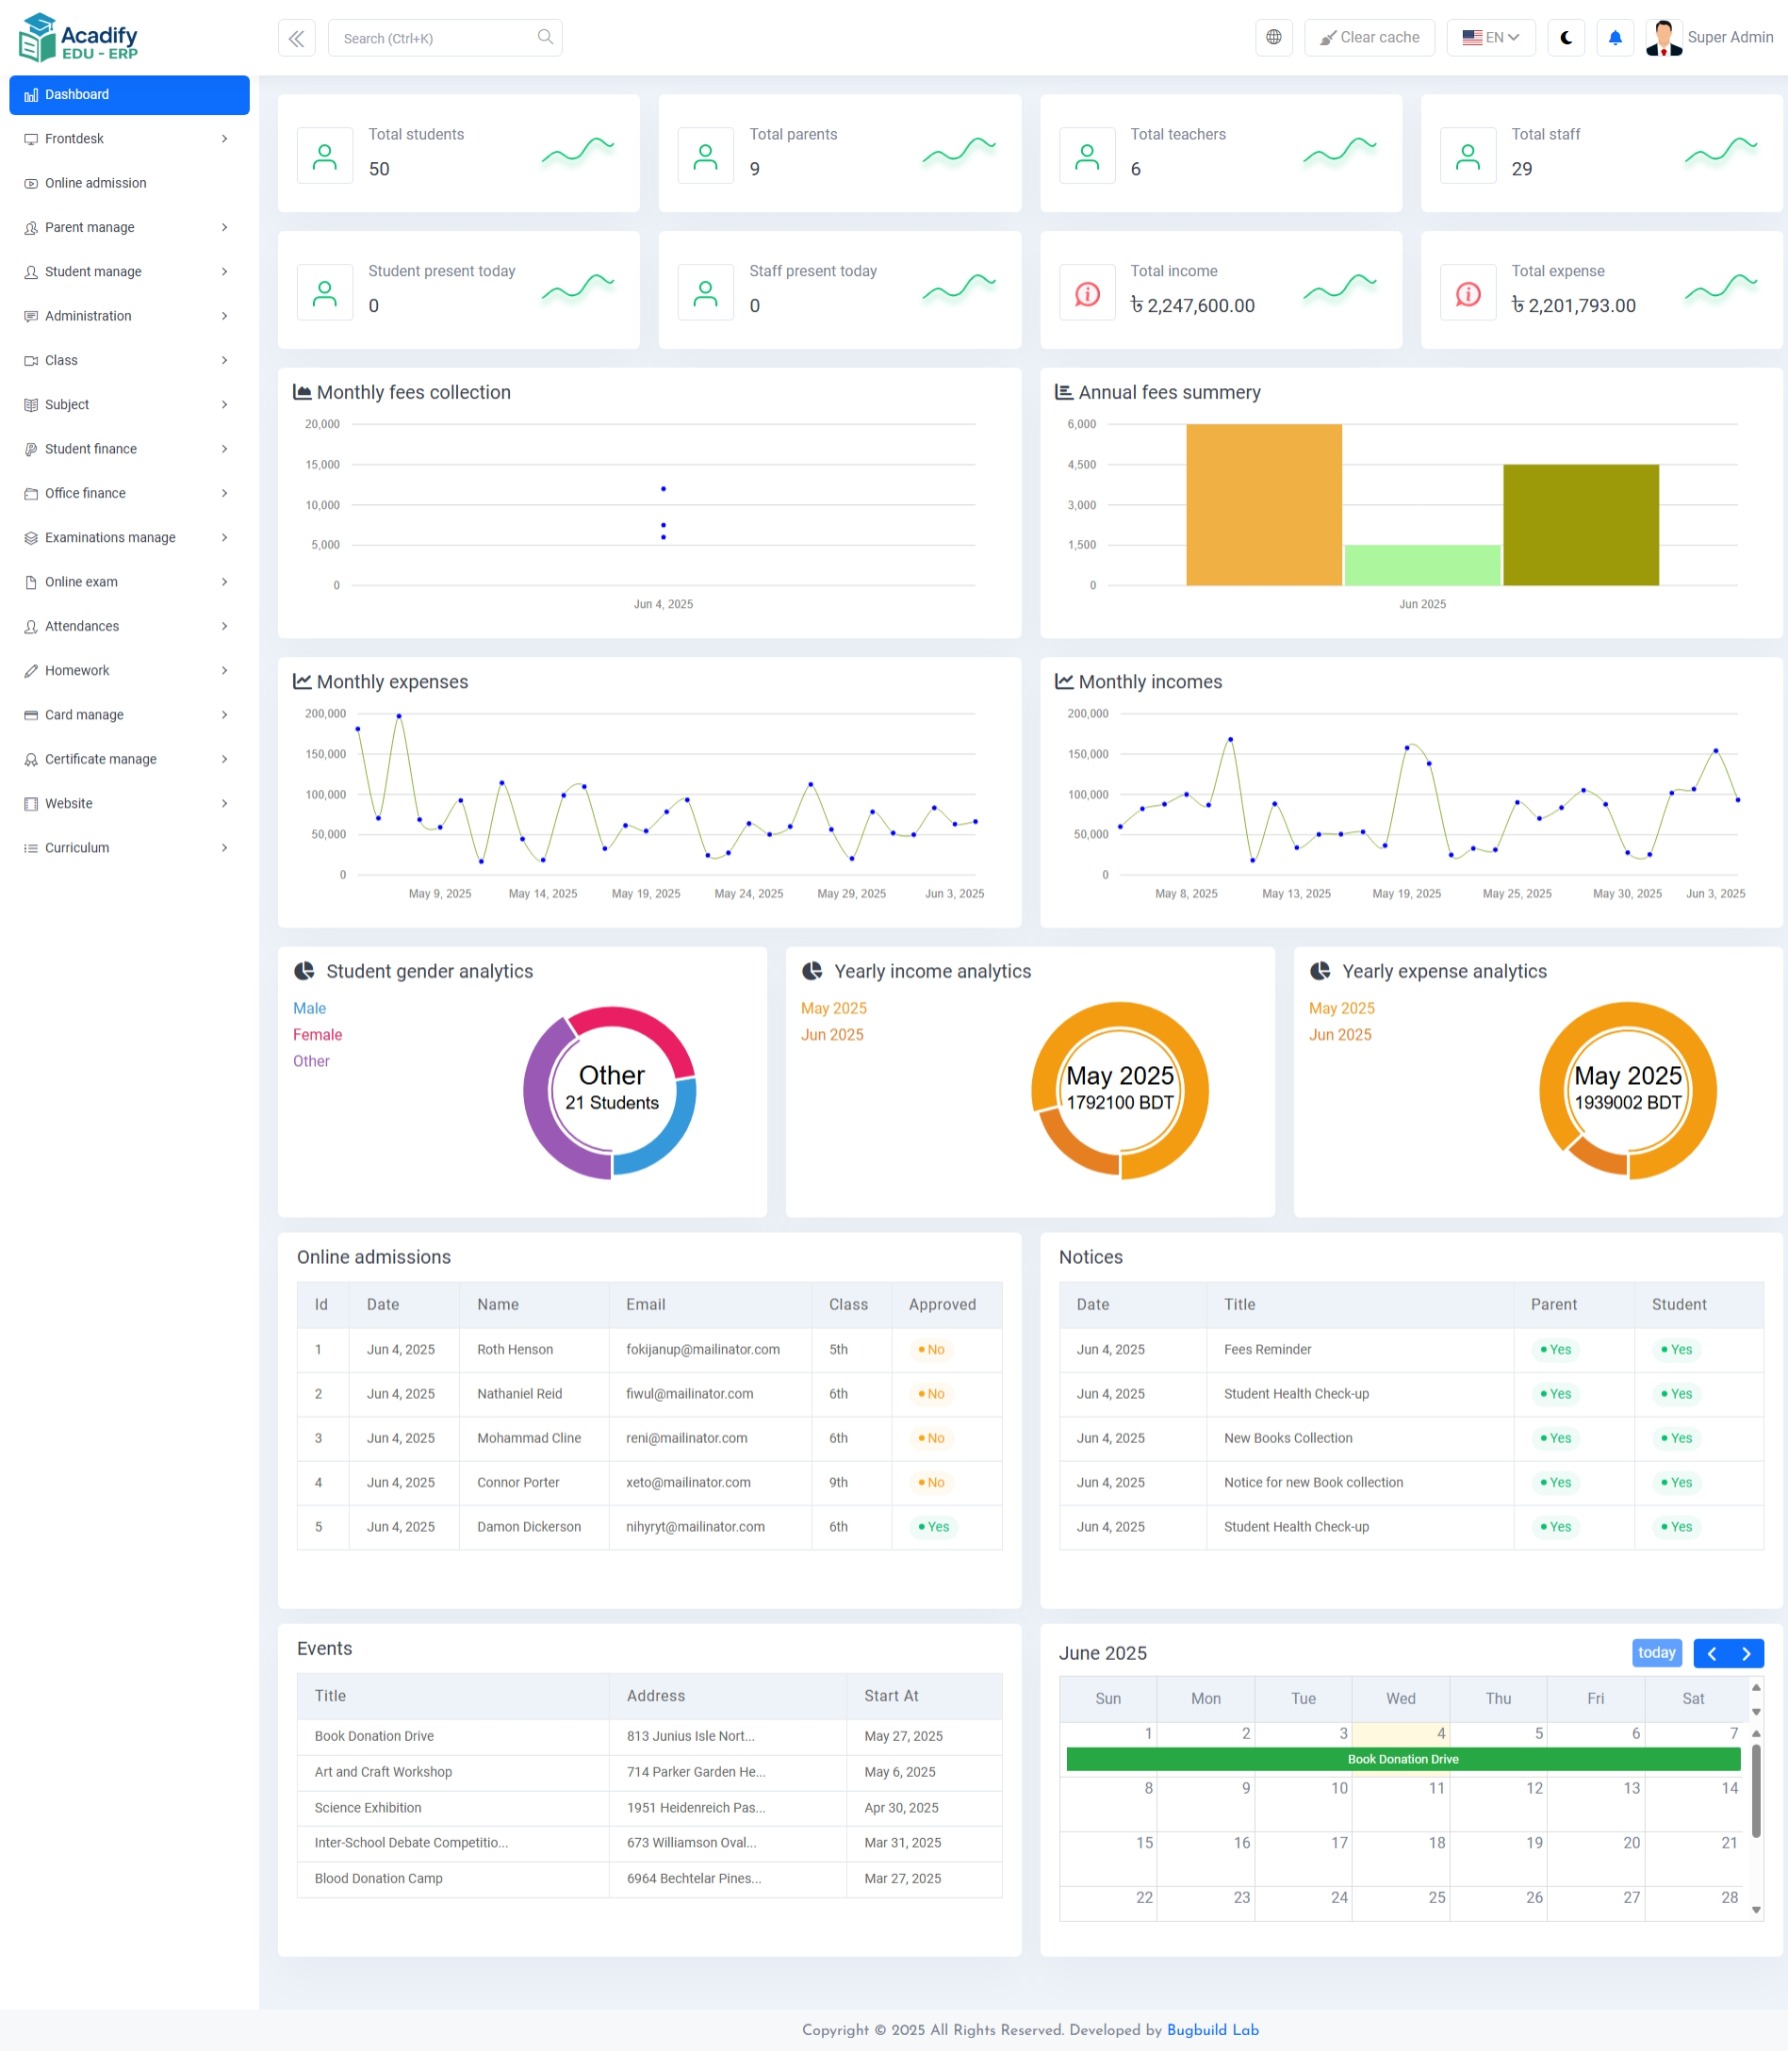
Dashboard
The Dashboard provides an overview of key metrics and analytics in one central view. This helps administrators quickly monitor the academic and financial status of the institution.
Key Metrics:
- Total students, parents, teachers, and staff counts
- Attendance stats for students and staff
- Total income and expense figures
- Monthly and yearly financial analytics
Visual Analytics:
Includes interactive graphs for monthly fee collection, annual fee summaries, expenses, incomes, and gender-based student distribution.
Recent Activities:
- Online admissions list with approval status
- Latest notices for students and parents
- Upcoming events and calendar for planning
Online Admission
The Online Admission section displays a list of student applications submitted via the online form. This module simplifies the process of managing new student entries.
Displayed Information:
- Student details including name, date of birth, blood group, contact info
- Academic details such as class, group, and department
- Previous school name and qualifications
- Guardian information with contact details
- Application status with approval options
This table provides school administrators with full applicant profiles in a single glance, and allows quick actions like approving or rejecting admissions.

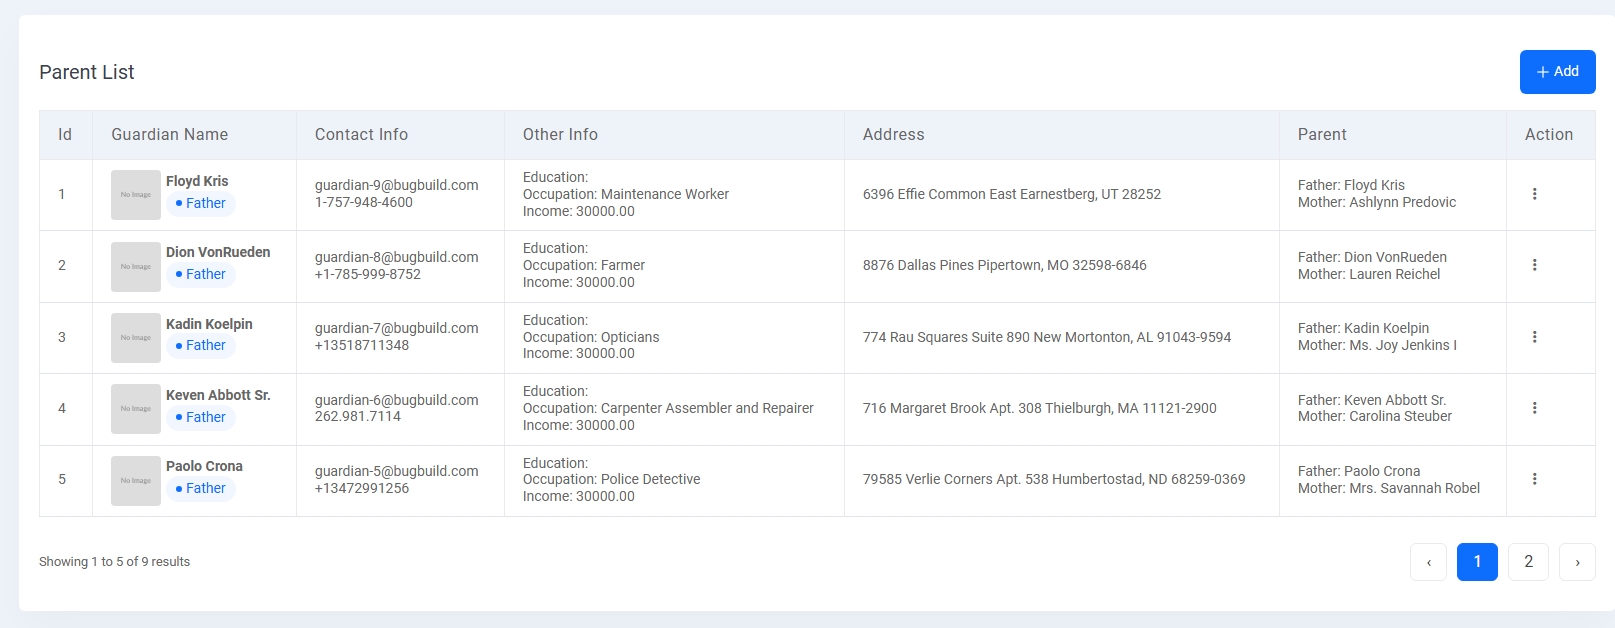
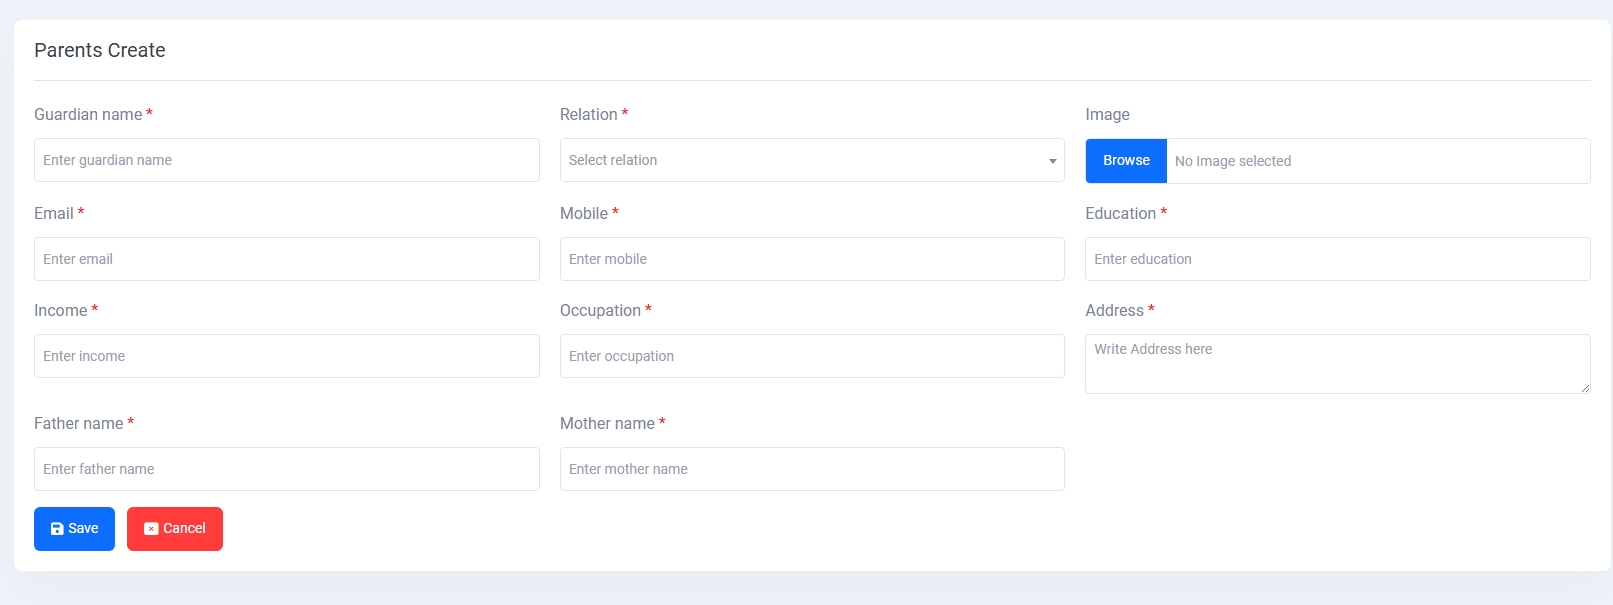
Parent List
The Parent List page displays all guardians registered in the system. This list is useful for tracking and managing parental or guardian information associated with students.
Data Displayed:
- Guardian name and relation (e.g., Father)
- Contact info including email and phone
- Education, occupation, and income
- Residential address
- Linked parent details like father's and mother's name
The list is paginated and includes action buttons for editing or further managing each record.
Student Manage
The Student Manage module provides comprehensive tools for handling all student-related data including categories, enrollment, login credentials, and student information management.
1. Category List:
Define and manage student classification types such as Regular or Ir-regular. Each category has a unique position number and active/inactive status toggle for sorting and availability.
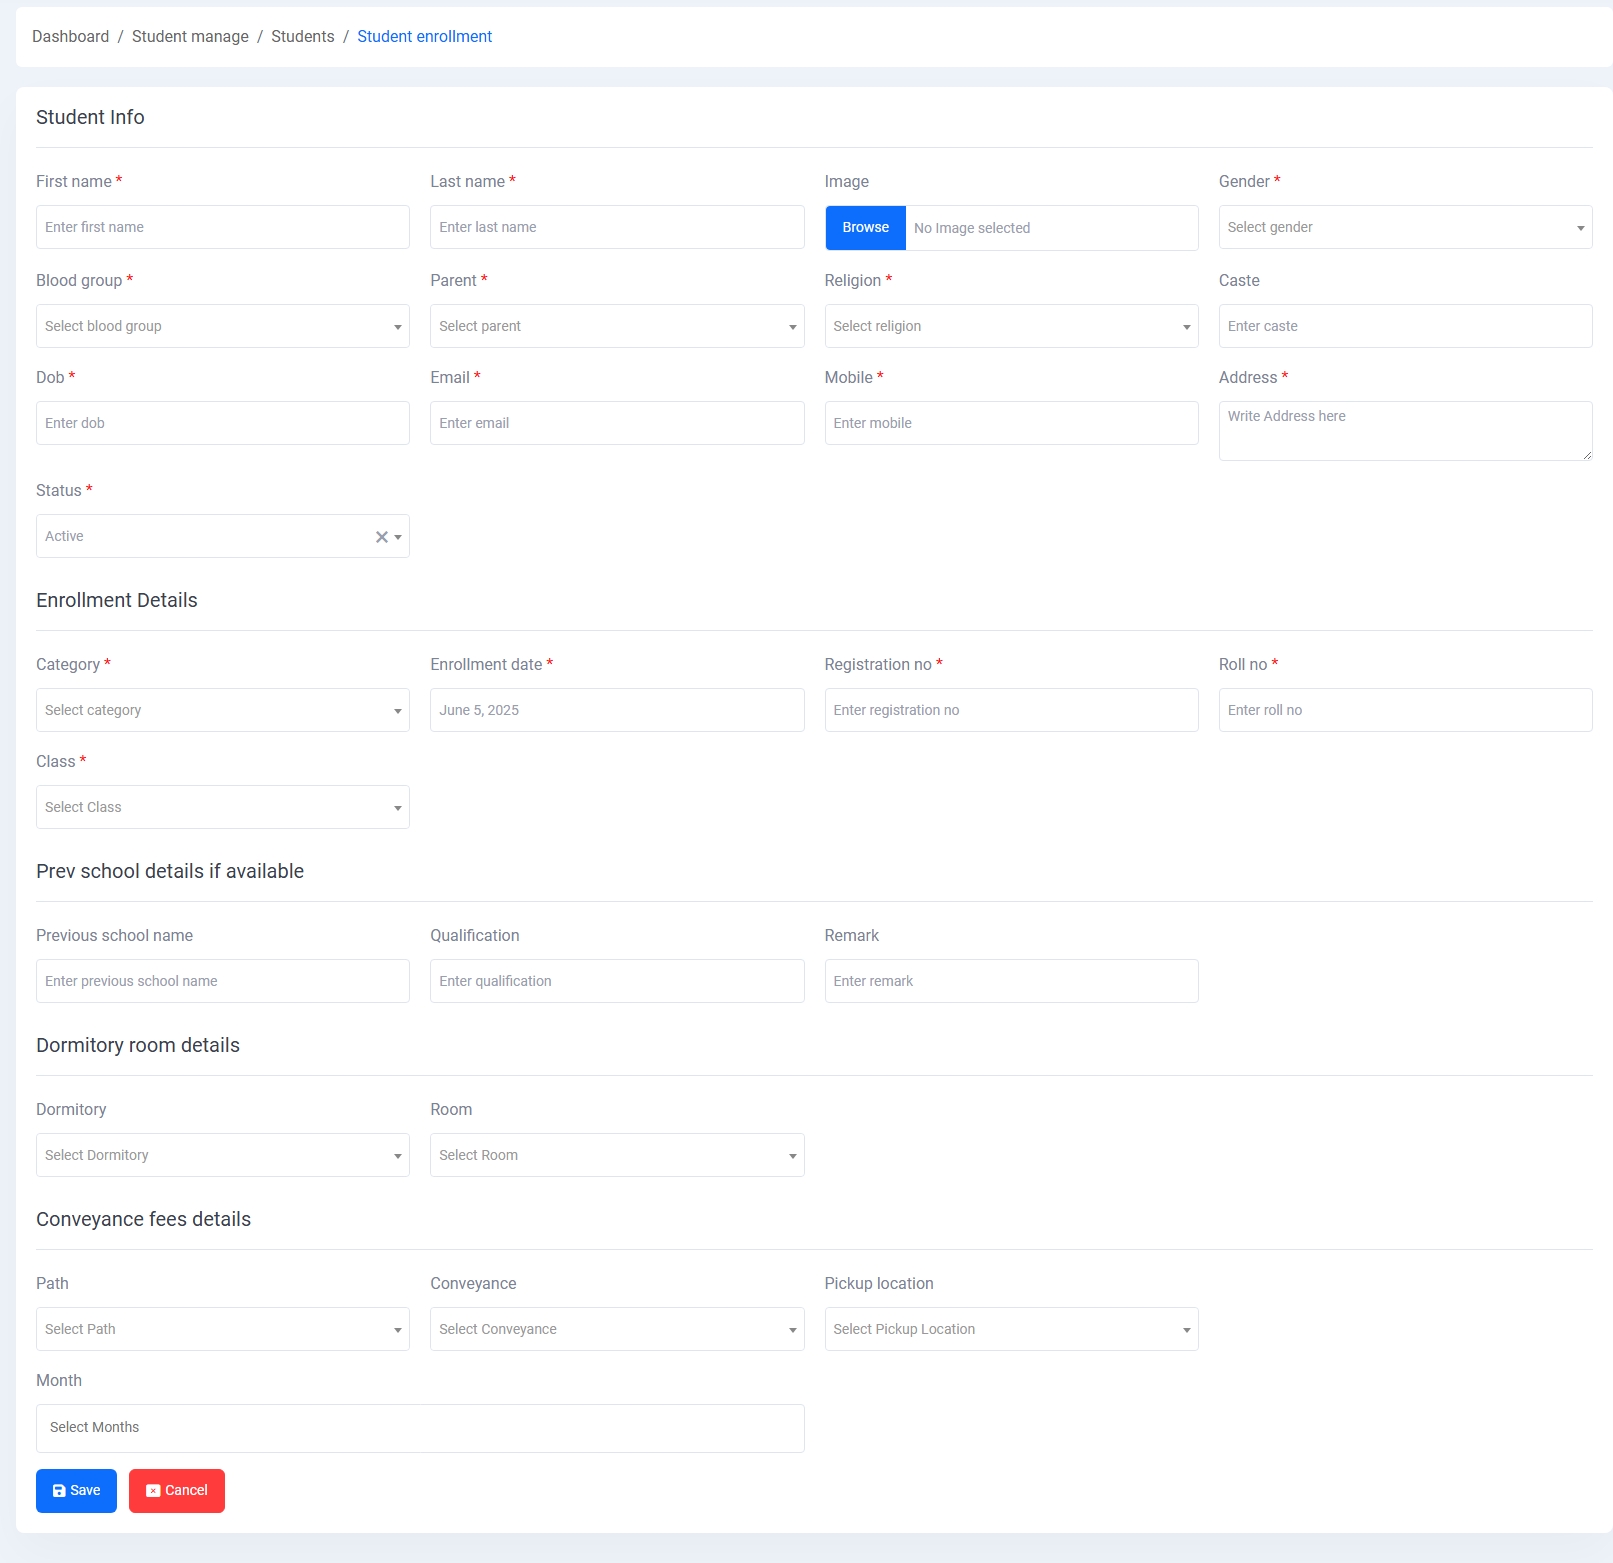
2. Student Enrollment:
This section features a detailed form to register a new student. The enrollment form is divided into several segments:
- Personal Information: First and last name, gender, date of birth, image, and status.
- Contact Details: Email, mobile number, and full address.
- Parental Information: Parent selection from the existing list, along with religion and caste fields.
- Enrollment Details: Category, enrollment date, class, registration number, and roll number.
- Previous School Details: Optional fields for previous school name, qualification, and remarks.
- Dormitory Details: Select dormitory and room assignment if applicable.
- Conveyance Details: Define student transport preferences including pickup path, location, and months of usage.
All required fields are validated, and the form supports file/image upload for student profile pictures. The layout is optimized for clarity and admin usability.
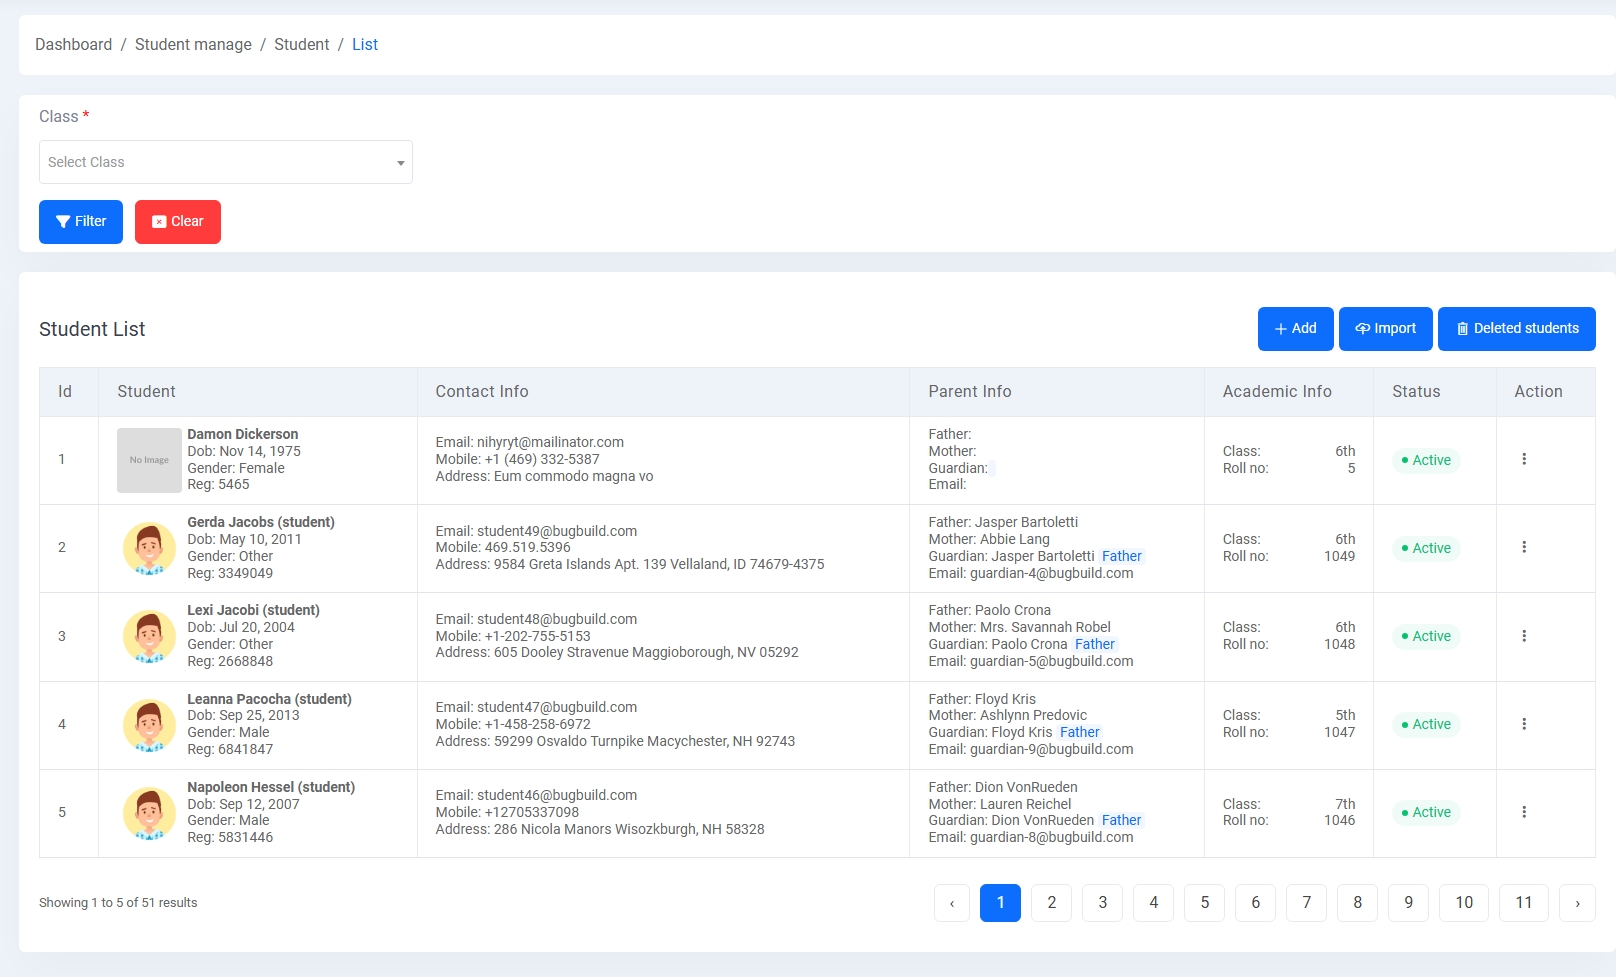
3. Students List:
Displays all registered students with full profiles, class info, parent linkage, and contact data. Features include pagination, filtering by class, edit/delete options, and import/export utilities.
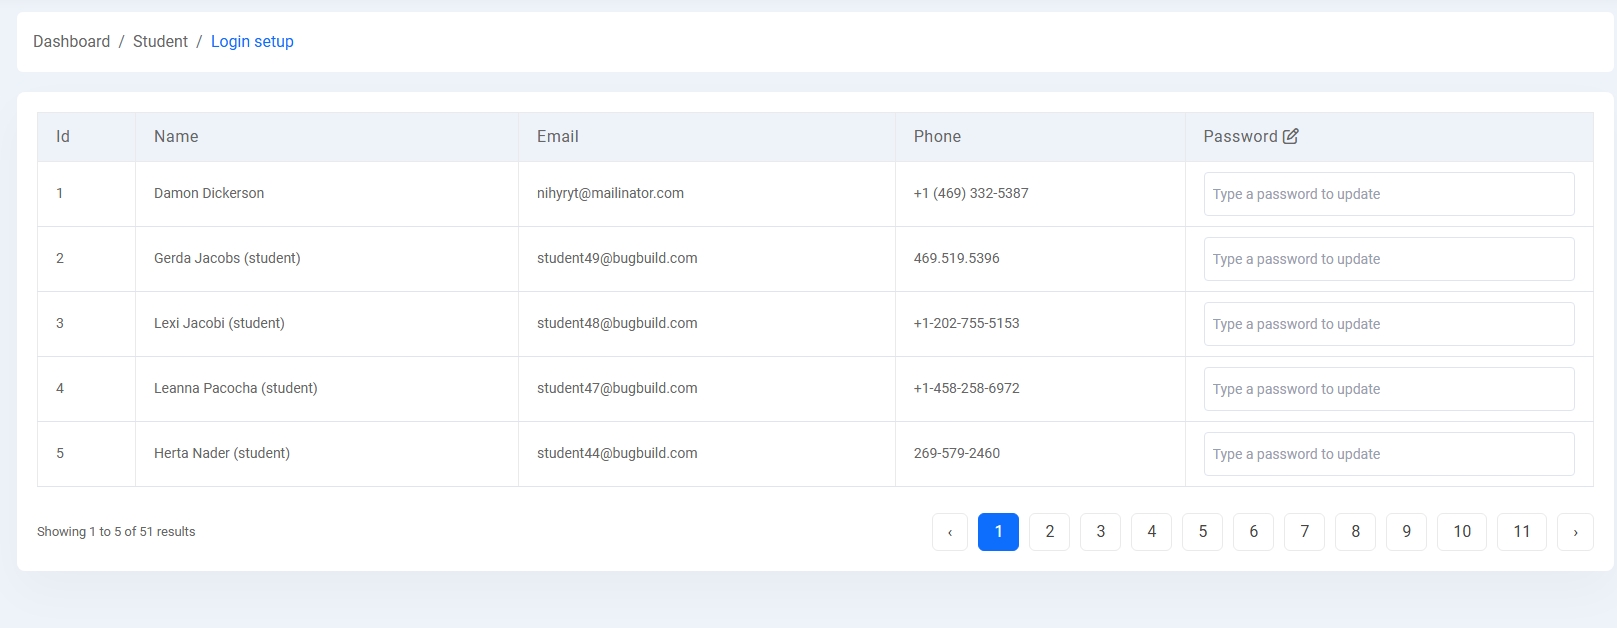
4. Login Setup:
A utility panel for updating student login credentials. Password fields are editable inline for each student entry, enabling quick access and control over account security.
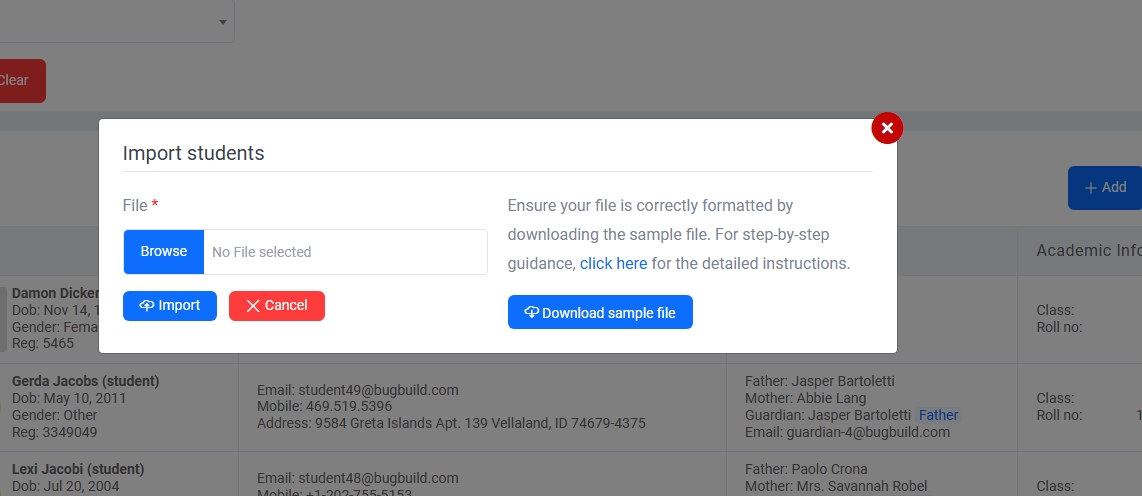
5. Import Students:
Use the modal to upload a formatted CSV file and import bulk student records. A sample file is provided to ensure proper structure and smooth integration.
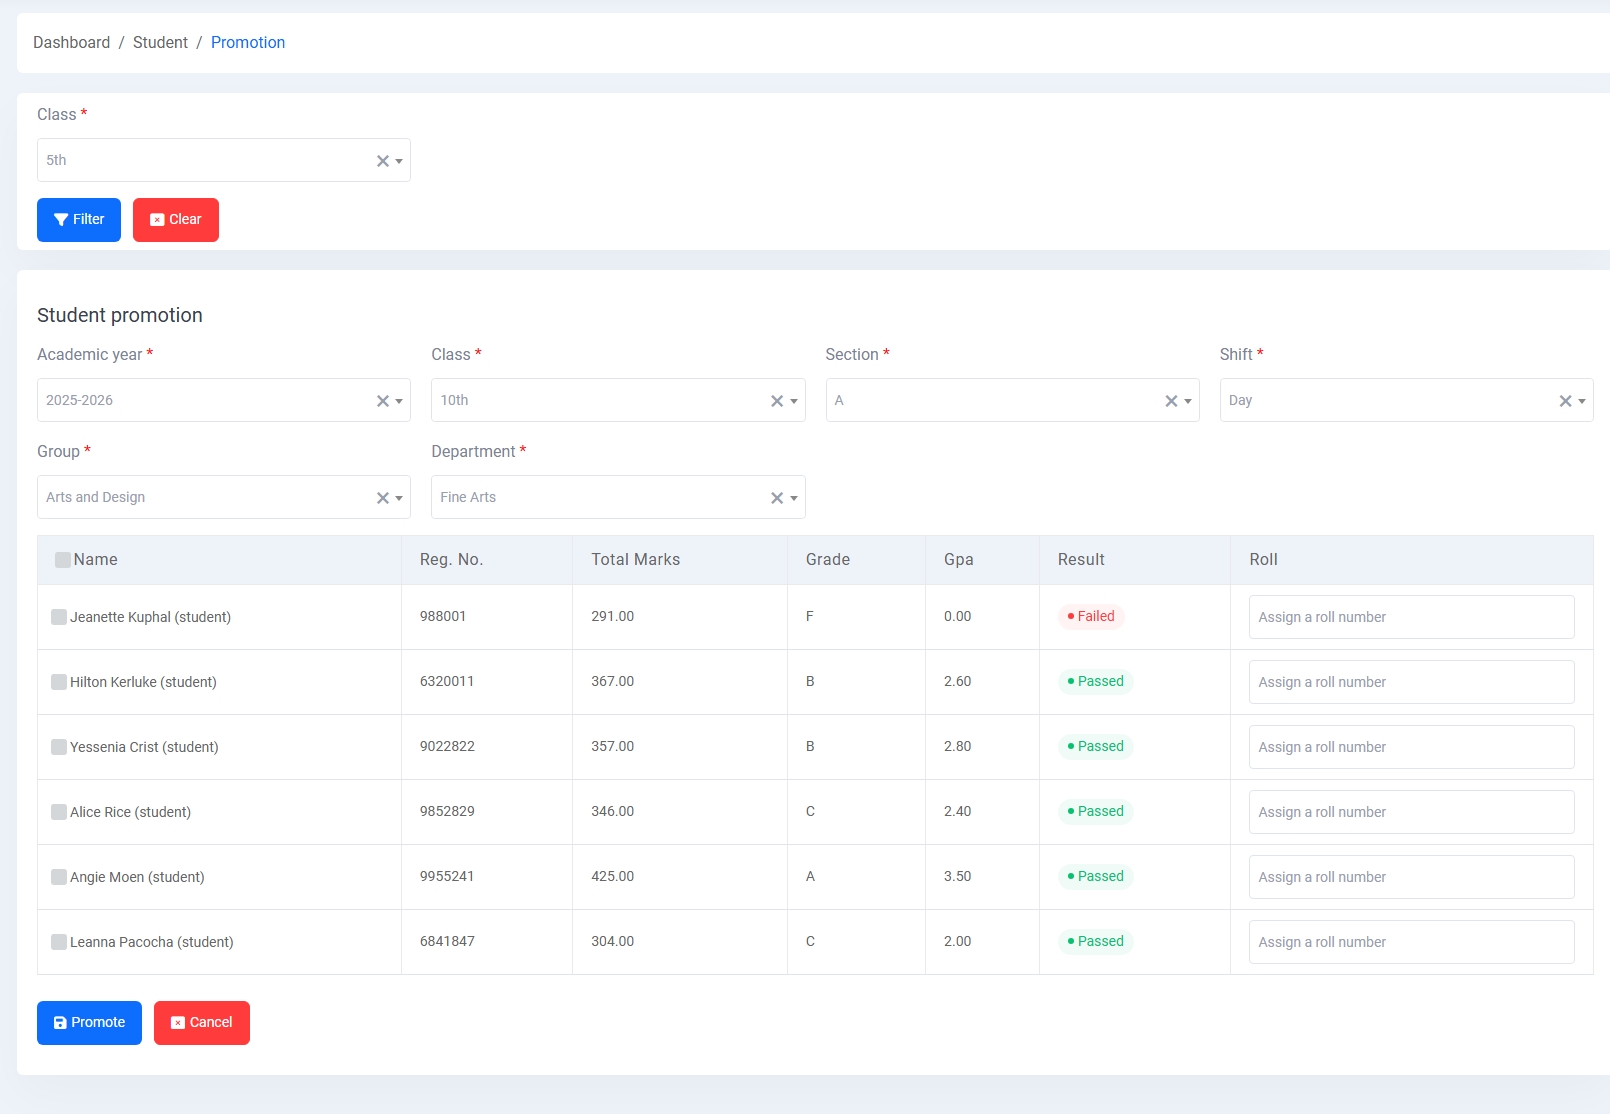
Student Promotion
The Student Promotion module allows administrators to promote eligible students to the next academic level based on academic performance, GPA, and pass status.
Filter & Selection:
Admins can filter students by current class before choosing their next academic path. Once filtered, students are listed along with their marks and promotion eligibility.
Promotion Criteria Fields:
- Academic Year: Target year of promotion
- Class, Section, Shift: Destination class placement
- Group & Department: Educational track for subject focus
Student Info Table:
- Displays name, registration number, marks, grade, GPA, and pass/fail status
- Roll numbers can be manually assigned to each promoted student
- Failing students are excluded from promotion by default
The interface includes Promote and Cancel buttons to finalize or discard the action. This ensures accurate record updates with minimal errors.
Administration
The Administration Module is designed to configure and maintain academic structures and scheduling elements. It supports institution-specific settings and educational streams.
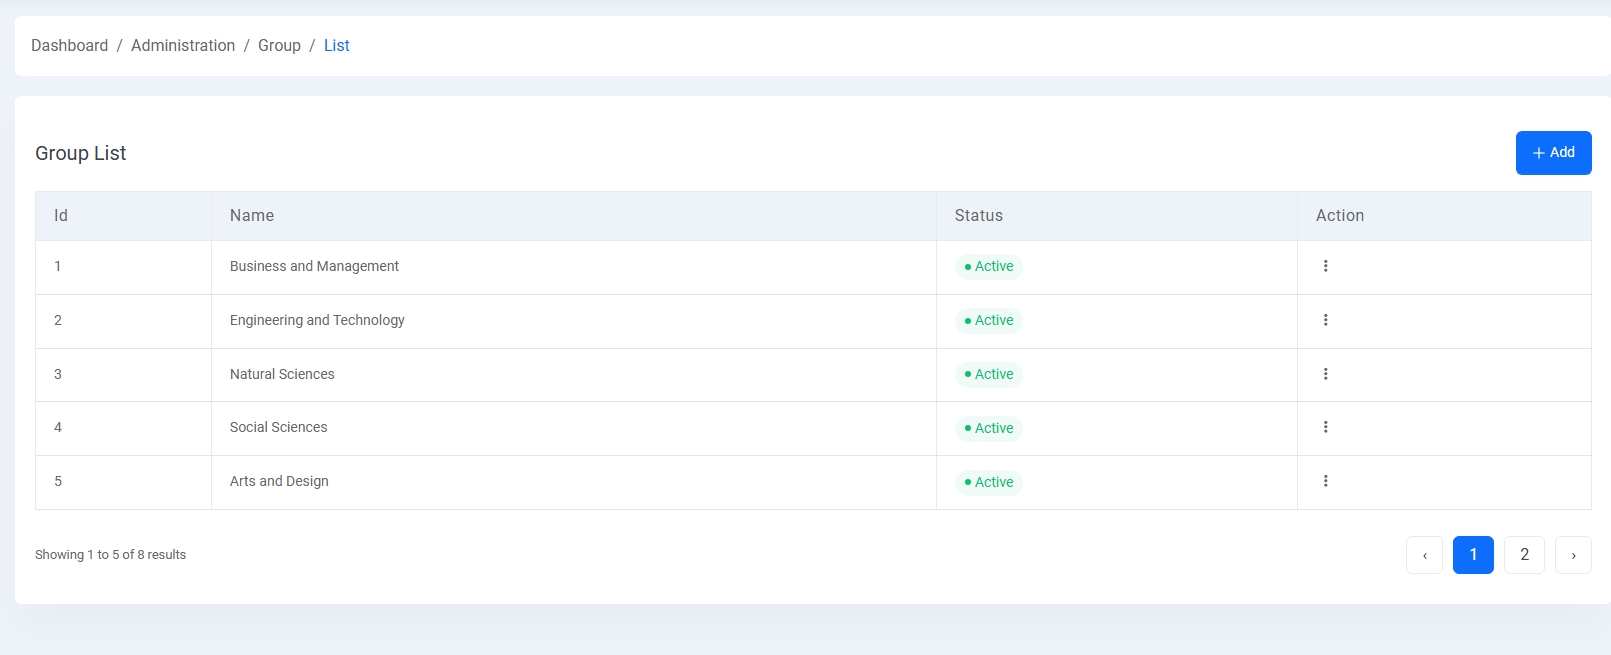
1. Group List:
Defines academic streams or faculties (e.g., Business, Engineering, Arts). Each group can be marked active/inactive and is used for student classification and course mapping.
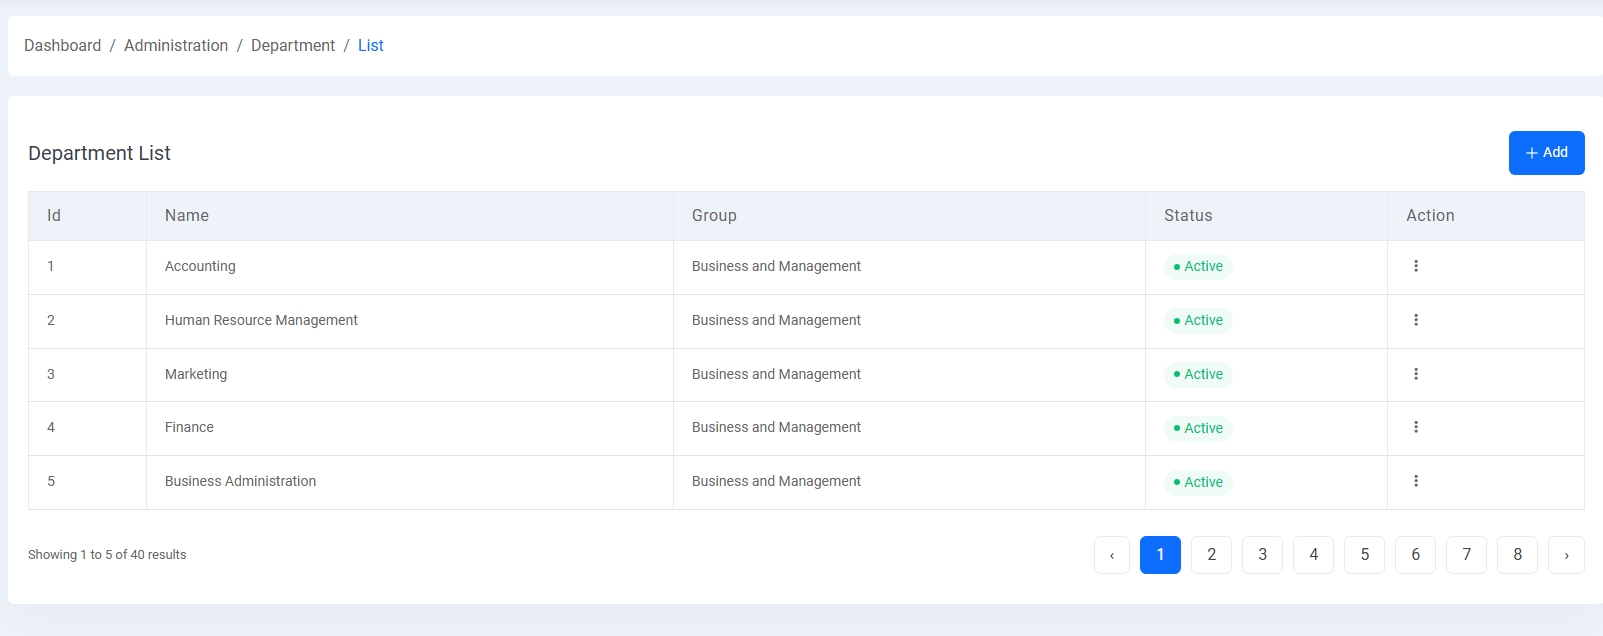
2. Department List:
Departments are tied to academic groups and represent specialized education areas (e.g., Accounting, HRM, Marketing). They are used in student enrollments and curriculum assignment.
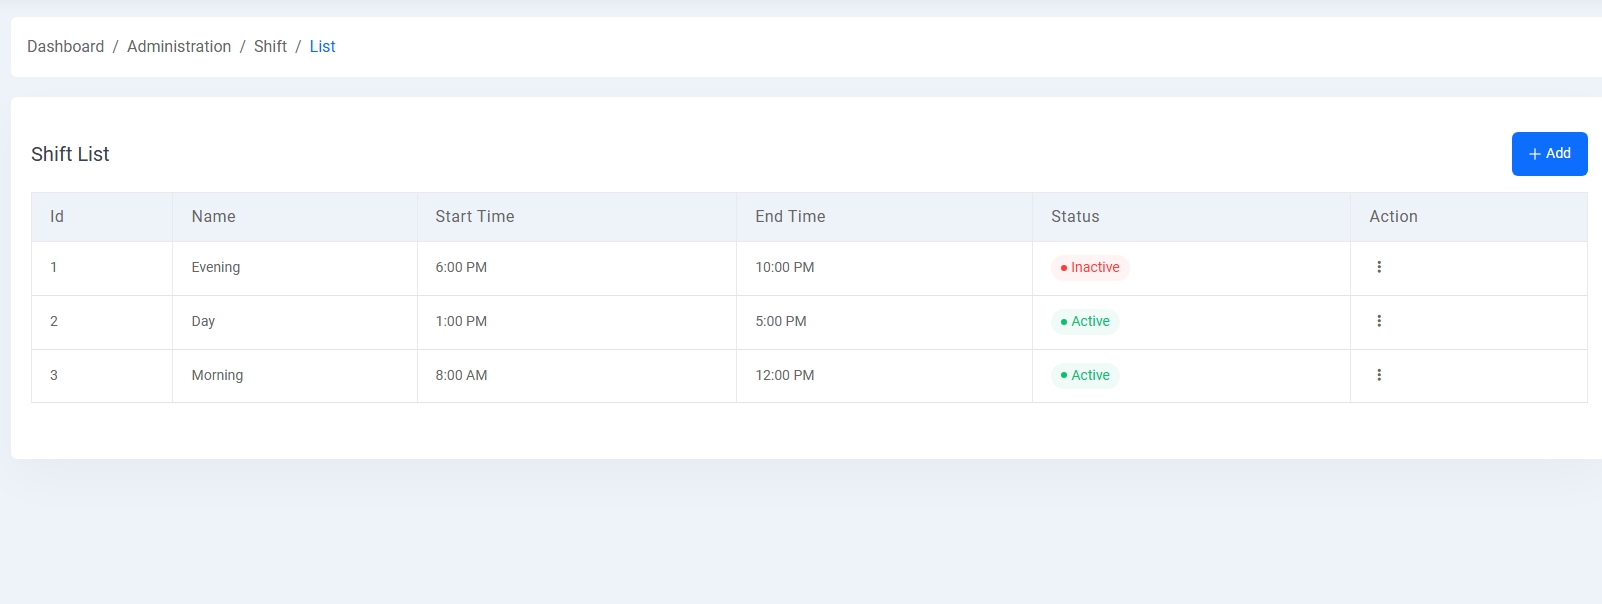
3. Shift List:
Schools can manage multiple daily sessions (e.g., Morning, Day, Evening) with dedicated start/end times. Shift status controls its availability during enrollment or routine assignment.
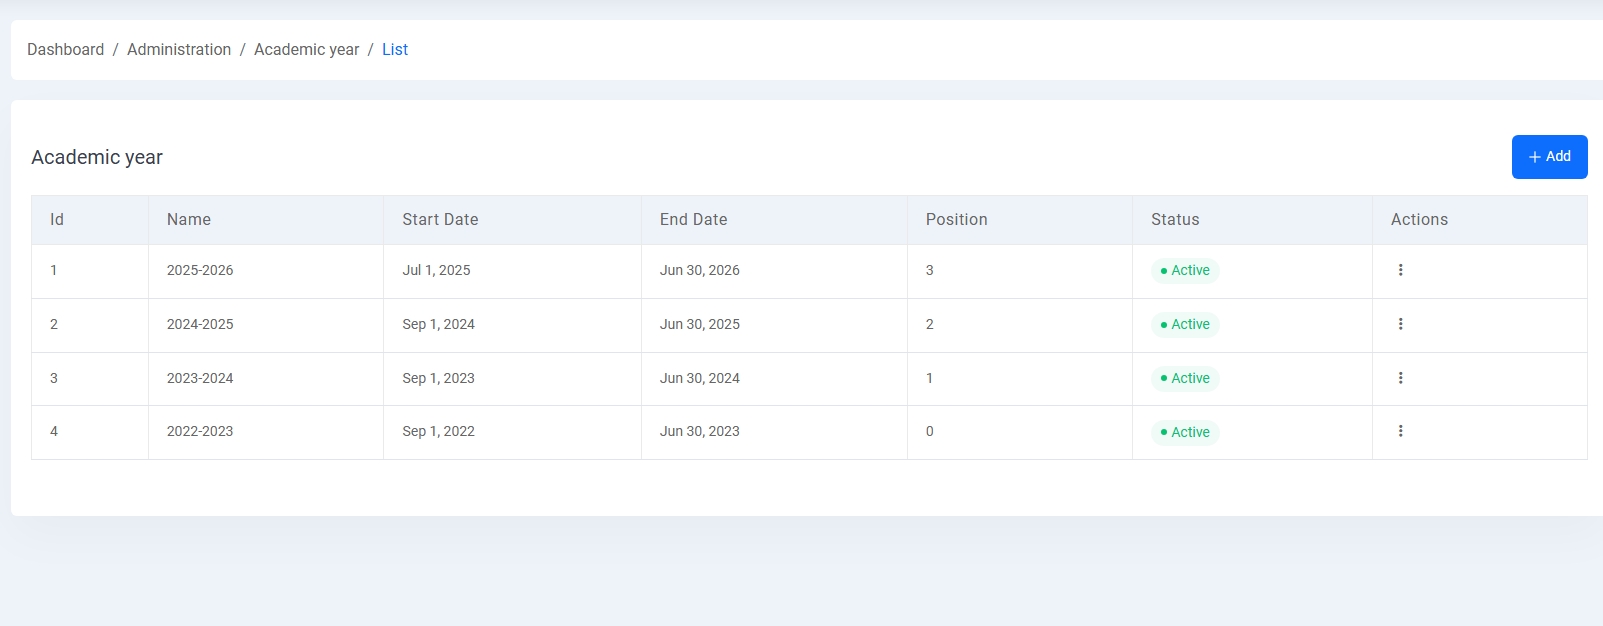
4. Academic Year:
Lists yearly academic terms with a start and end date. Each year is assigned a display position and can be activated or deactivated as needed.
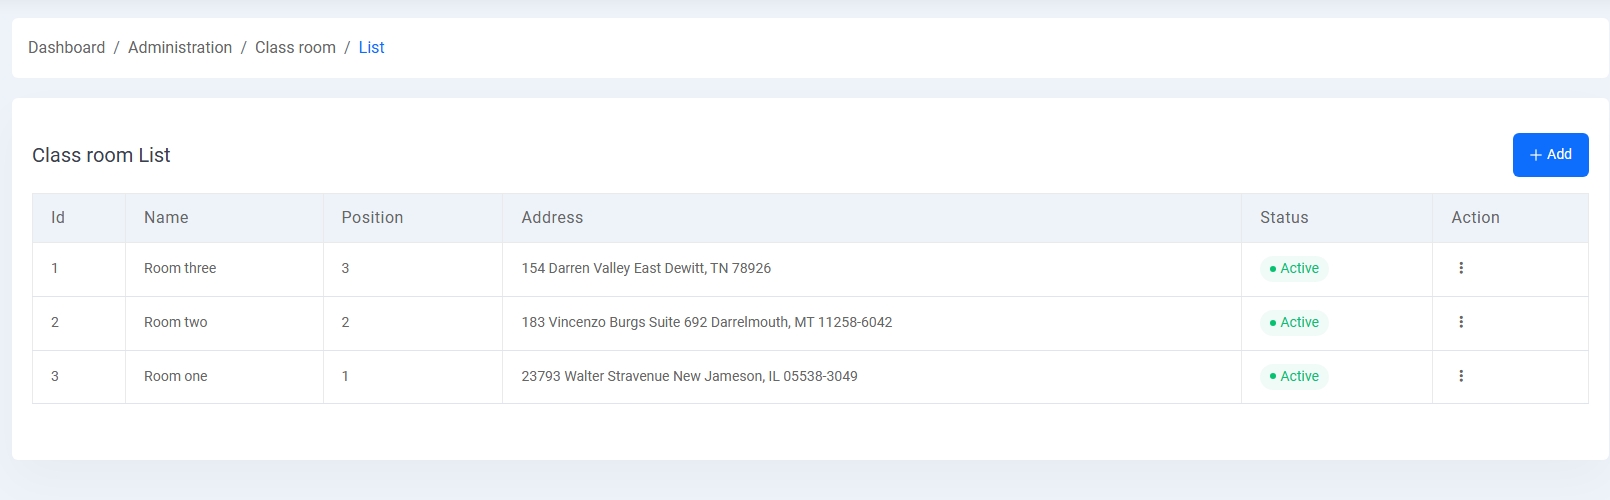
5. Class Room List:
Admins can define classrooms with labels (e.g., Room One), physical address, and display order. This is useful for seat planning and attendance systems.
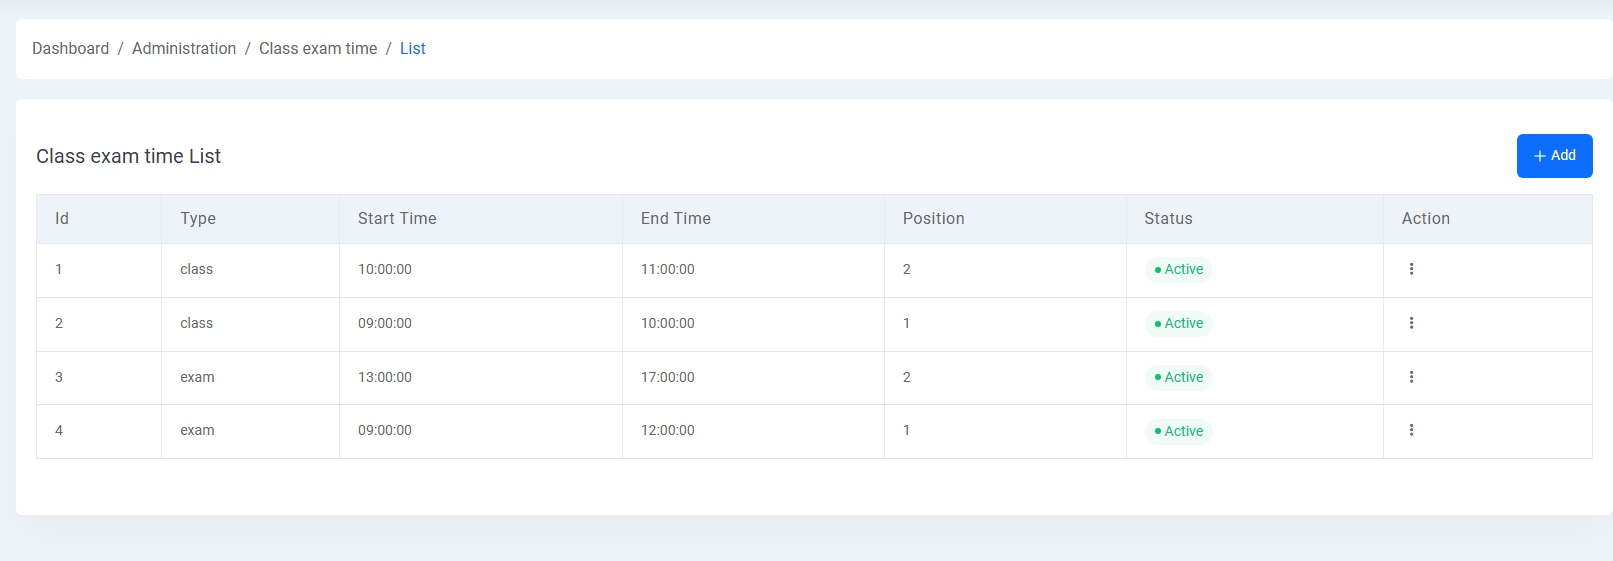
6. Class Exam Time:
Schedule class and exam times by type (e.g., class or exam), with start and end time entries, and ordered by position. This list supports daily timetable and exam routine generation.
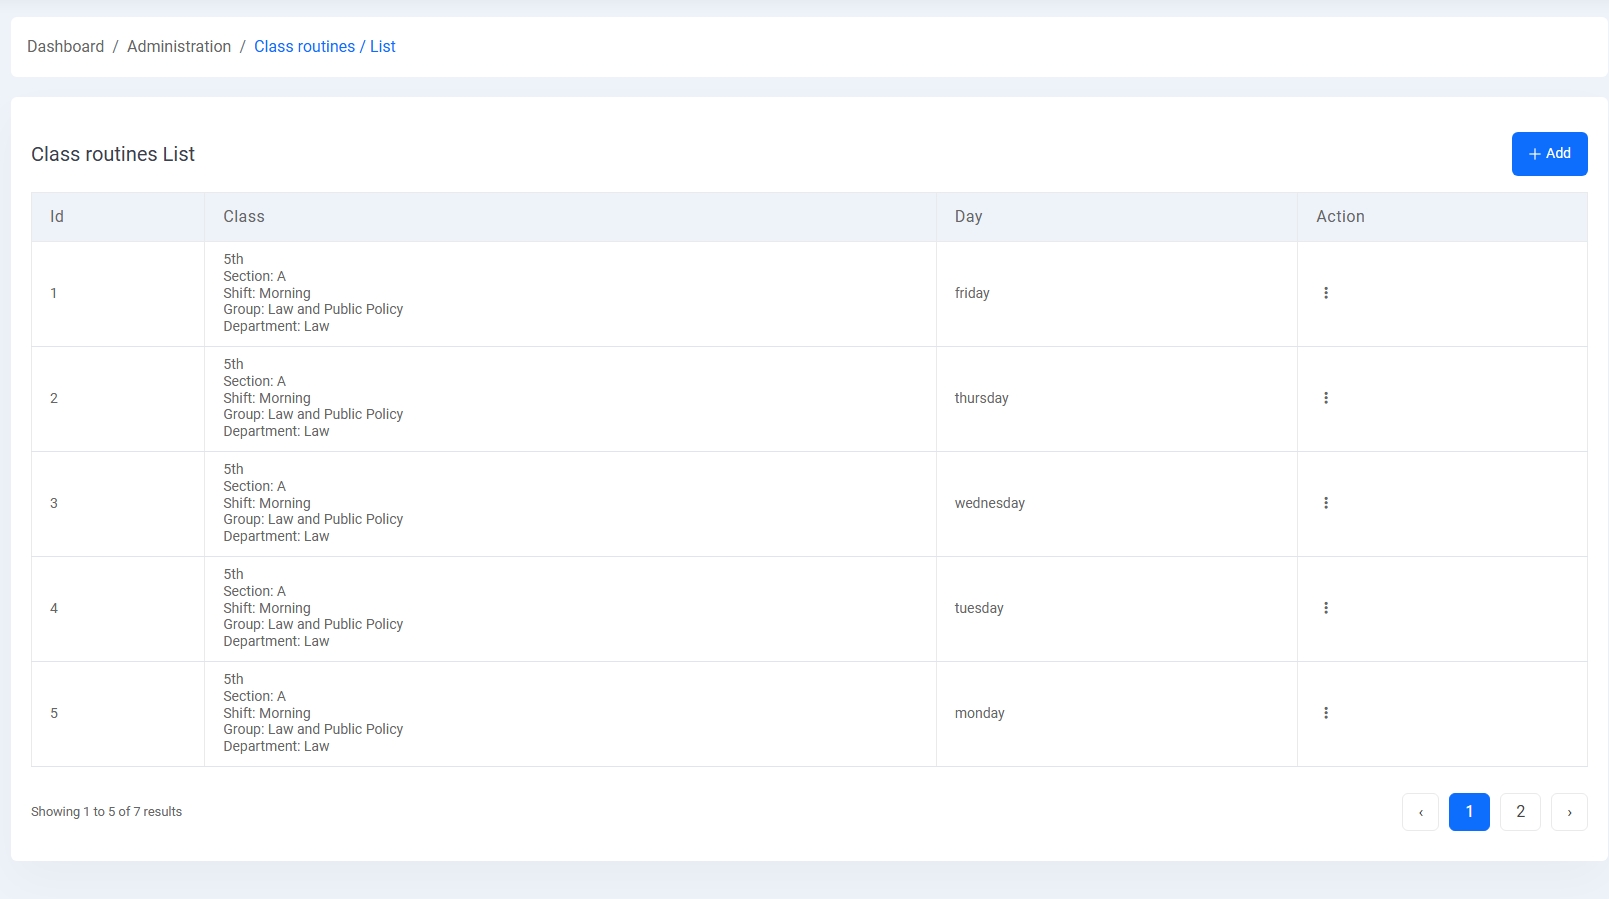
7. Class Routine:
Weekly class routines are created by mapping class, section, group, shift, and department to specific days of the week. This ensures structured academic scheduling and attendance tracking.
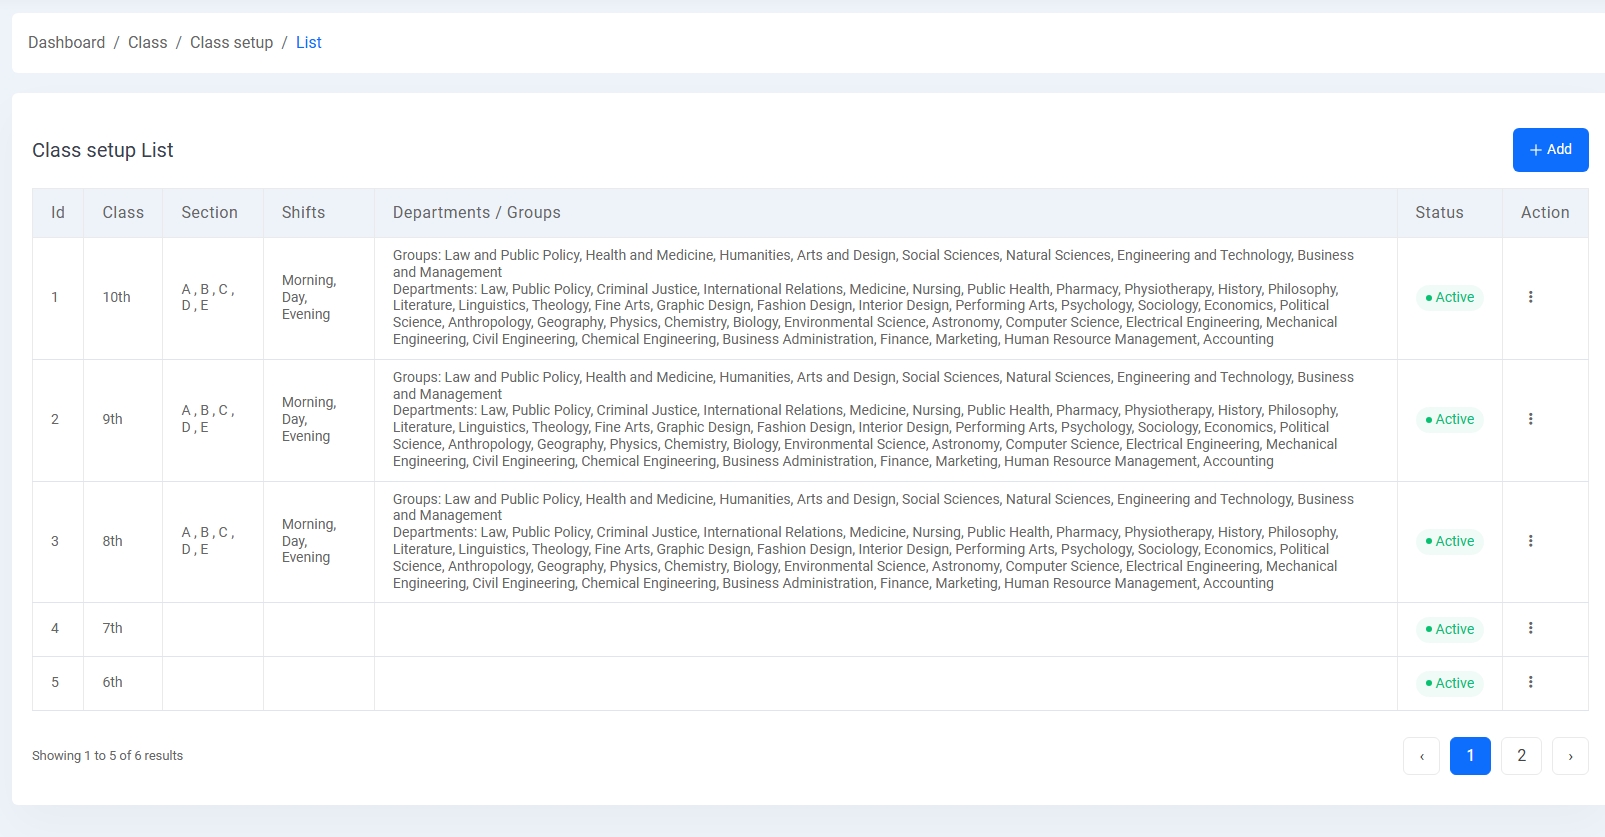
Class Setup
The Class Setup module is used to map each class to relevant sections, shifts, departments, and groups. This configuration defines the academic structure for each class in the institution.
Class Setup List:
Displays all configured classes (e.g., 6th to 10th) with their assigned:
- Sections: Sub-classifications like A, B, C
- Shifts: Morning, Day, Evening schedules
- Groups: Broad educational domains like Arts, Science, Business
- Departments: Specialized subjects under each group
The table allows quick review of the class-wise academic structure and provides options to activate/deactivate or edit configurations.
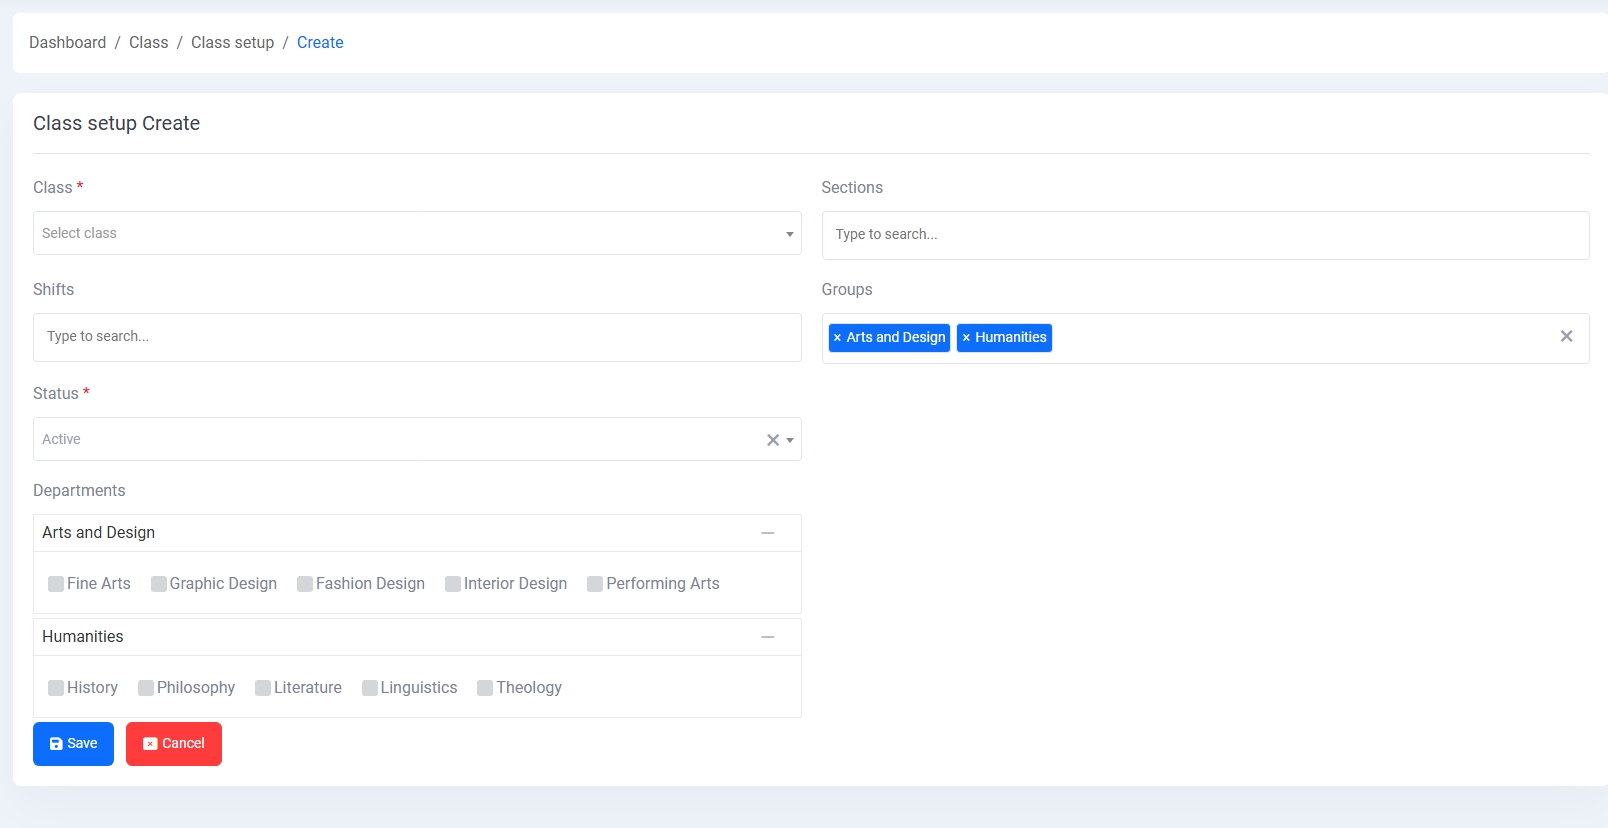
Class Setup Create:
This form enables admins to create or update class configurations. Required fields include:
- Class: Selection from available classes
- Sections and Shifts: Multi-select fields for student division and session timing
- Status: Marks the setup as active or inactive
- Groups & Departments: Admins can assign multiple groups, and then pick relevant departments from each
Once configured, these setups ensure that student enrollment, routine setup, and academic planning work seamlessly with class definitions.
Subject Management
The Subject Management module is designed to handle all academic subject-related configurations, including subject definitions, grouping, and teacher assignments.
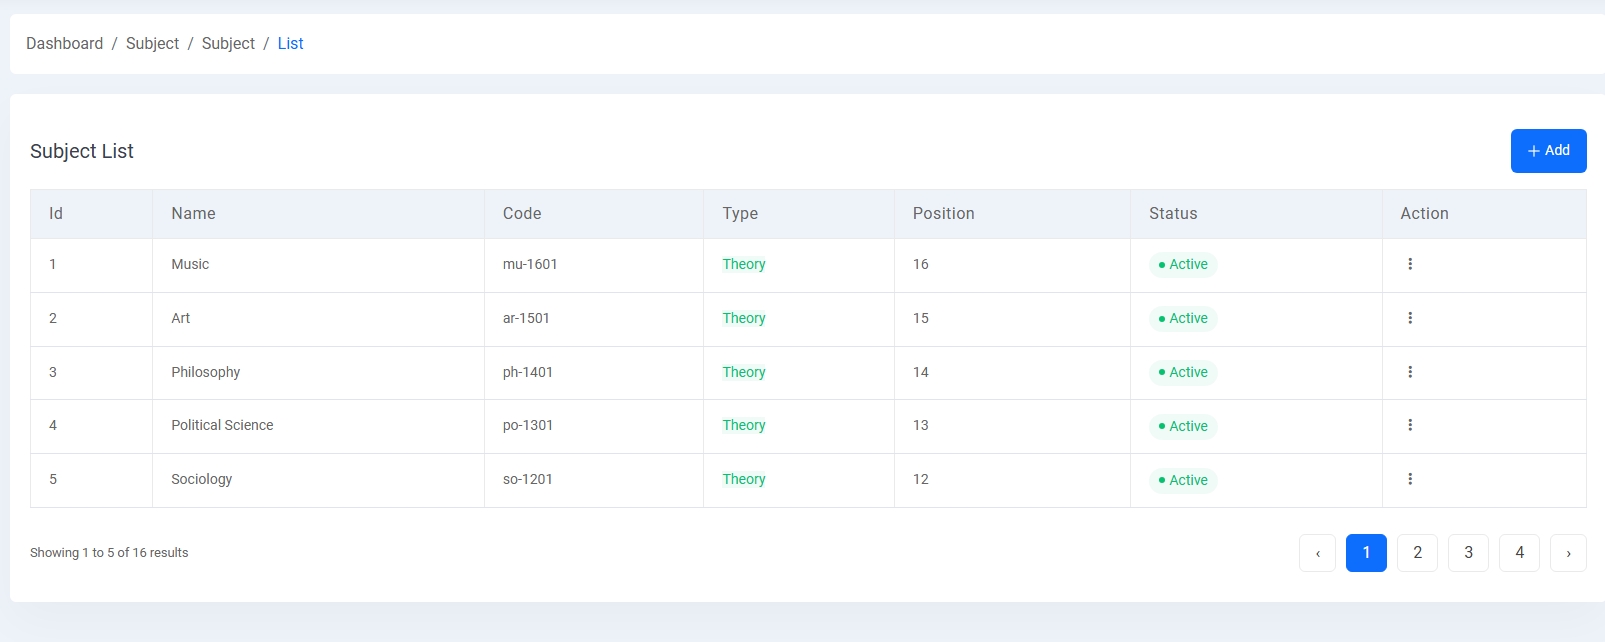
1. Subject List:
Displays the list of all available academic subjects. Each subject includes:
- Name (e.g., Art, Philosophy)
- Code (e.g., ar-1501)
- Type (Theory/Practical)
- Position (for ordered display)
- Status (Active/Inactive)
This list supports pagination and quick access for edits.
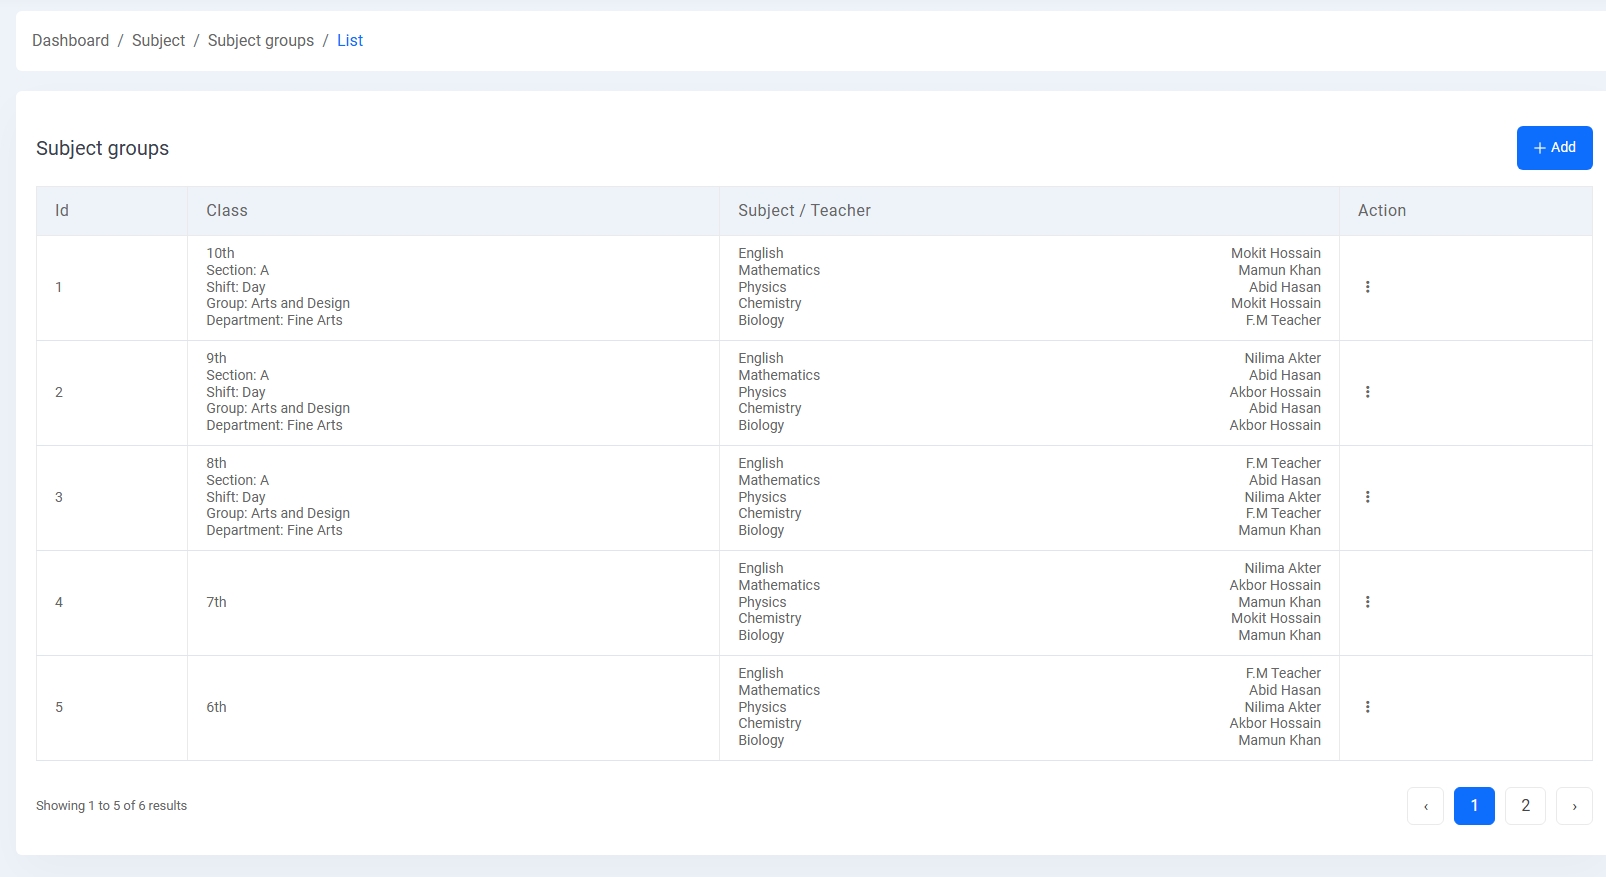
2. Subject Groups:
This screen organizes subjects based on class, section, shift, group, and department. For each row, the assigned subjects and their respective teachers are listed. This grouping ensures that each class section has the correct teacher mapped to each subject.
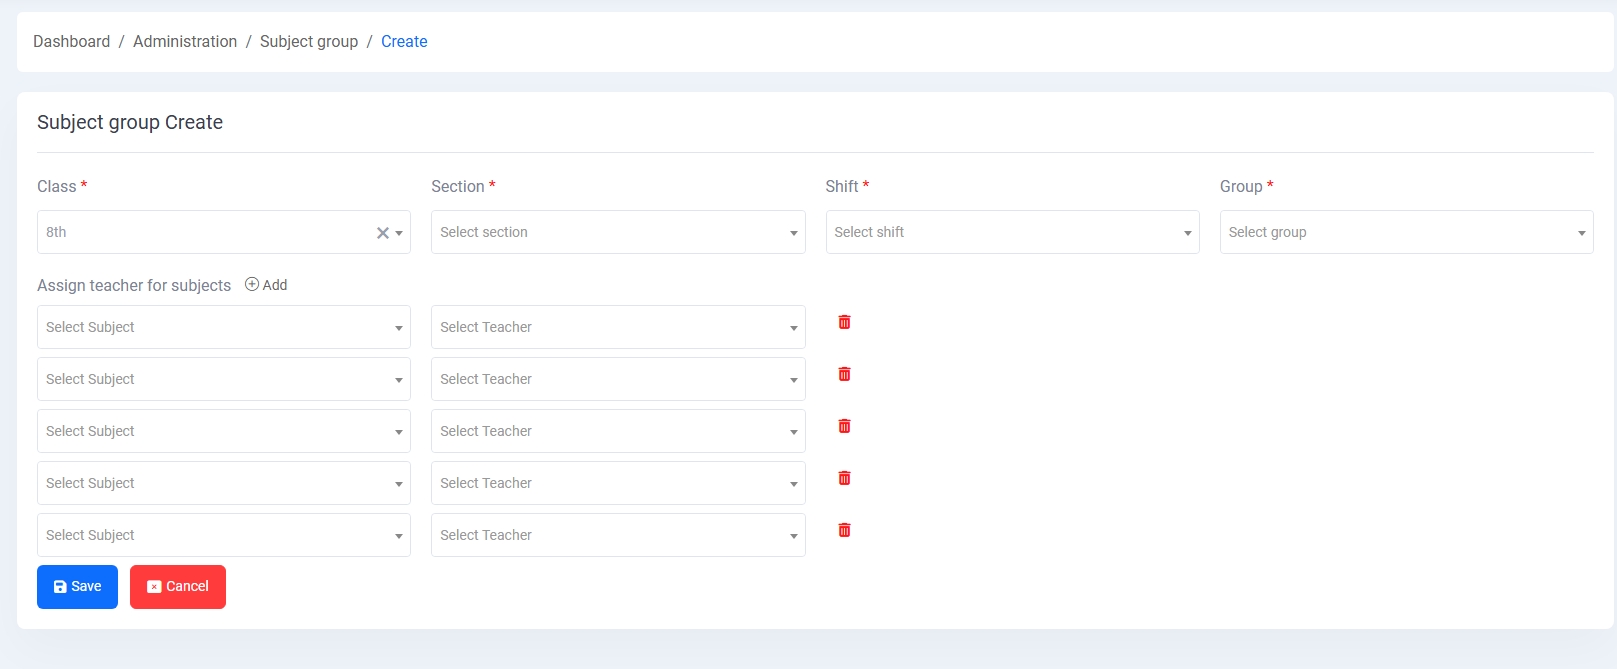
3. Subject Group Create:
Enables the assignment of subjects to a specific class section. Admins must define:
- Class, Section, Shift, Group: The academic context for the subjects
- Subjects: Selected from the master list
- Teachers: Assigned individually per subject
Multiple subjects can be assigned in one go using dynamic add/remove controls. This form ensures structured subject distribution and clear accountability for teaching staff.
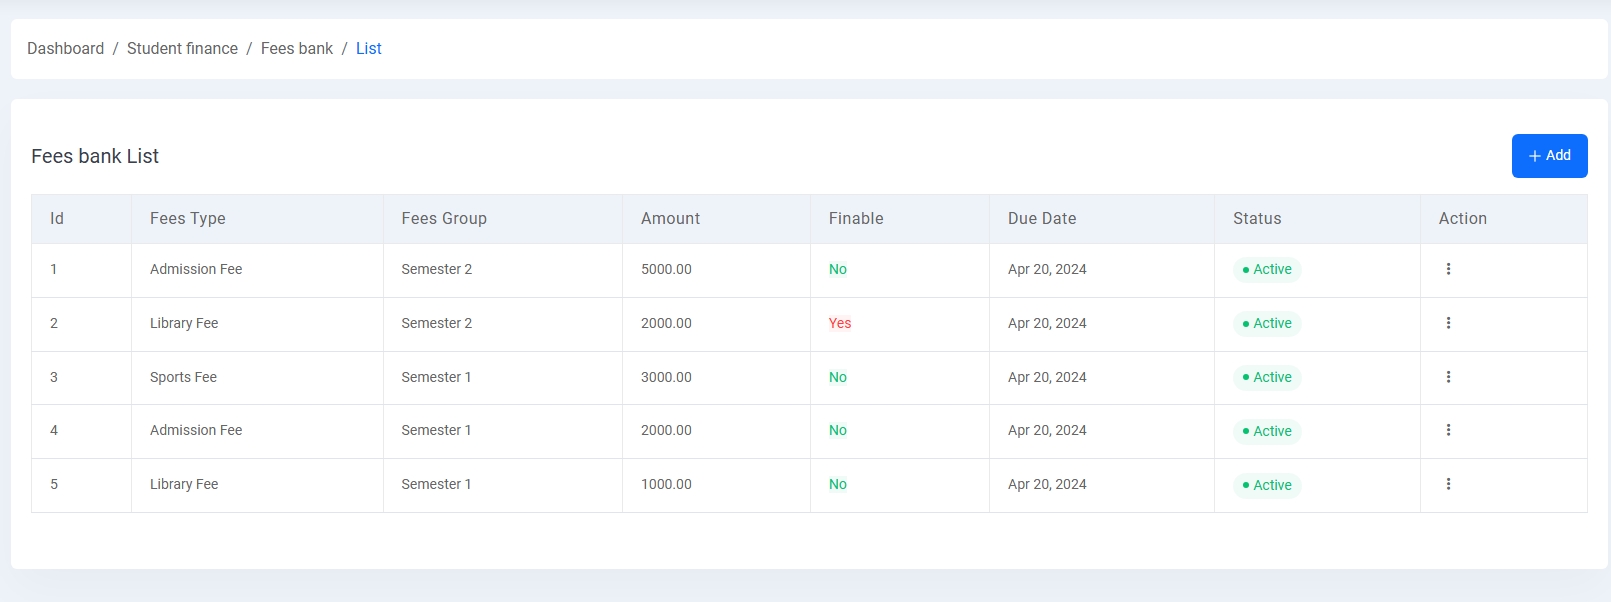
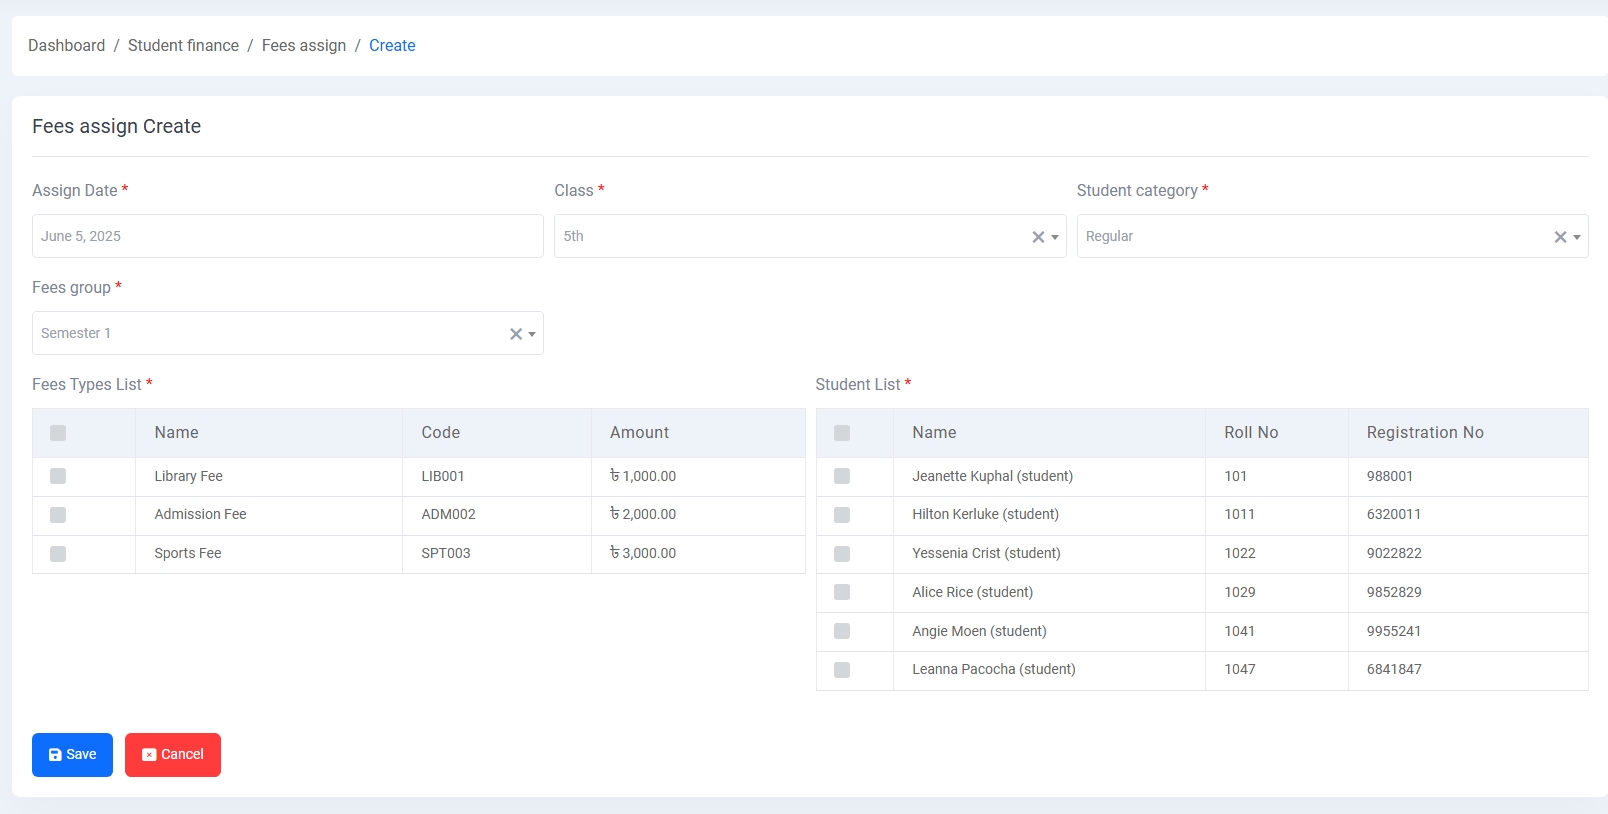
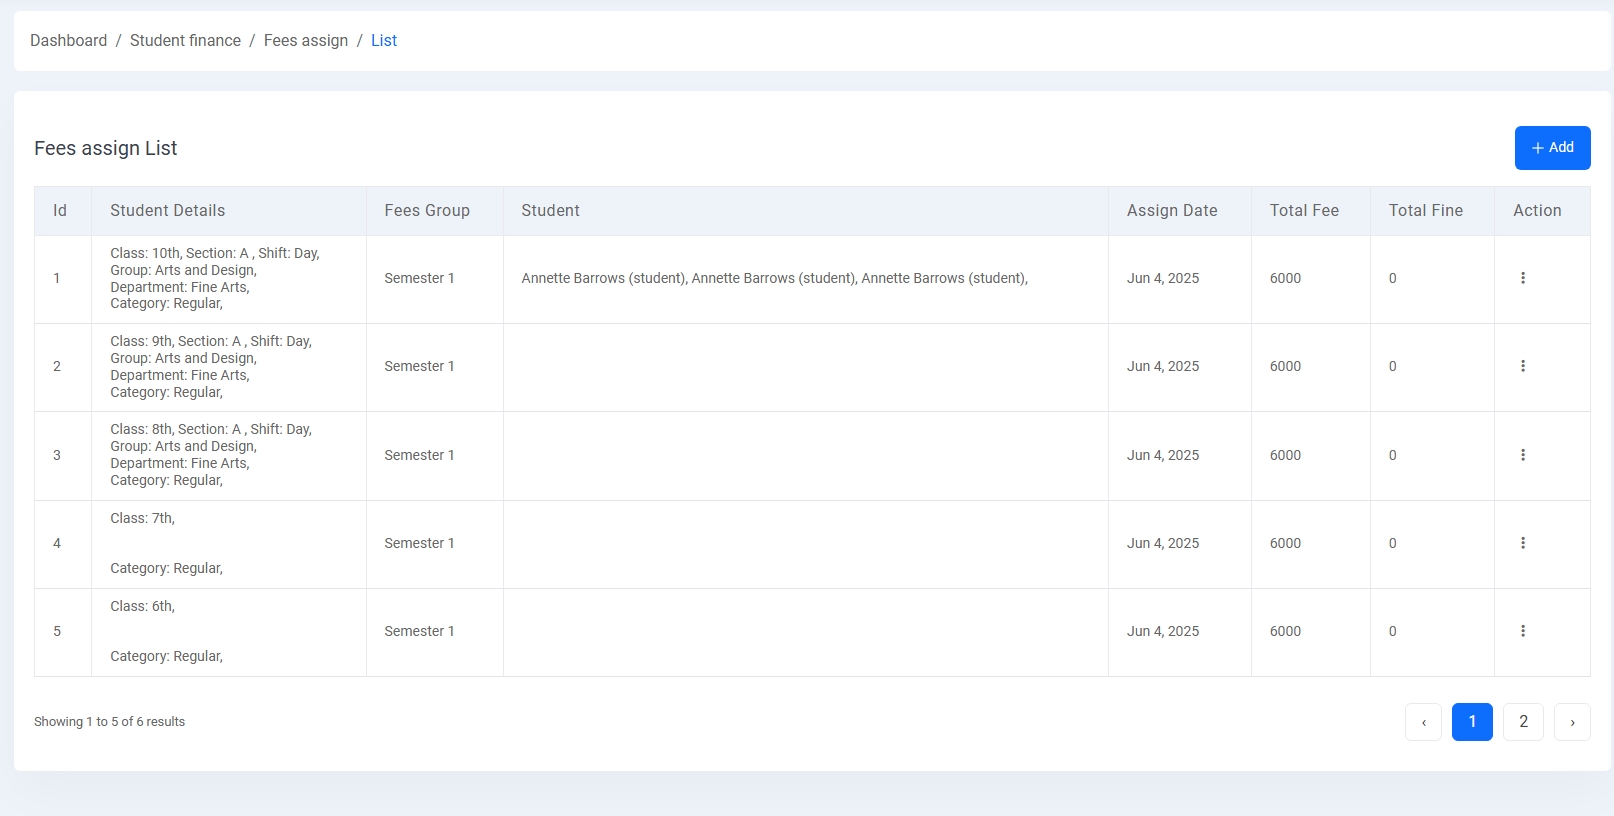
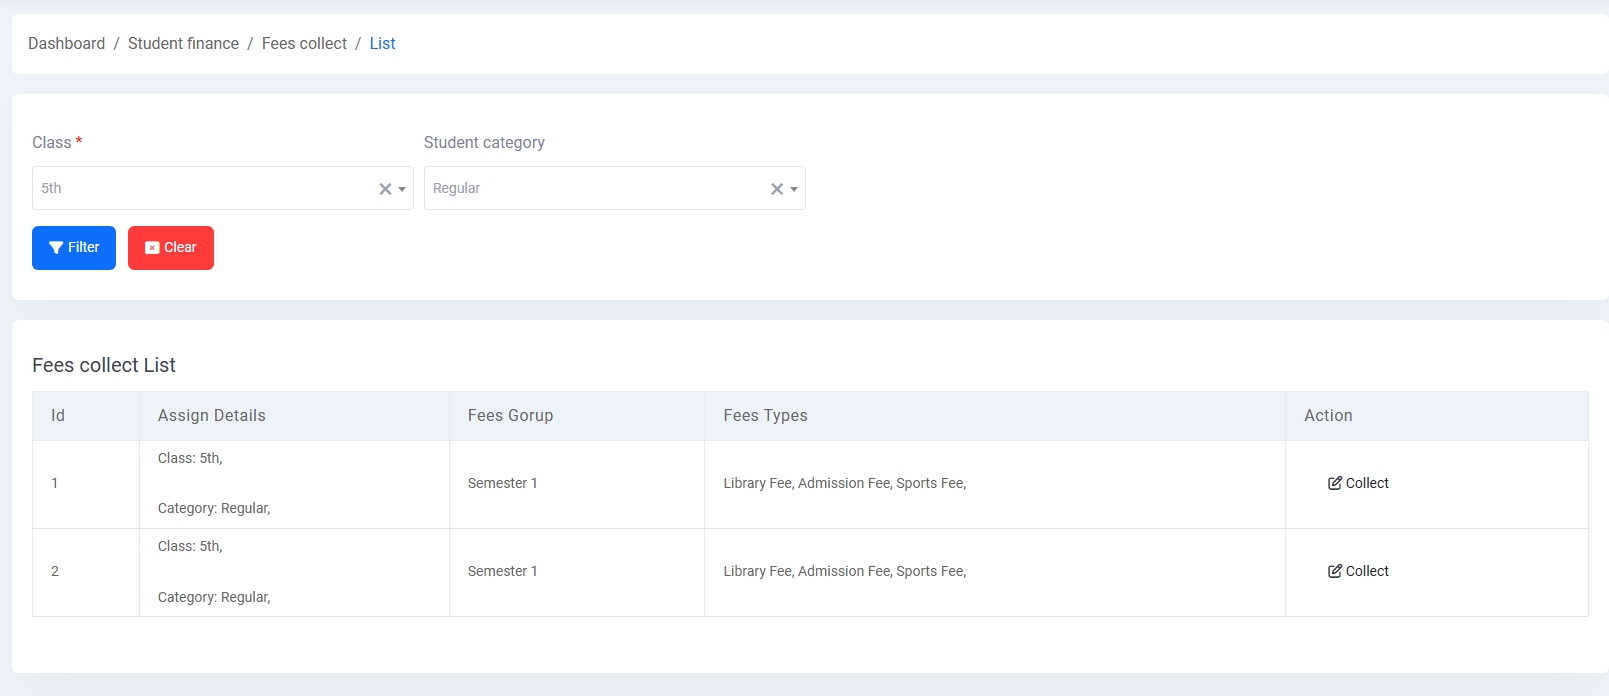
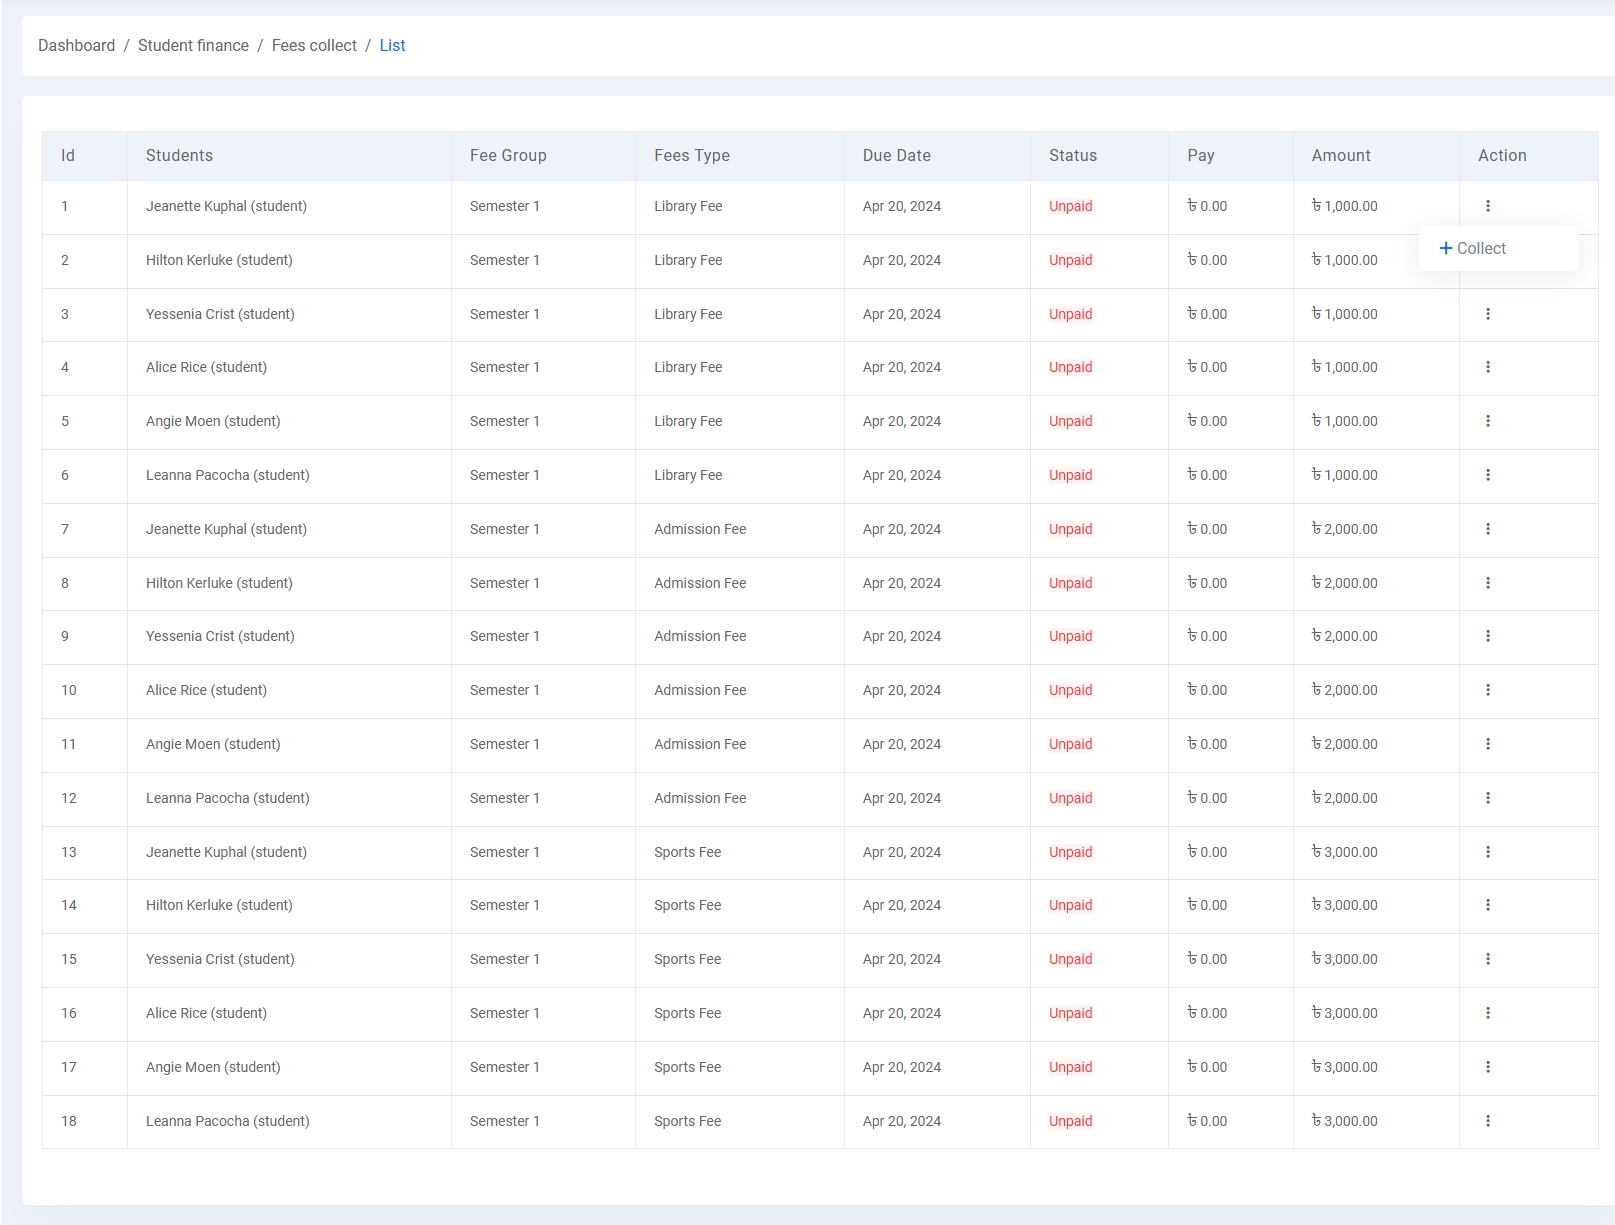
Fees Collection
The Fees Collection module allows administrators to manage, assign, and collect student fees efficiently. It consists of several interconnected components designed for flexibility and transparency.
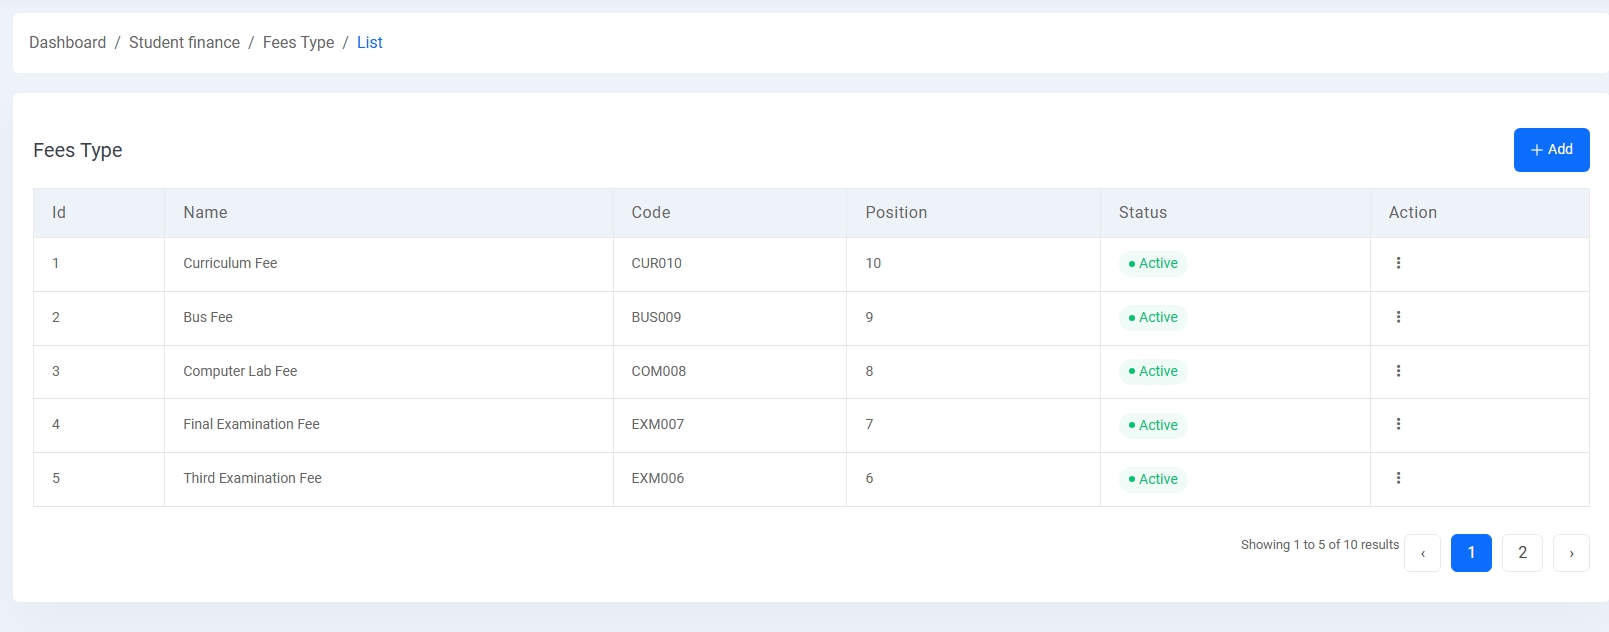
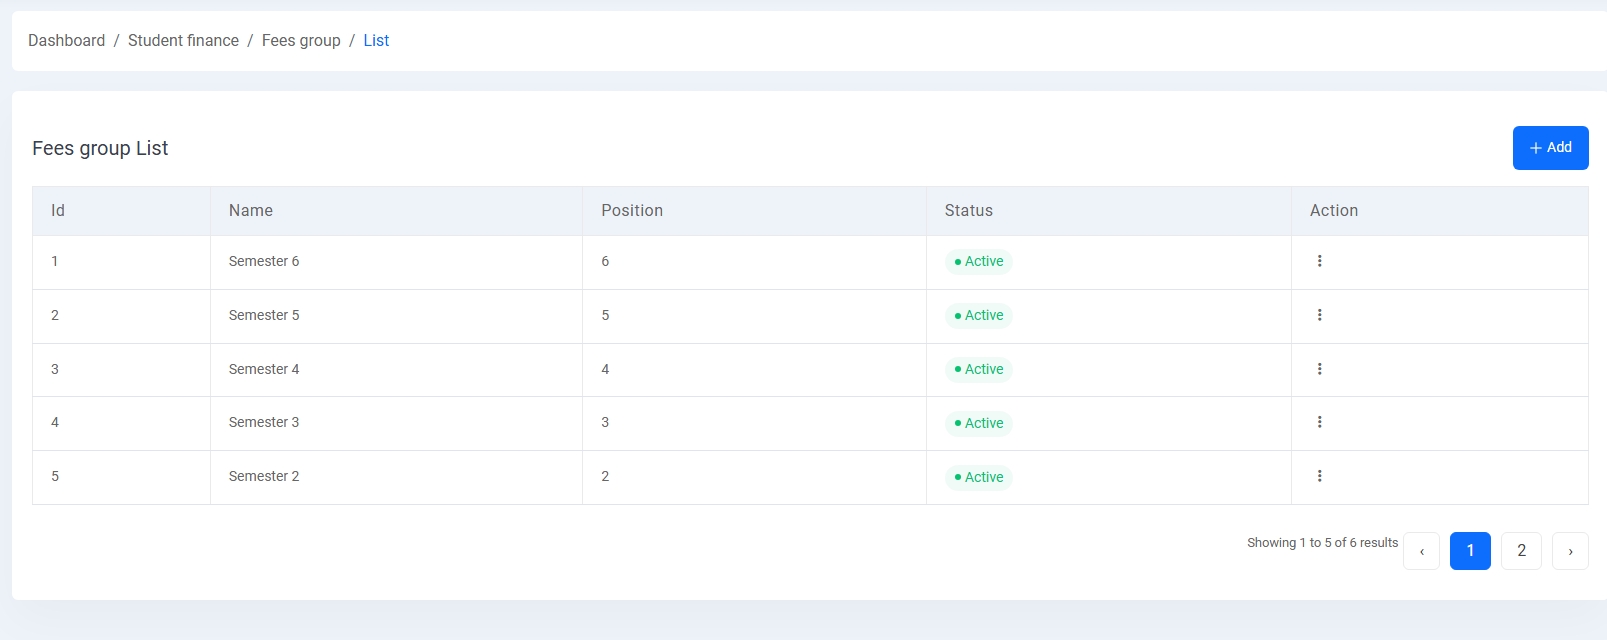
Step 1 – Define Fees Bank:
Create various fee types (e.g., Admission, Library, Sports) under specific fee groups (like semesters). Set the amount, due date, and whether the fee is finable or not.
Step 2 – Assign Fees:
Select a class and student category. Choose the relevant fee group and fee types. Assign the selected fees to a list of students. This prepares the data for tracking payment status.
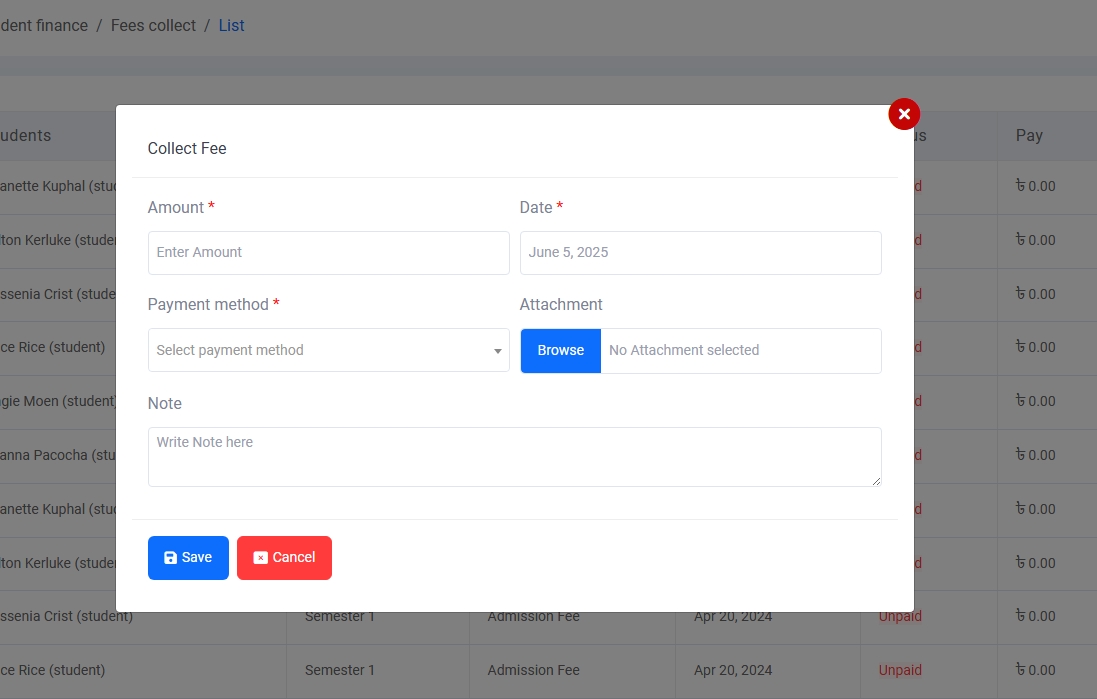
Step 3 – Collect Fees:
View unpaid dues per student under the Fees Collect List. Click on Collect to enter the amount, payment method, optional attachment, and notes. Save the entry to record payment.
Step 4 – Monitor Status:
Keep track of unpaid, partially paid, and paid statuses along with total amount and due date to ensure timely follow-ups and financial reporting.

Office Finance
The Office Finance module manages organizational financial operations such as bank information, account heads, bank accounts, incomes, and expenses. This section helps streamline financial tracking and reporting.
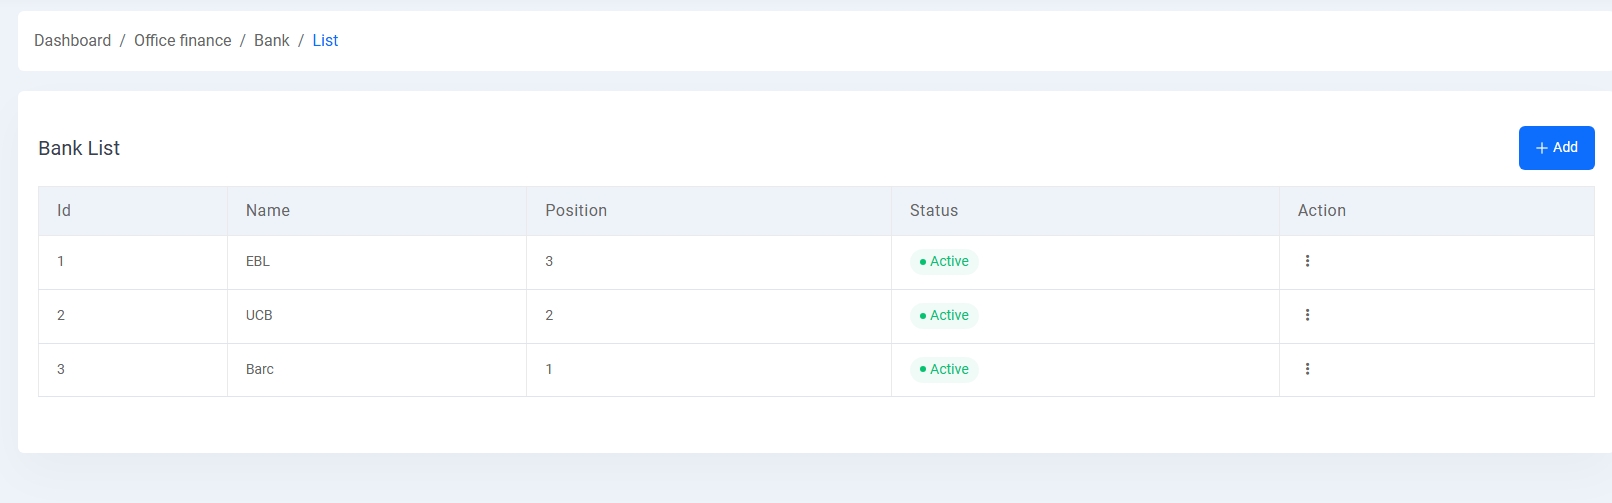
1. Bank List:
Displays a list of banks including name, position, and status. Admins can add, edit, or delete bank records.
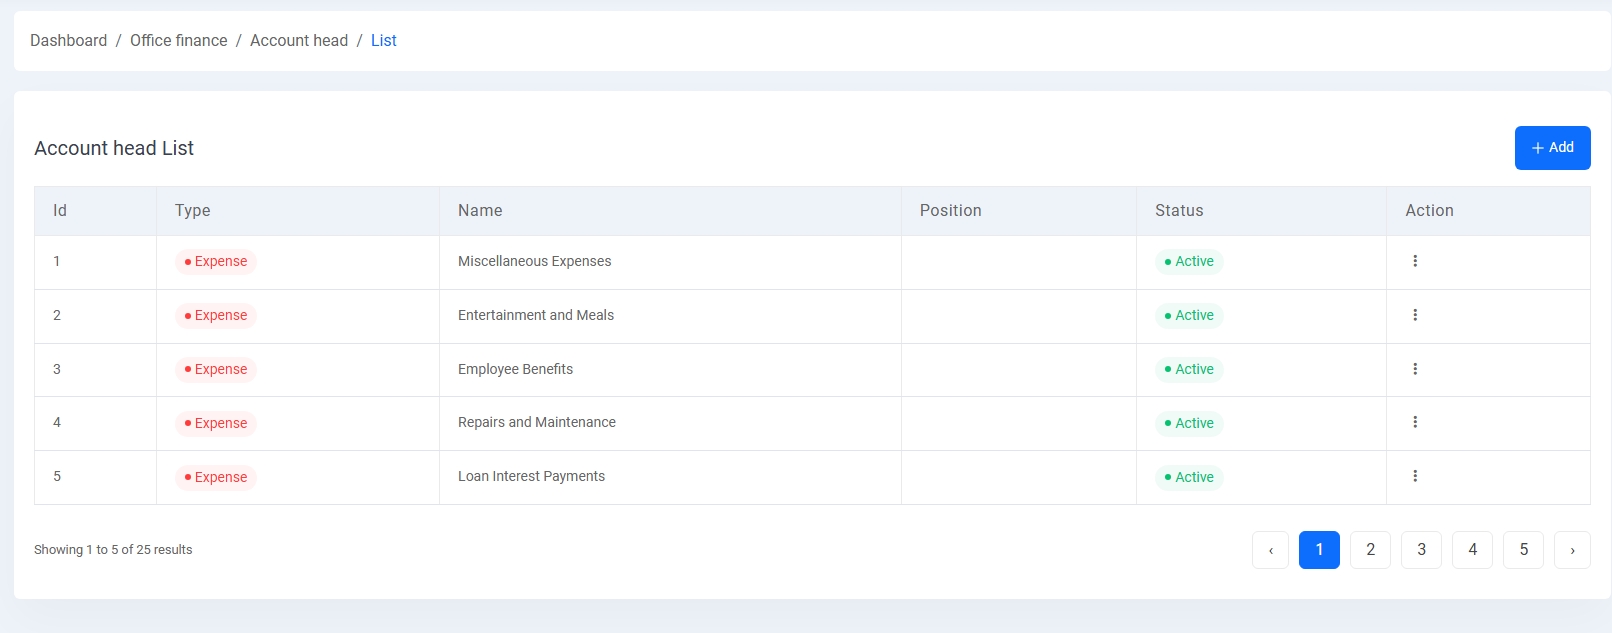
2. Account Head List:
Shows financial categories like "Expense" or "Income" with associated names and statuses. Users can create and manage account types relevant to their operations.
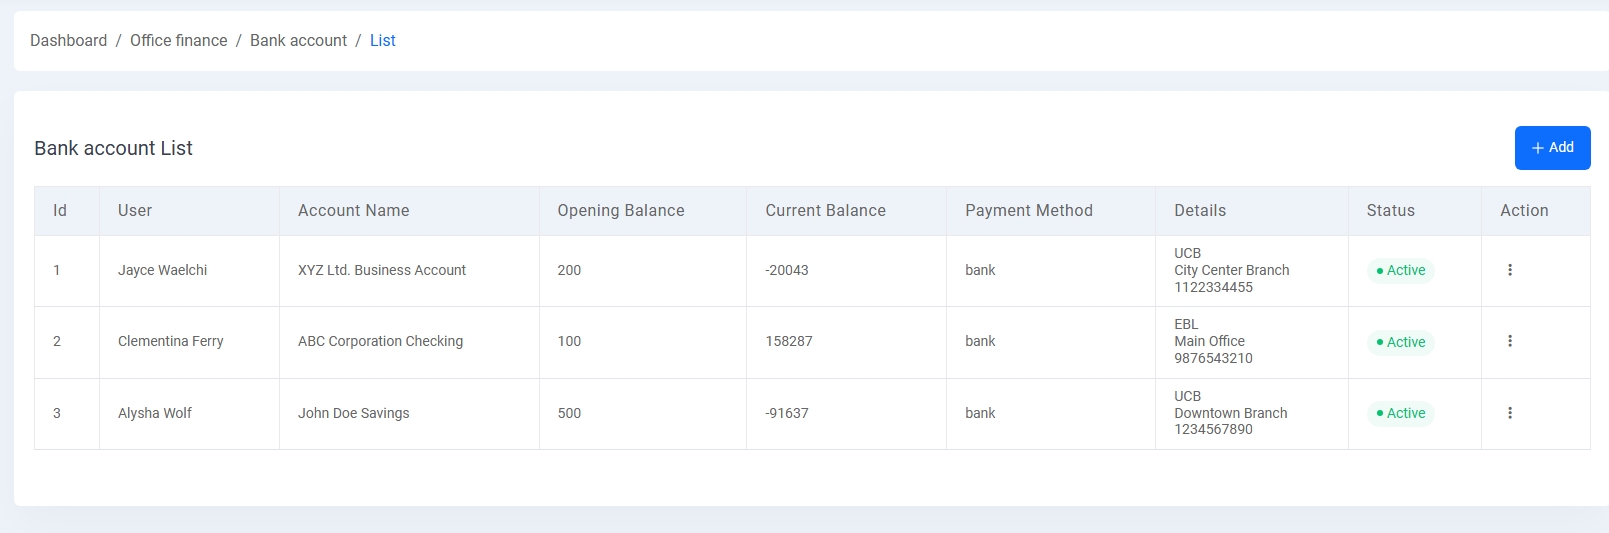
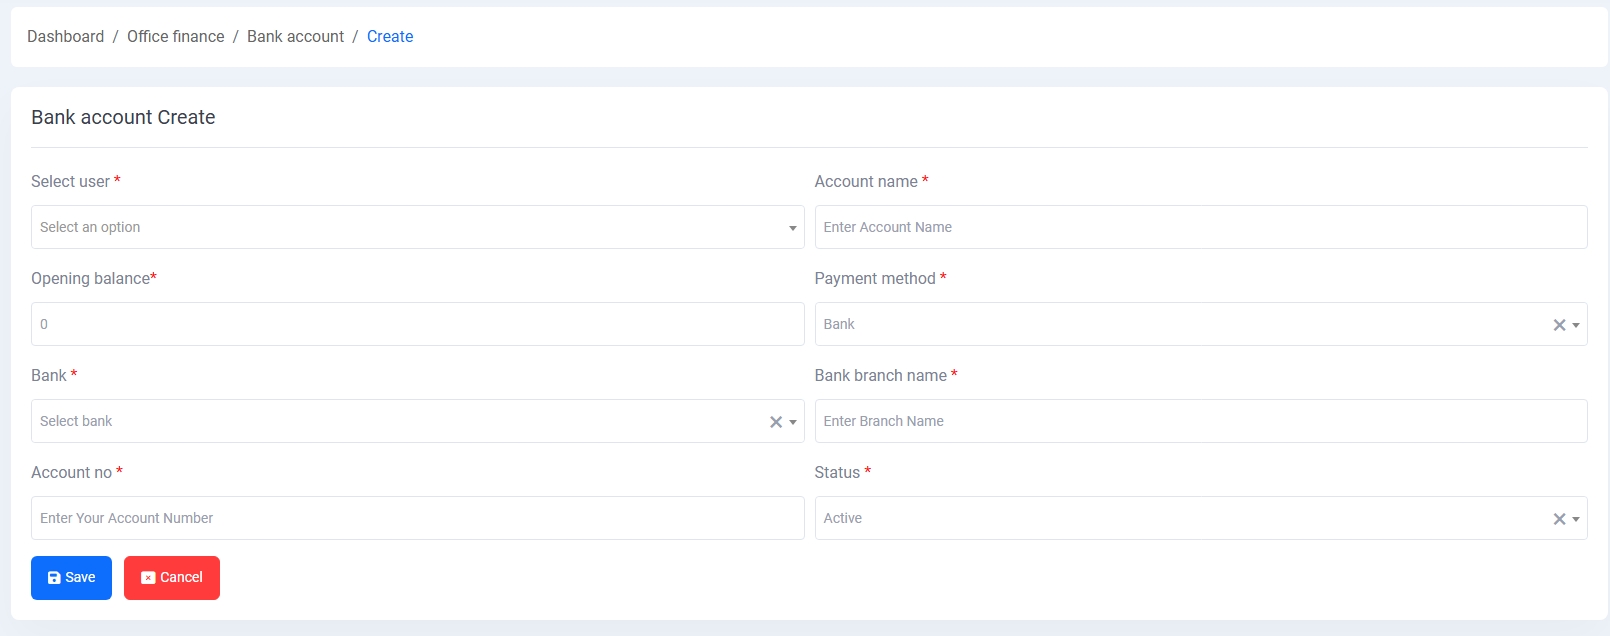
3. Bank Account List:
Presents all bank accounts with details such as account name, user, opening and current balance, payment method, and branch info. Admins can create new accounts with proper credentials and assign them to users.
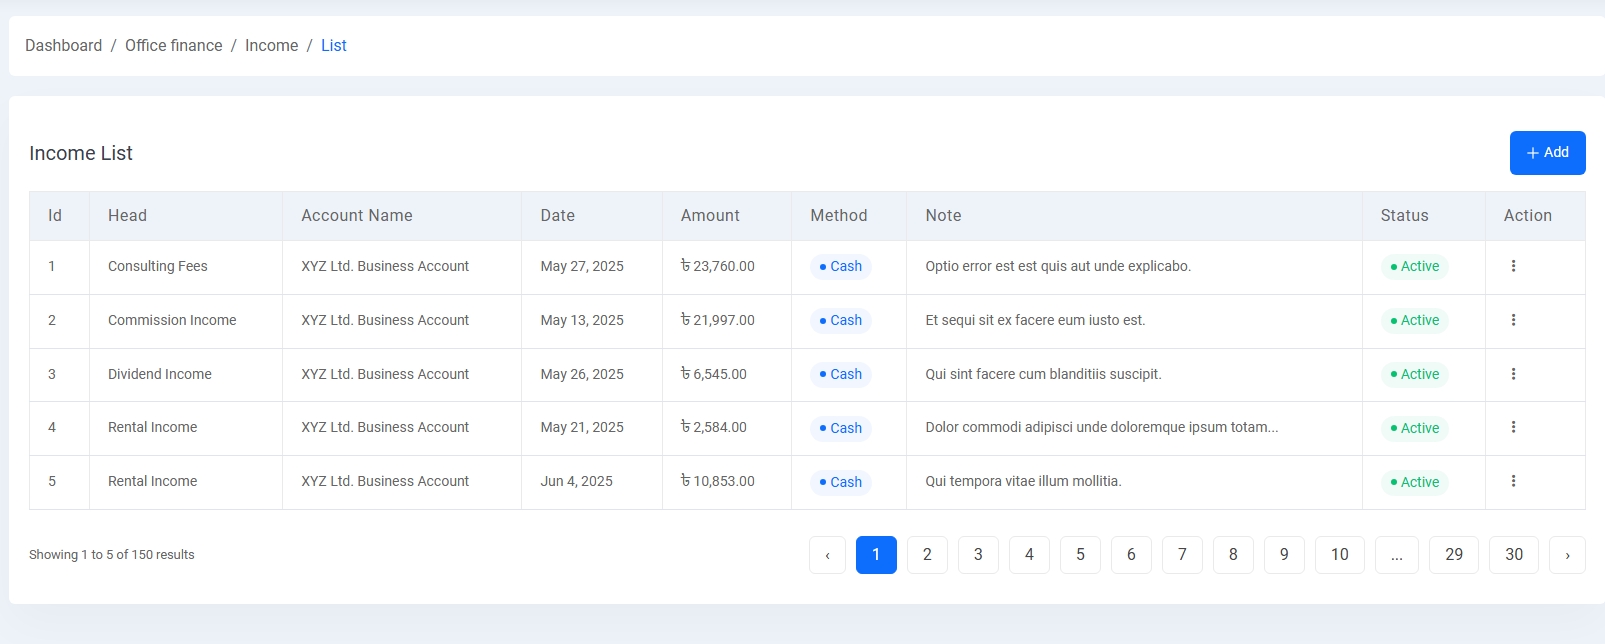
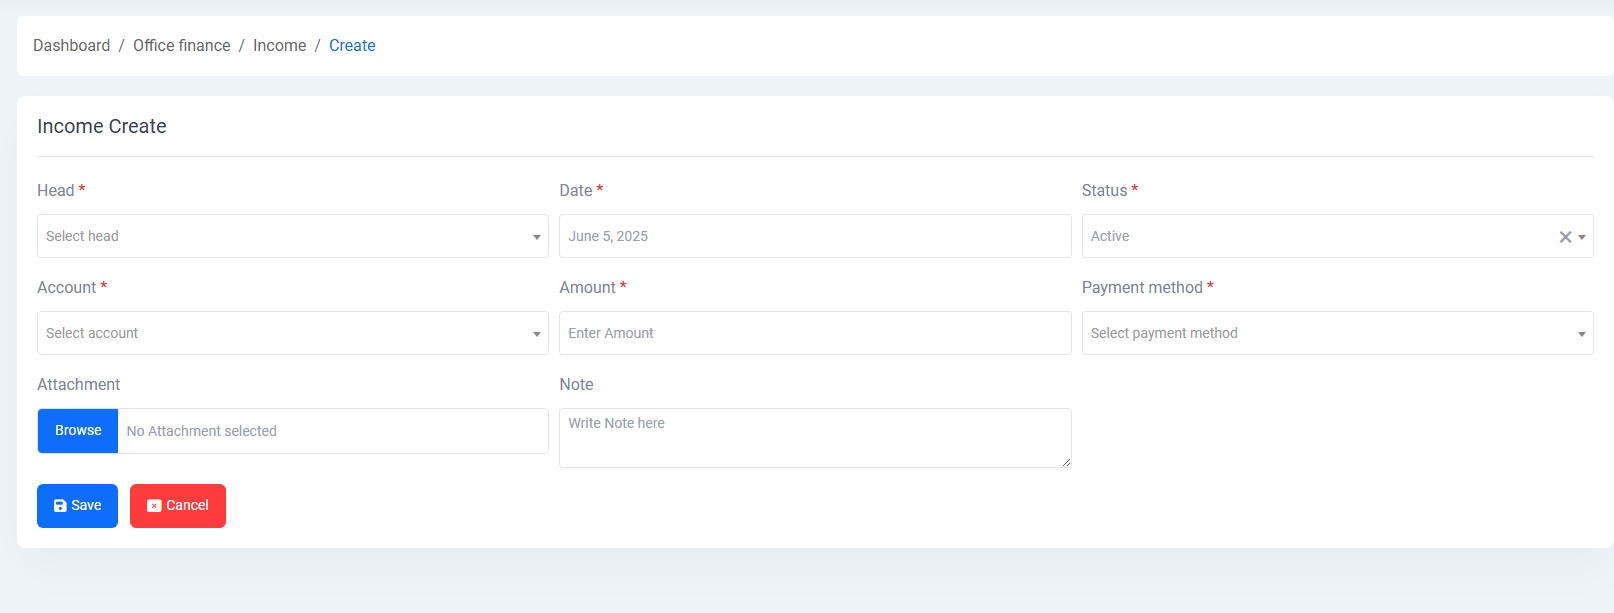
4. Income List:
Records all income transactions, including head, account, amount, method (e.g., Cash, Bank), and optional notes. Entries can be added, edited, and managed based on status.
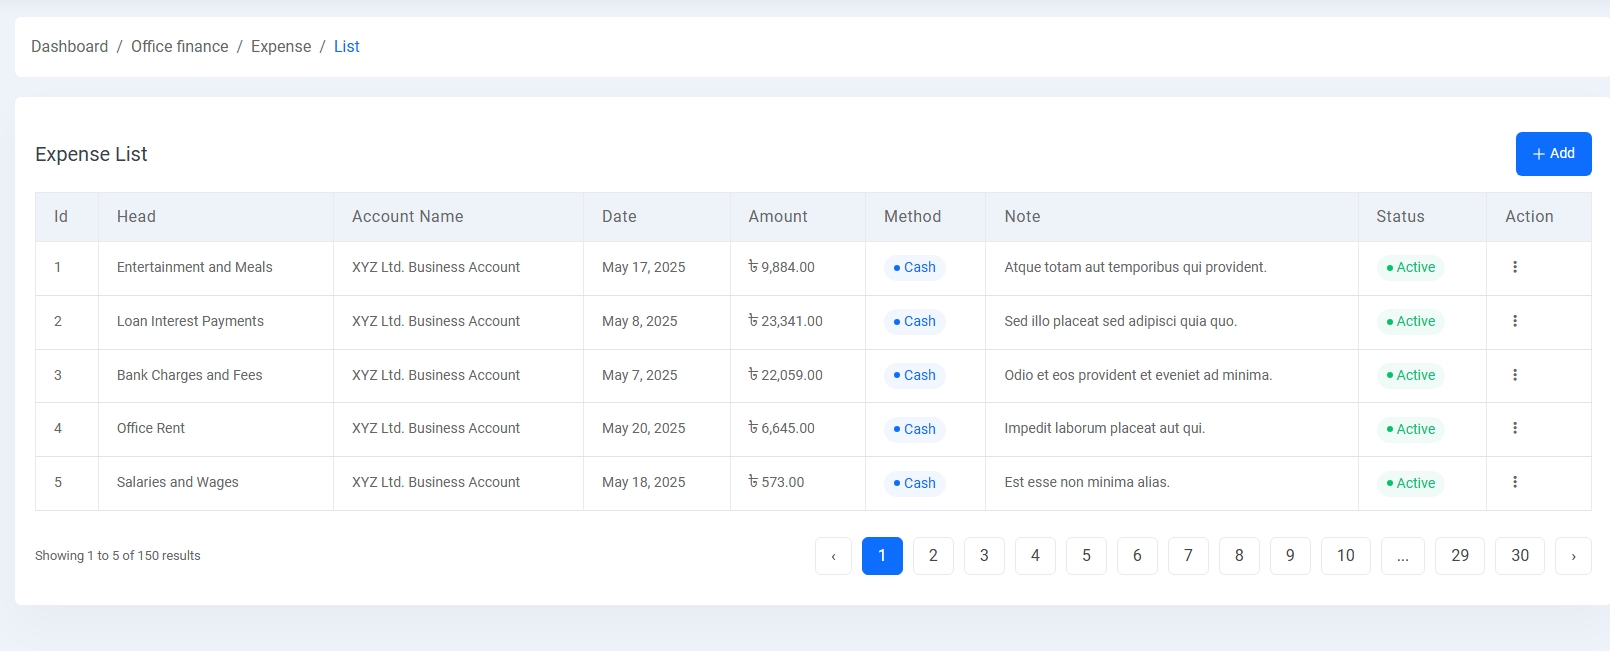
5. Expense List:
Tracks all outgoing transactions like rent, wages, or interest payments. Includes fields such as account, head, amount, date, method, and status.
Creating Entries:
Every financial module (bank, income, expense, etc.) comes with a form where you can add new entries. Forms typically include fields marked with * for required info, like status, method, amount, and account or bank name.
This module ensures efficient tracking of financial activities and enhances transparency within the system.
Exam Management
The Exam Management module enables administrators to plan, organize, and evaluate student assessments effectively.
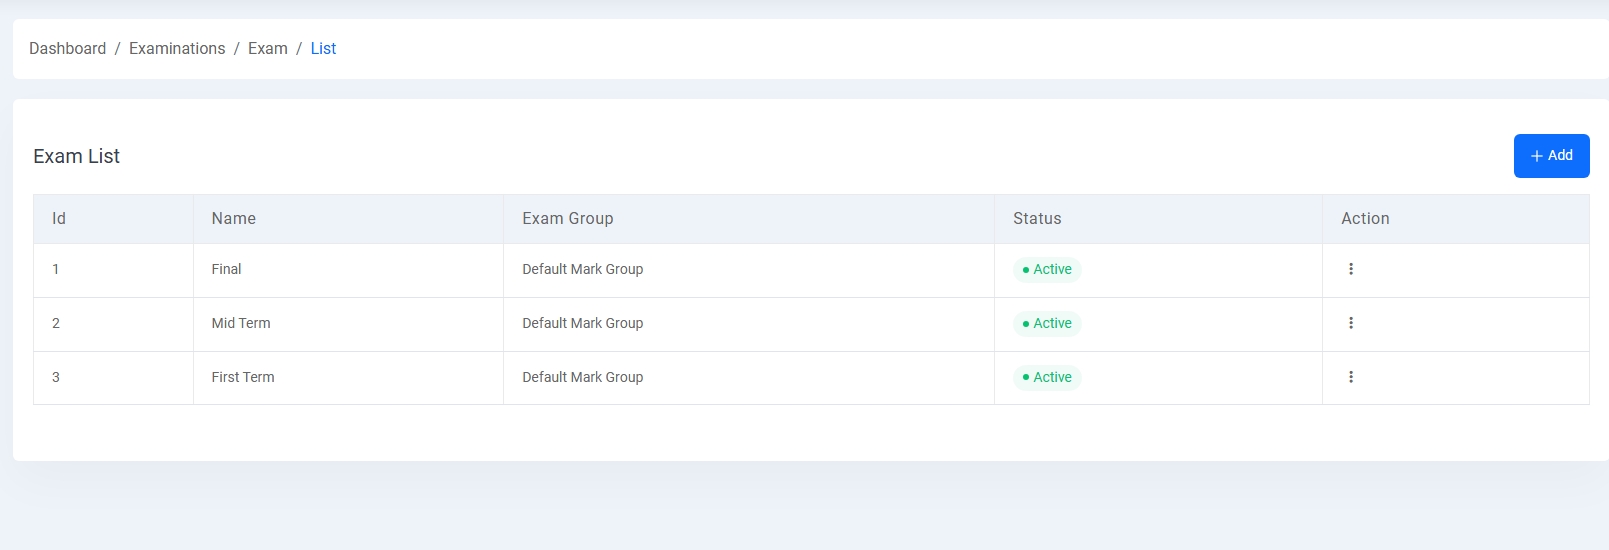
1. Exam List:
Lists all exams such as Final, Mid Term, and First Term with associated Exam Groups and status.
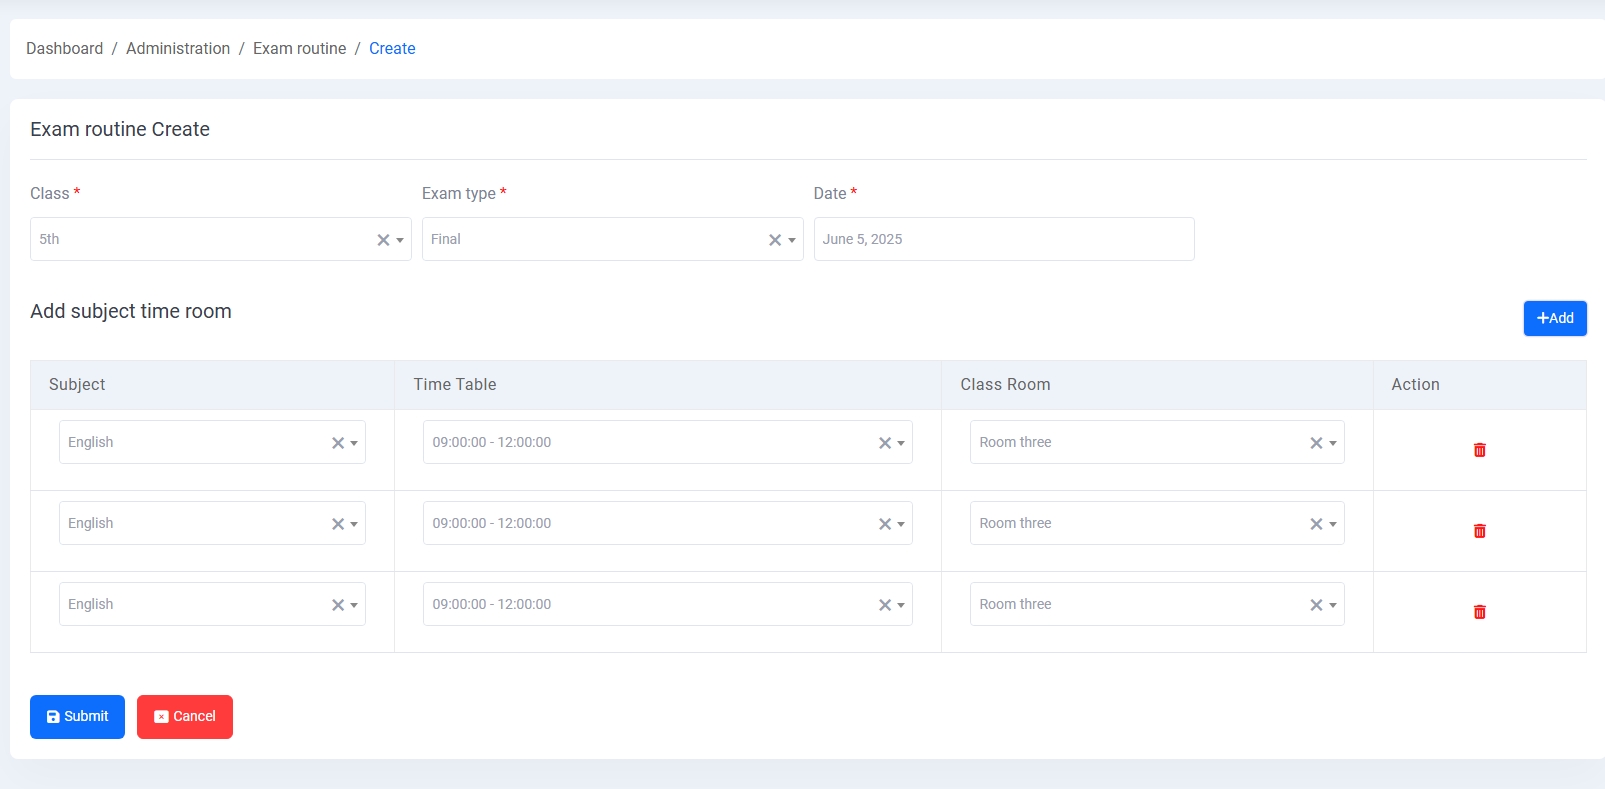
2. Exam Routine:
Admins can create routines by selecting class, exam type, date, subject, time table, and classroom. Subjects can be added dynamically.
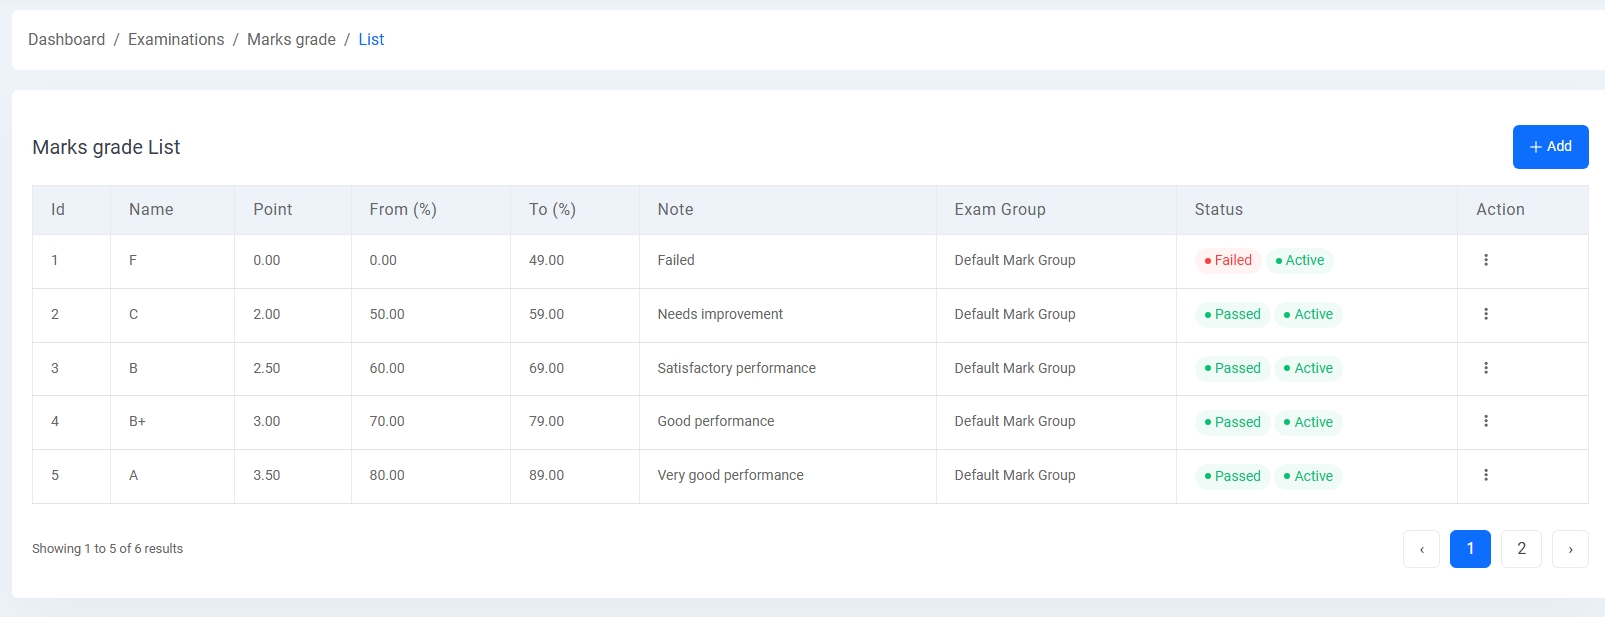
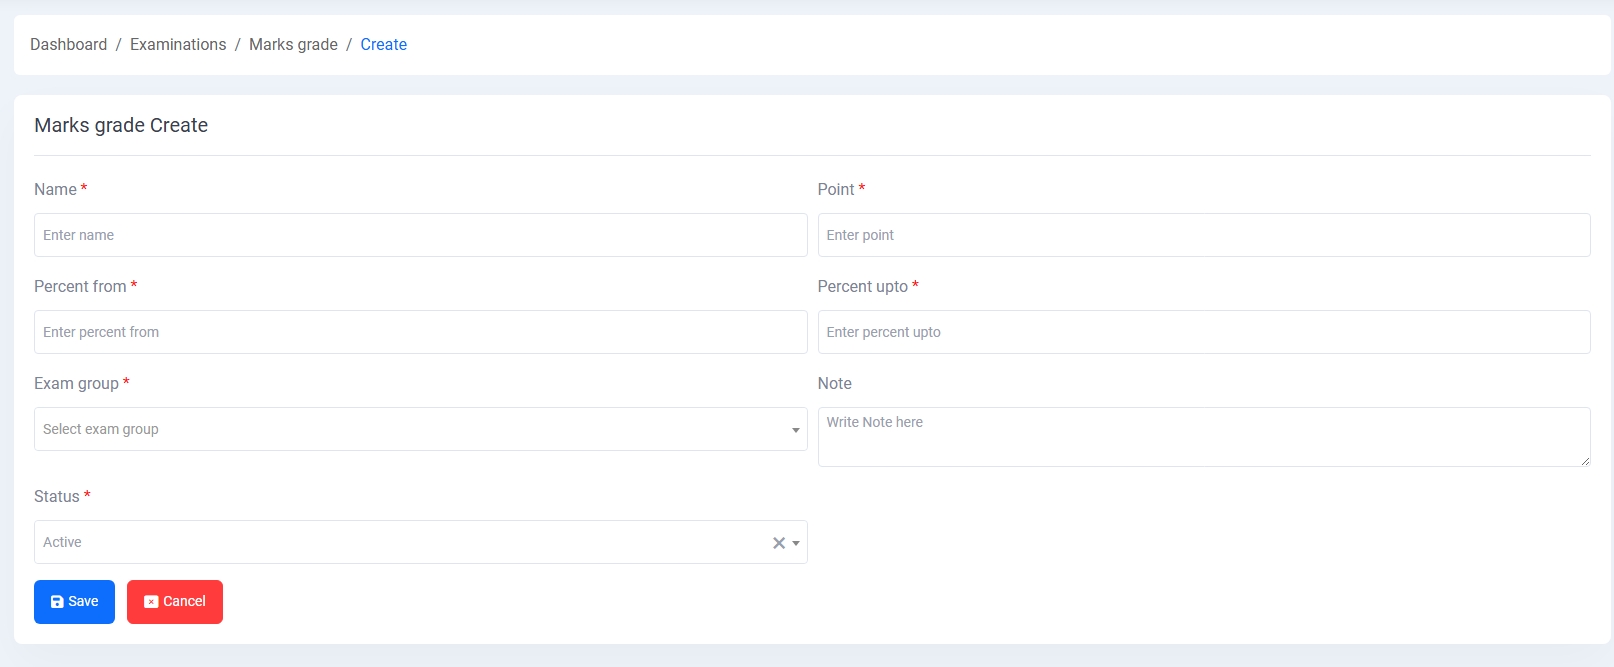
3. Marks Grade:
Enables setting up grading criteria with points, percentage ranges, notes, and status (e.g., Passed, Failed).
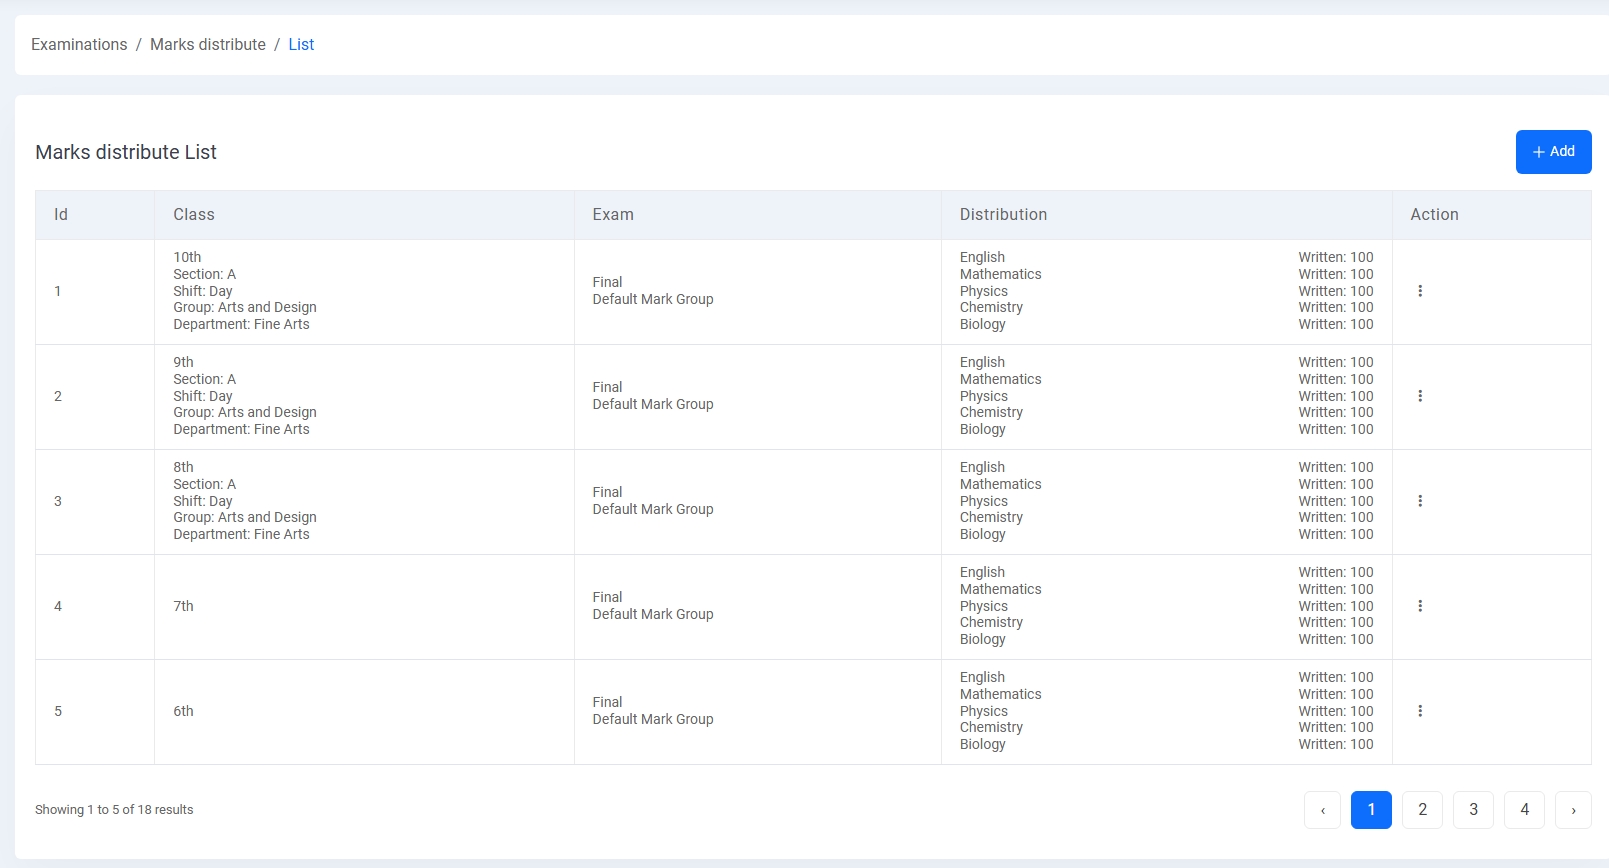
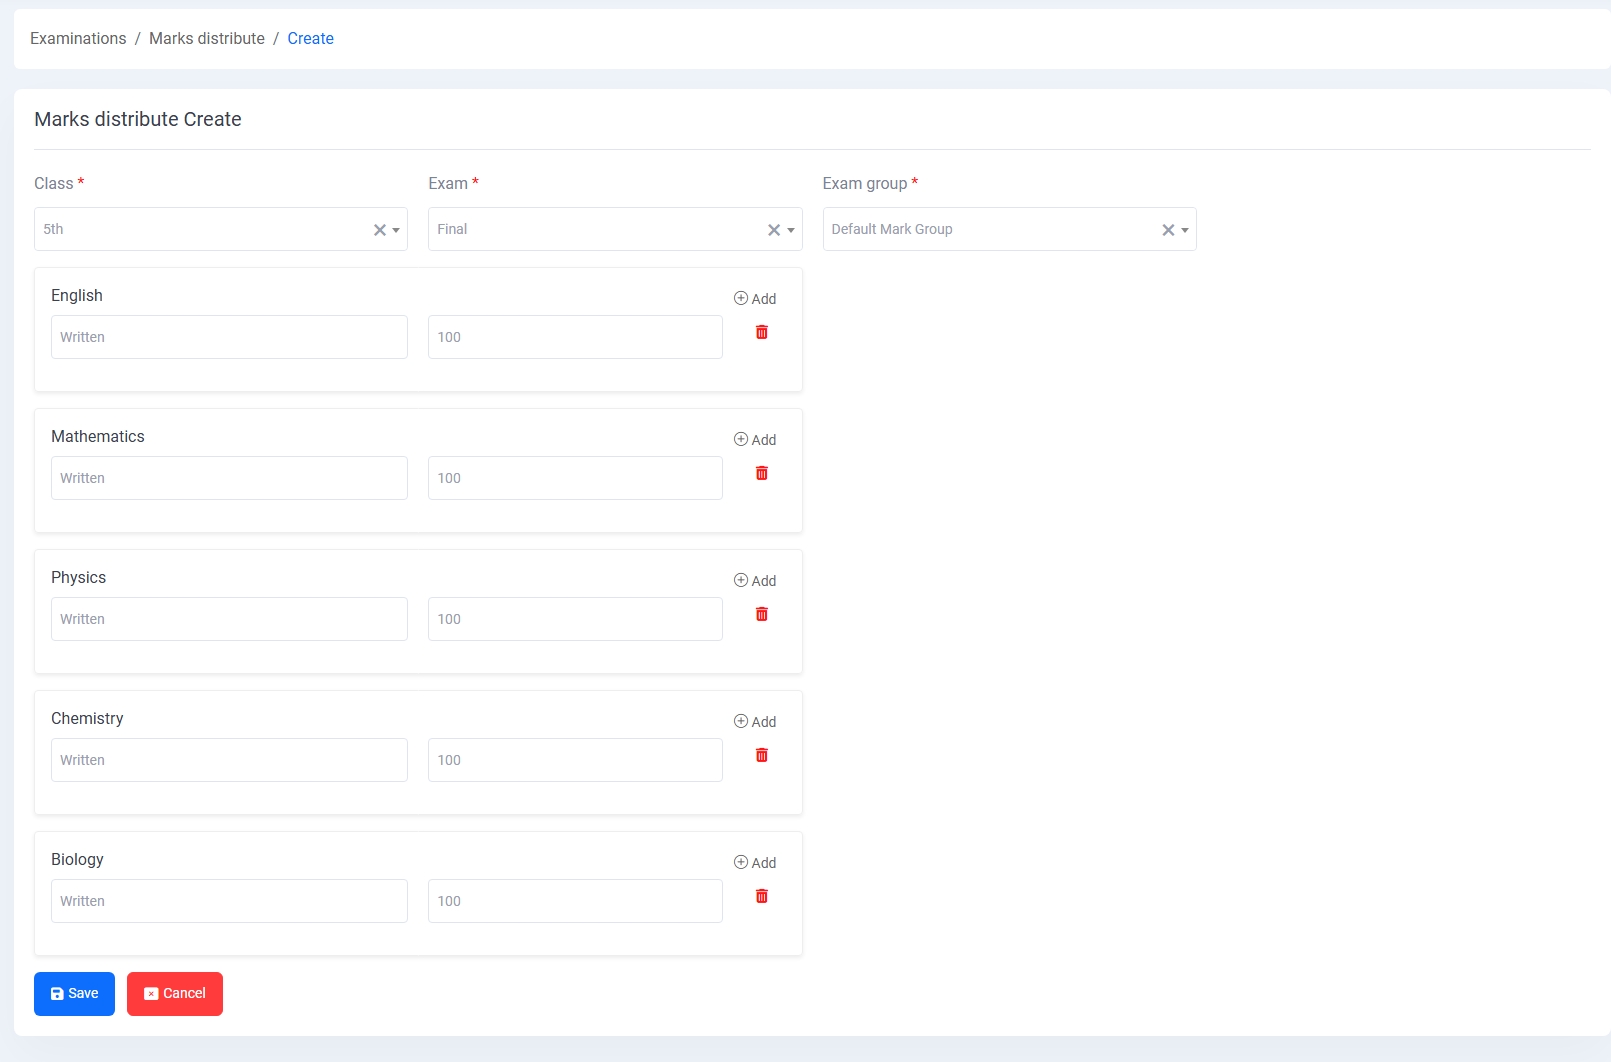
4. Marks Distribution:
Facilitates the configuration of subject-wise mark types (e.g., Written) and total marks for each class, exam, and exam group. This structure allows for dynamic subject and section handling.
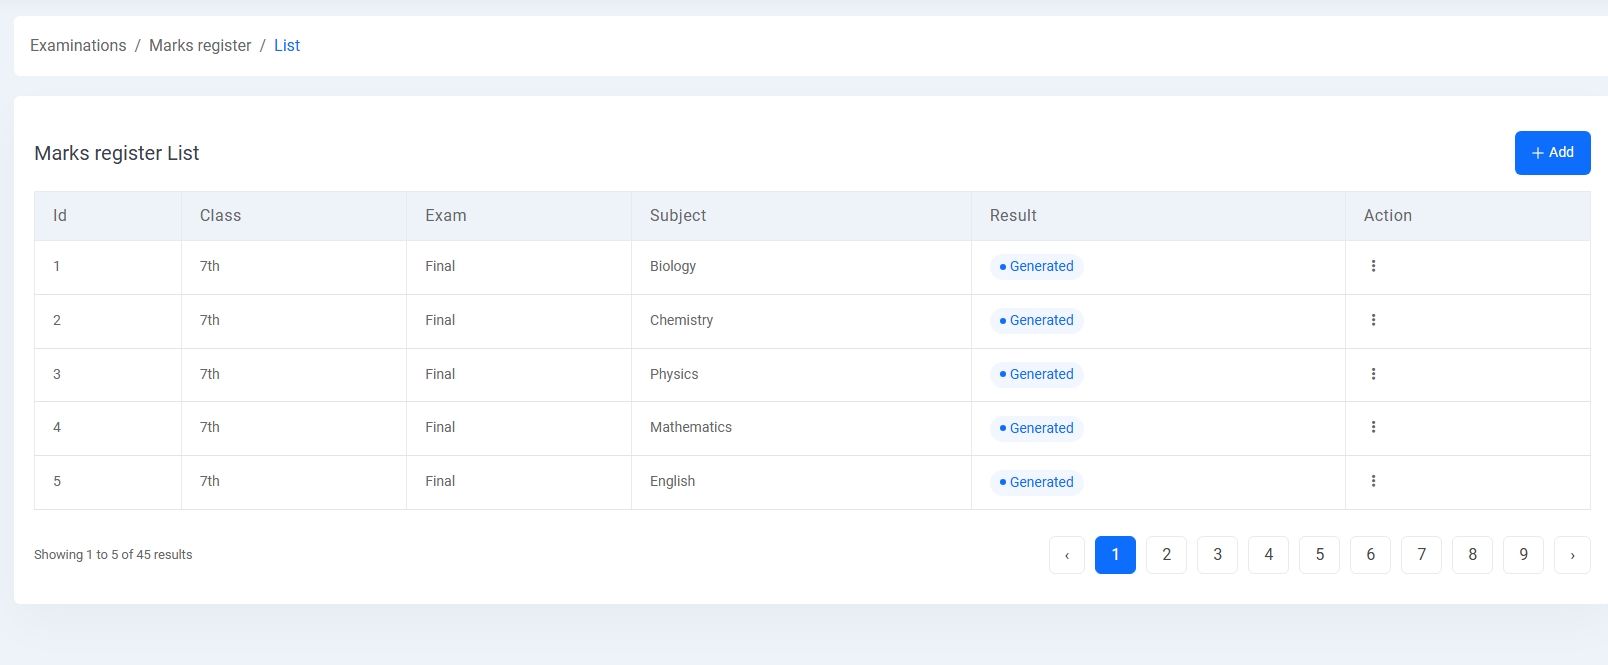
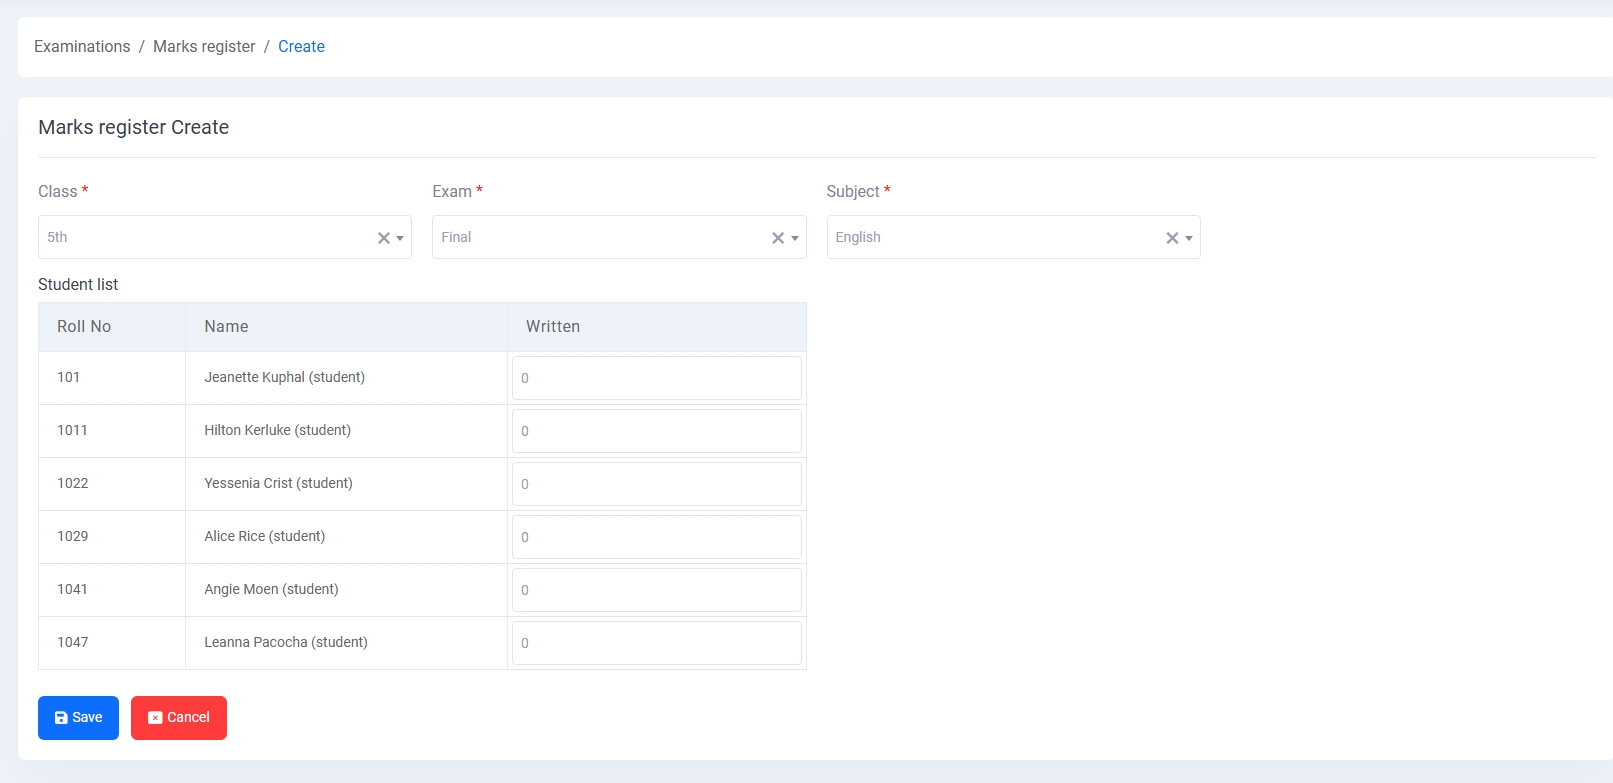
5. Marks Register:
Provides an interface to enter student-wise marks based on class, subject, and exam. Admins can manually input scores and view generated results for each subject.
Online Exam Management
The Online Exam module allows administrators to create and manage exams, questions, and assessments for students in a virtual environment. It supports dynamic question grouping, difficulty levels, and scheduling with precision.
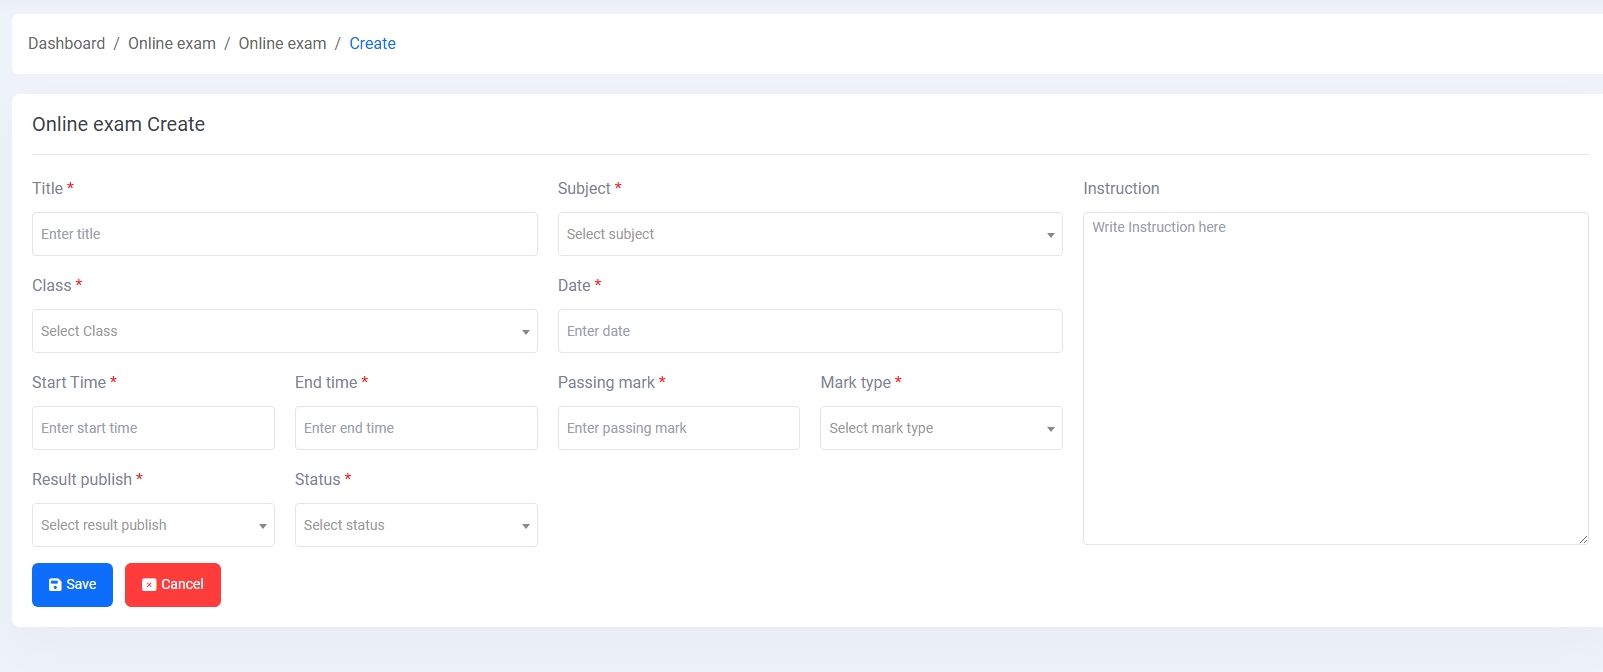
1. Online Exam Create:
Admins can define online exams by setting the title, class, subject, date, time, passing mark, mark type, and publishing status. Instructions can also be included for student guidance.
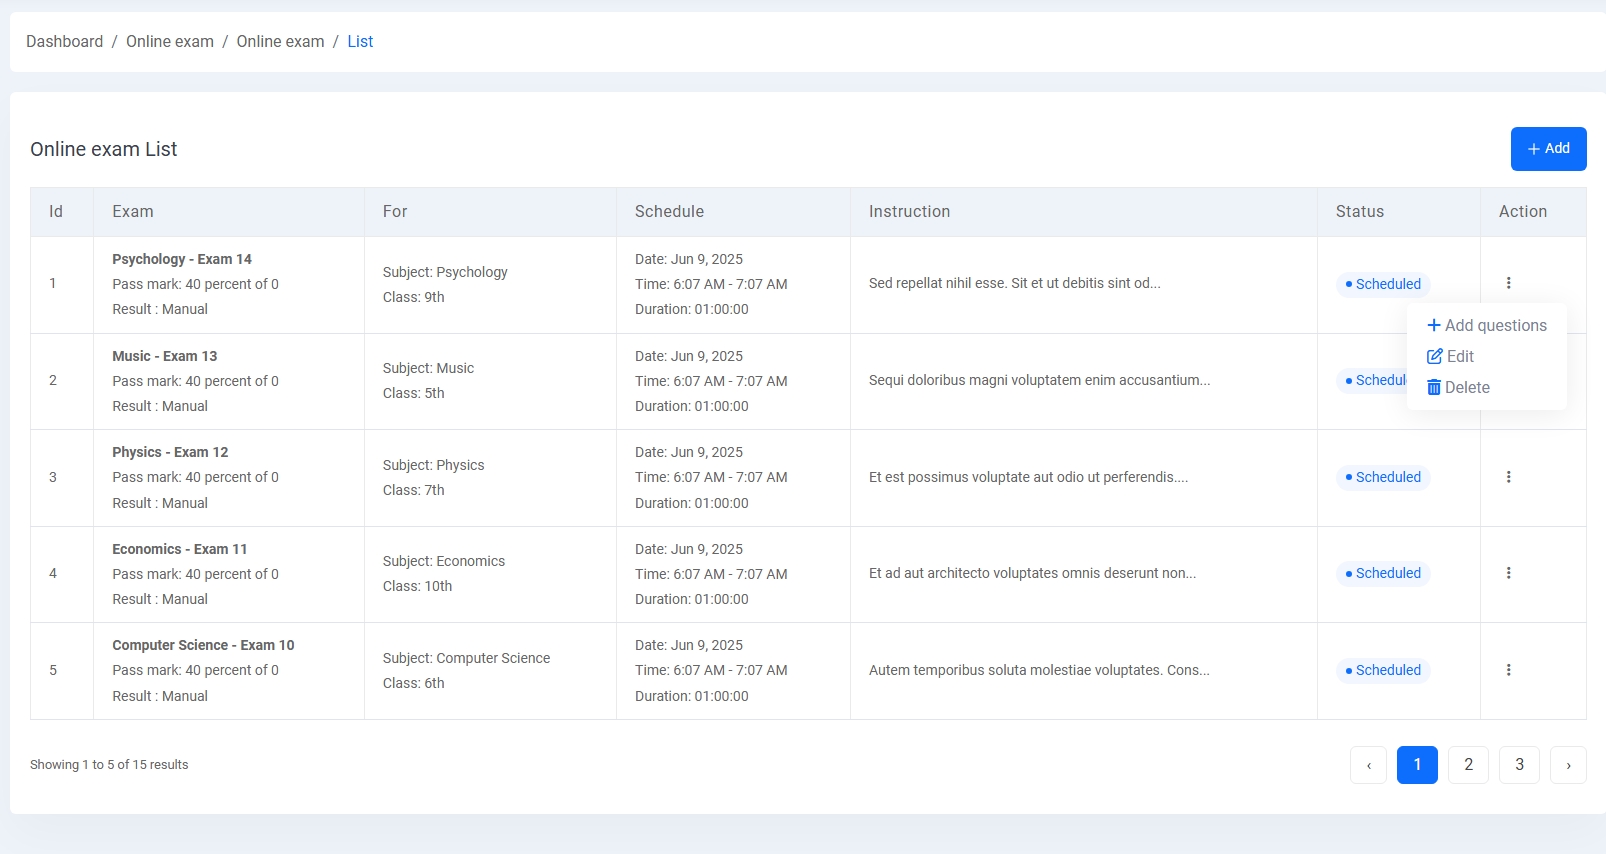
2. Online Exam List:
View all scheduled online exams with subject, schedule, instructions, and their current status. Admins can add questions or edit/delete any exam from here.
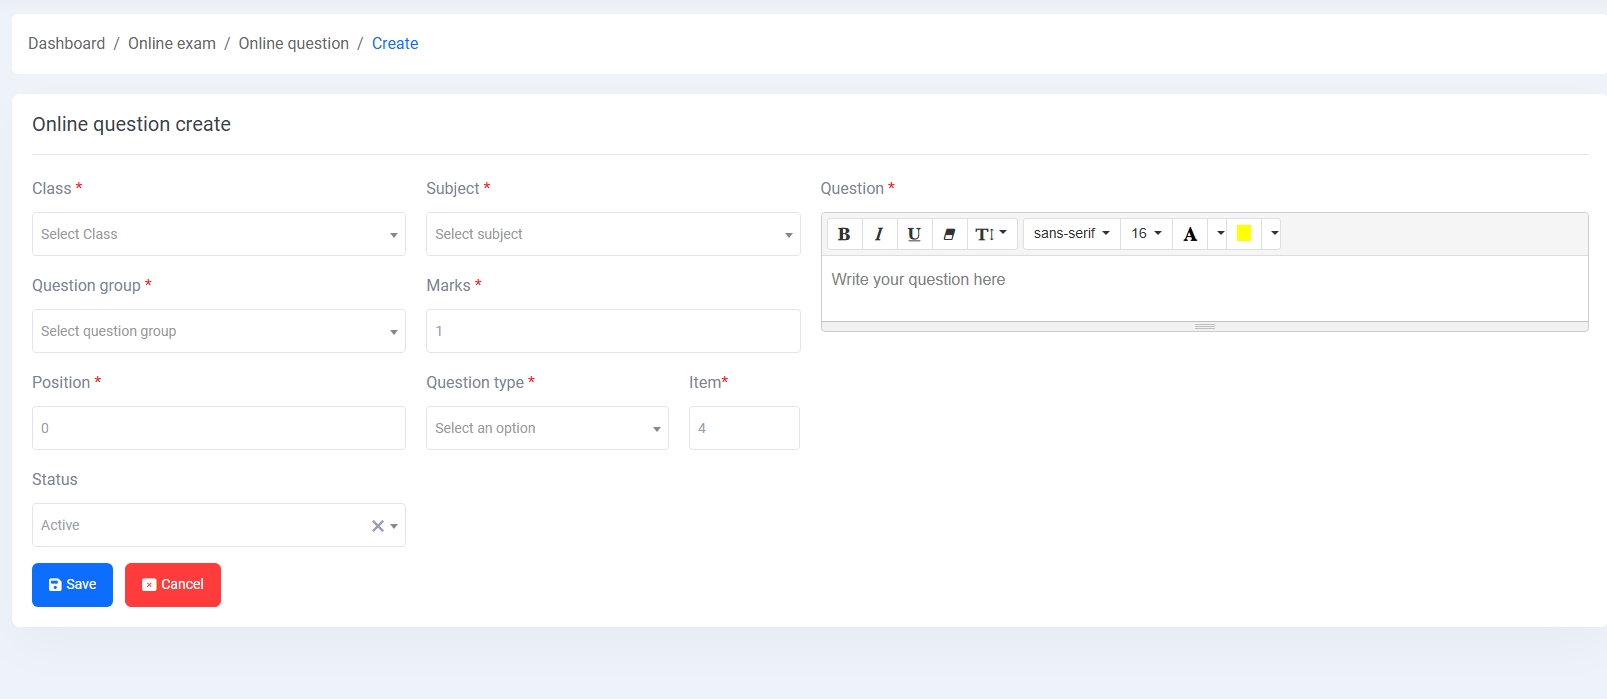
3. Online Question Create:
Set up individual questions with class, subject, marks, group, type, and difficulty level. A rich text editor is provided for formatting the question text.
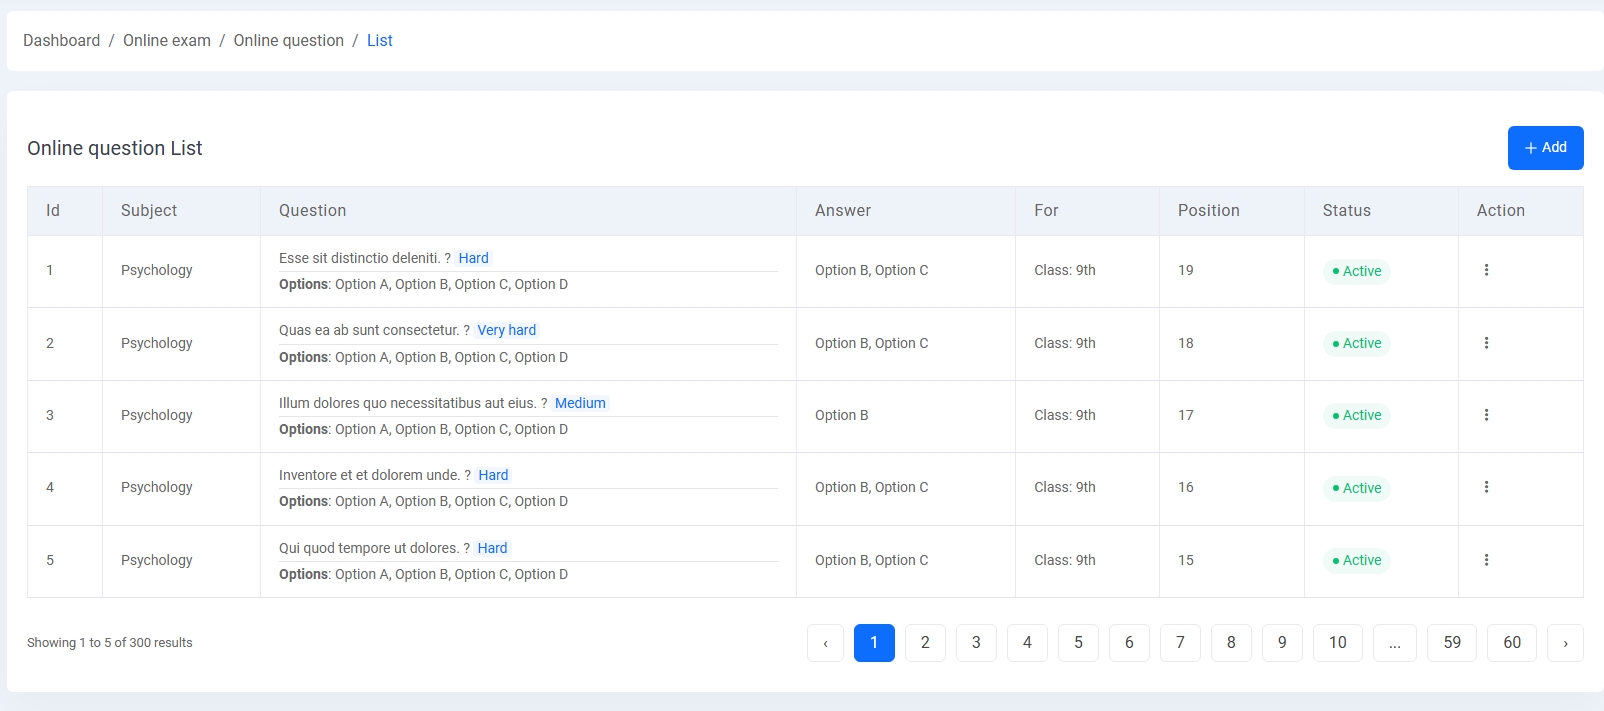
4. Online Question List:
Displays all created questions with subject, difficulty group, answer, and availability across classes. Helps manage large banks of questions efficiently.
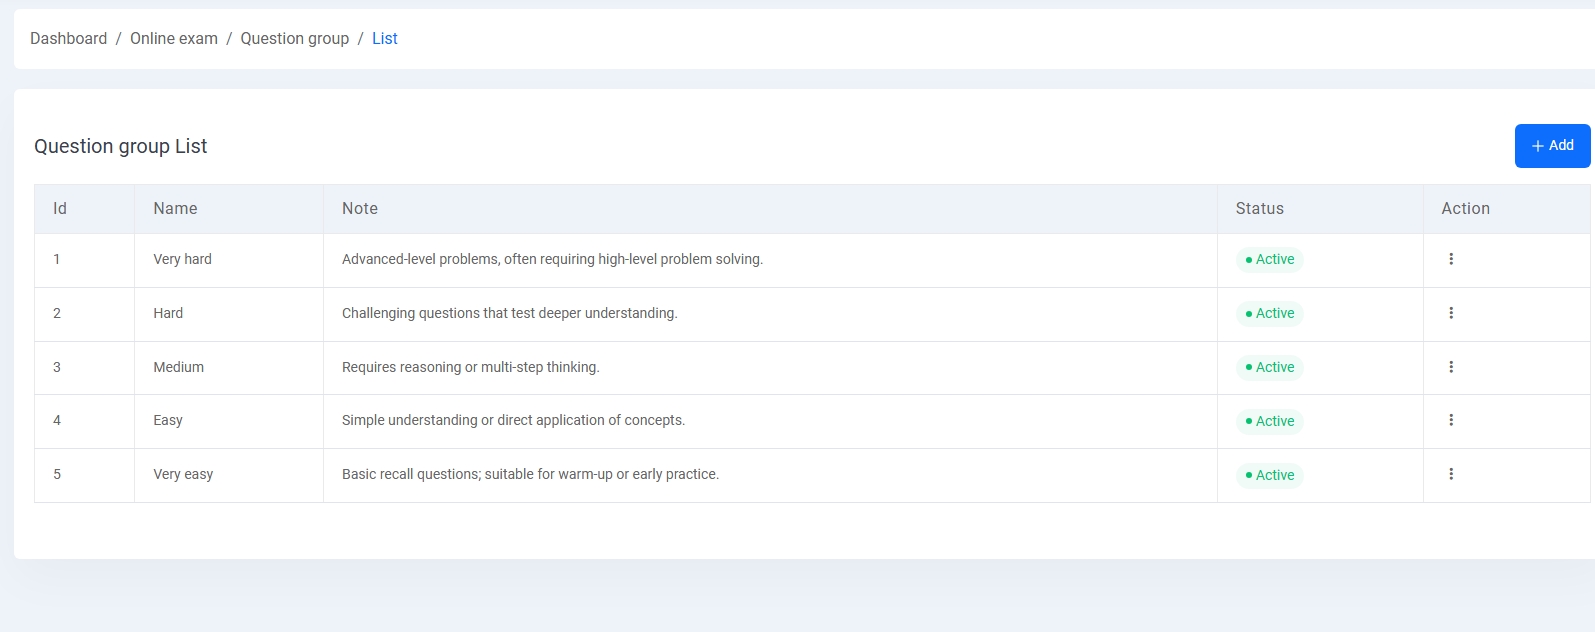
5. Question Group:
Create categories like Very Hard, Hard, Medium, Easy, and Very Easy with descriptions. These help organize questions by complexity.
Certificate Management
The Certificate Management module enables administrators to design, generate, and issue various types of certificates to students and employees.
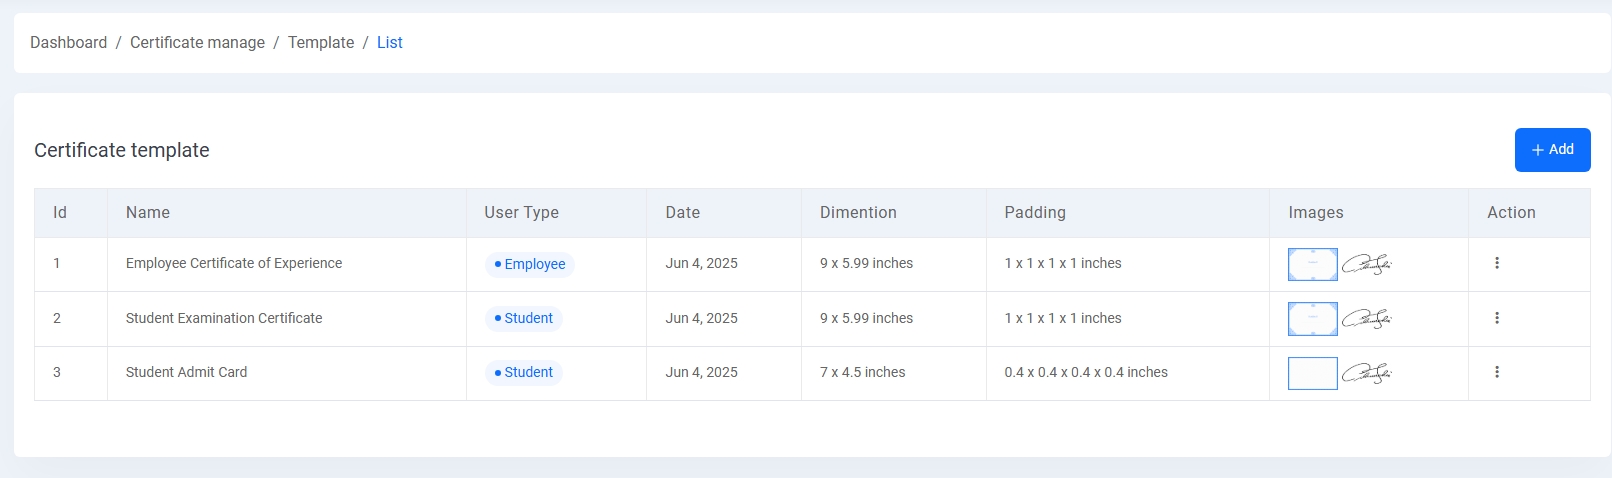
1. Certificate Template List:
Displays all created certificate templates with details like name, user type (Student/Employee), creation date, dimensions, padding, and preview images.
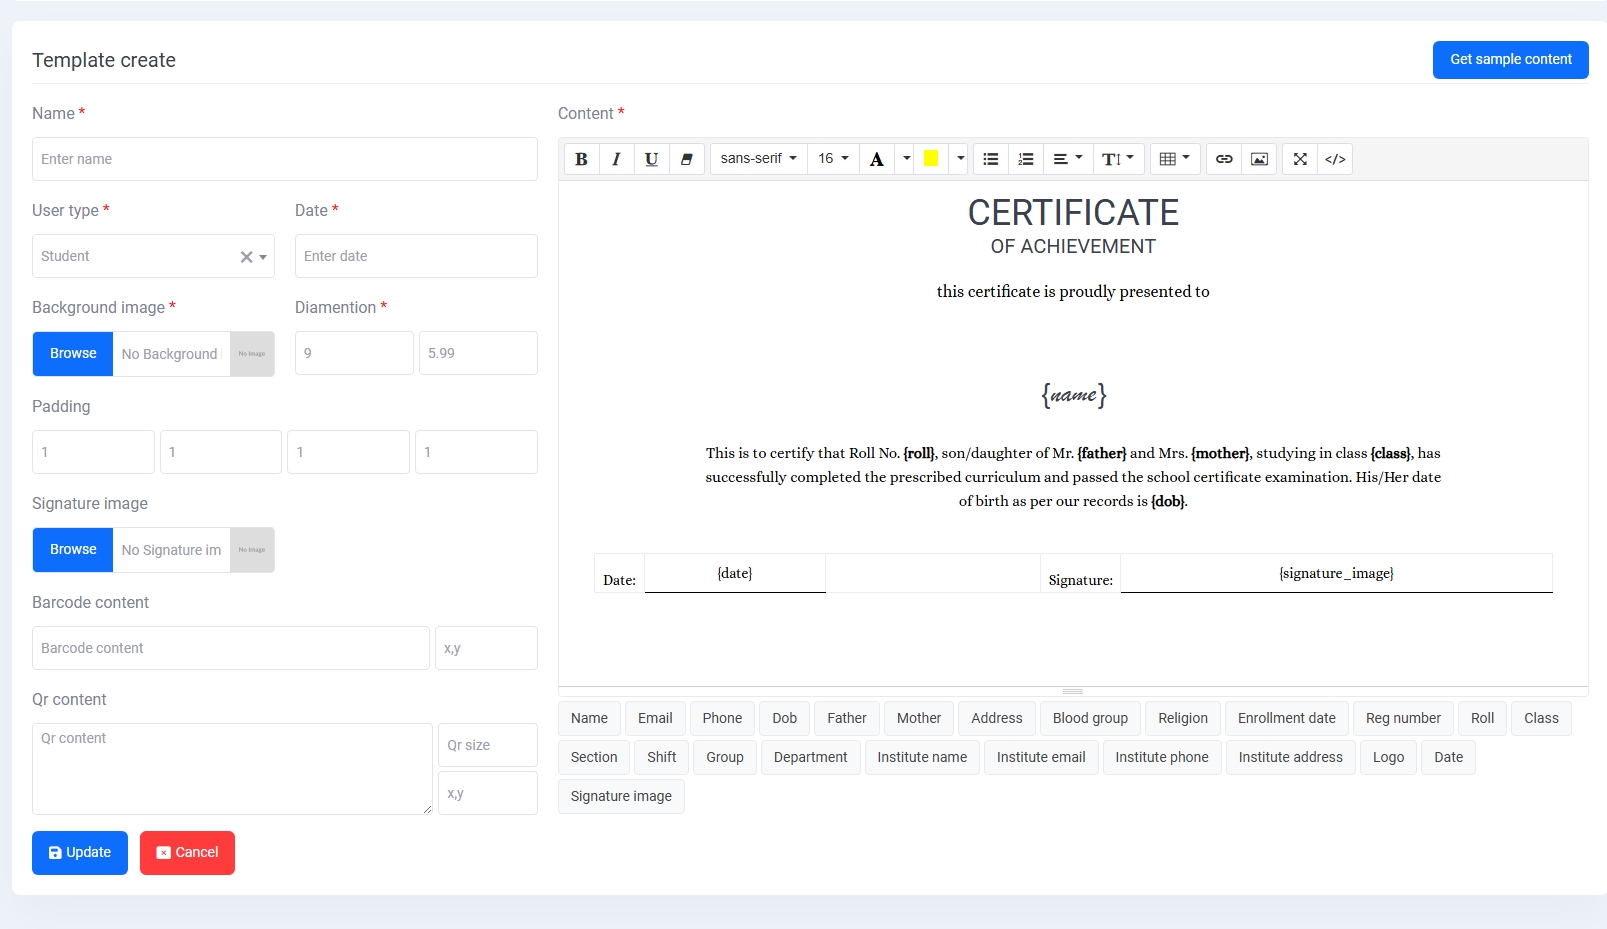
2. Create/Edit Template:
Admins can create or modify certificate templates by entering the name, selecting user type and date, uploading background and signature images, setting dimensions and padding, and writing certificate content using dynamic tags like {name}, {roll}, {class}, etc.
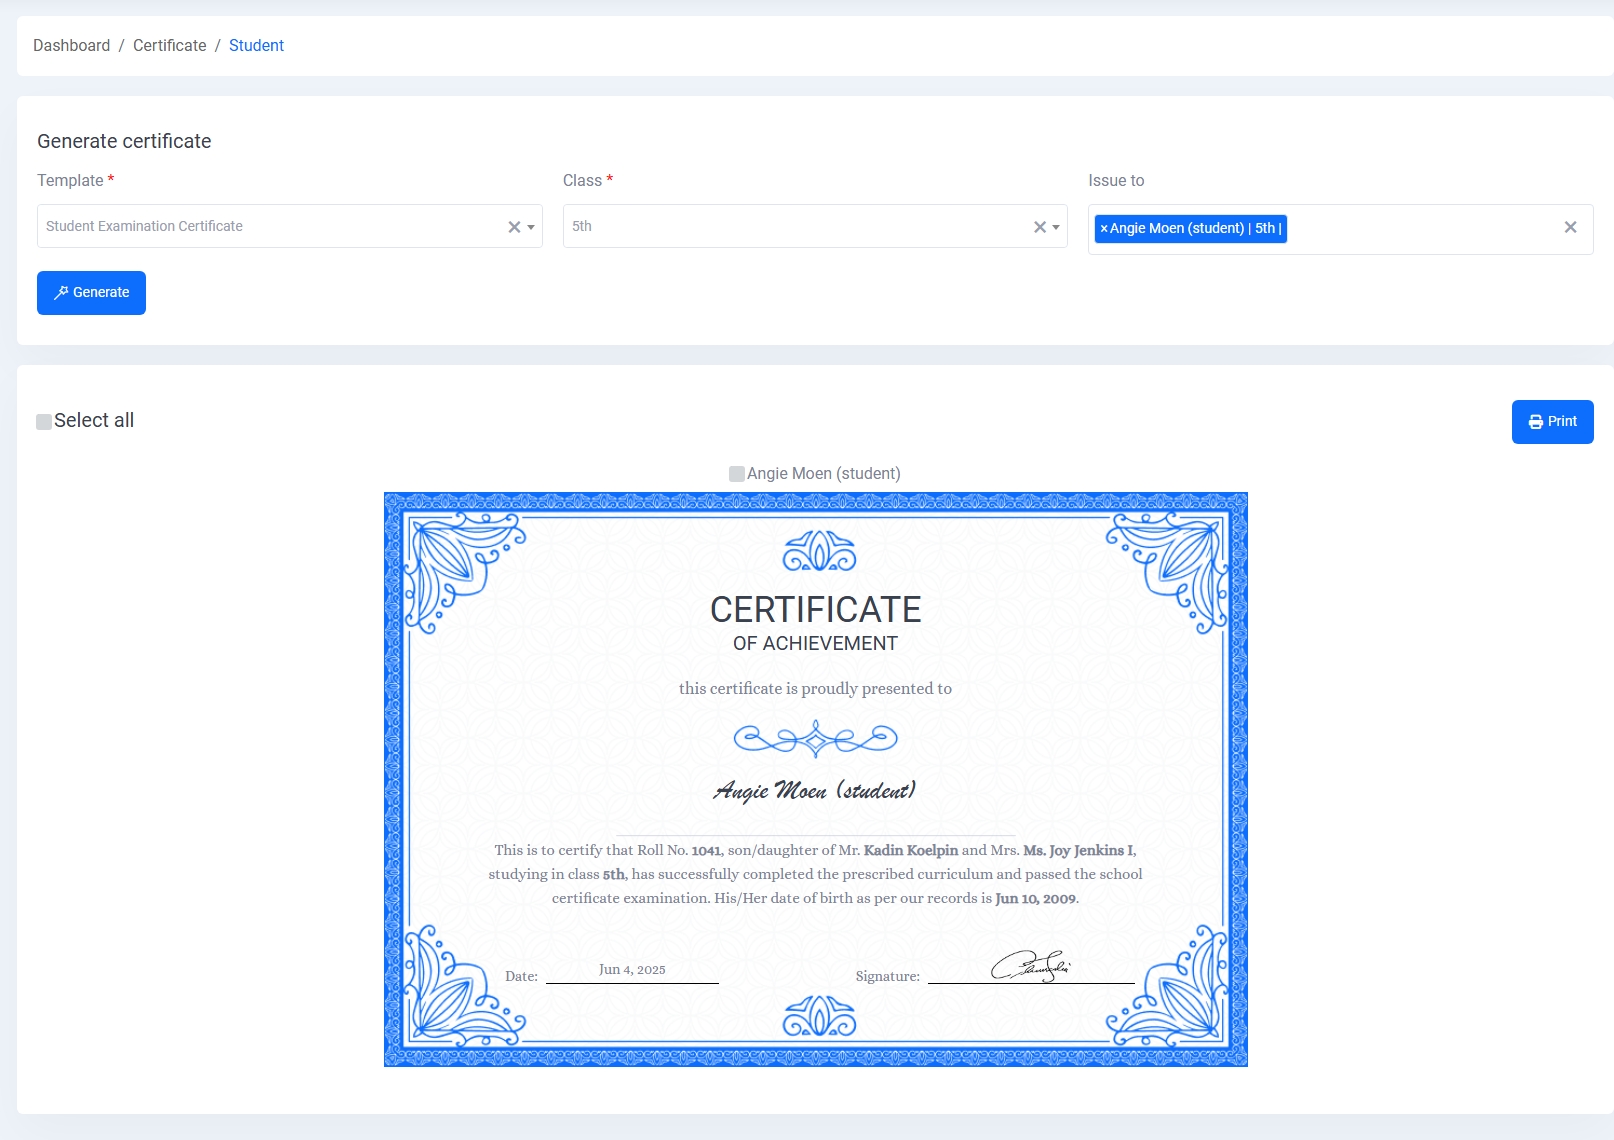
3. Generate Student Certificate:
Allows selection of a template and class to generate and preview certificates for students. Multiple students can be selected for bulk printing.
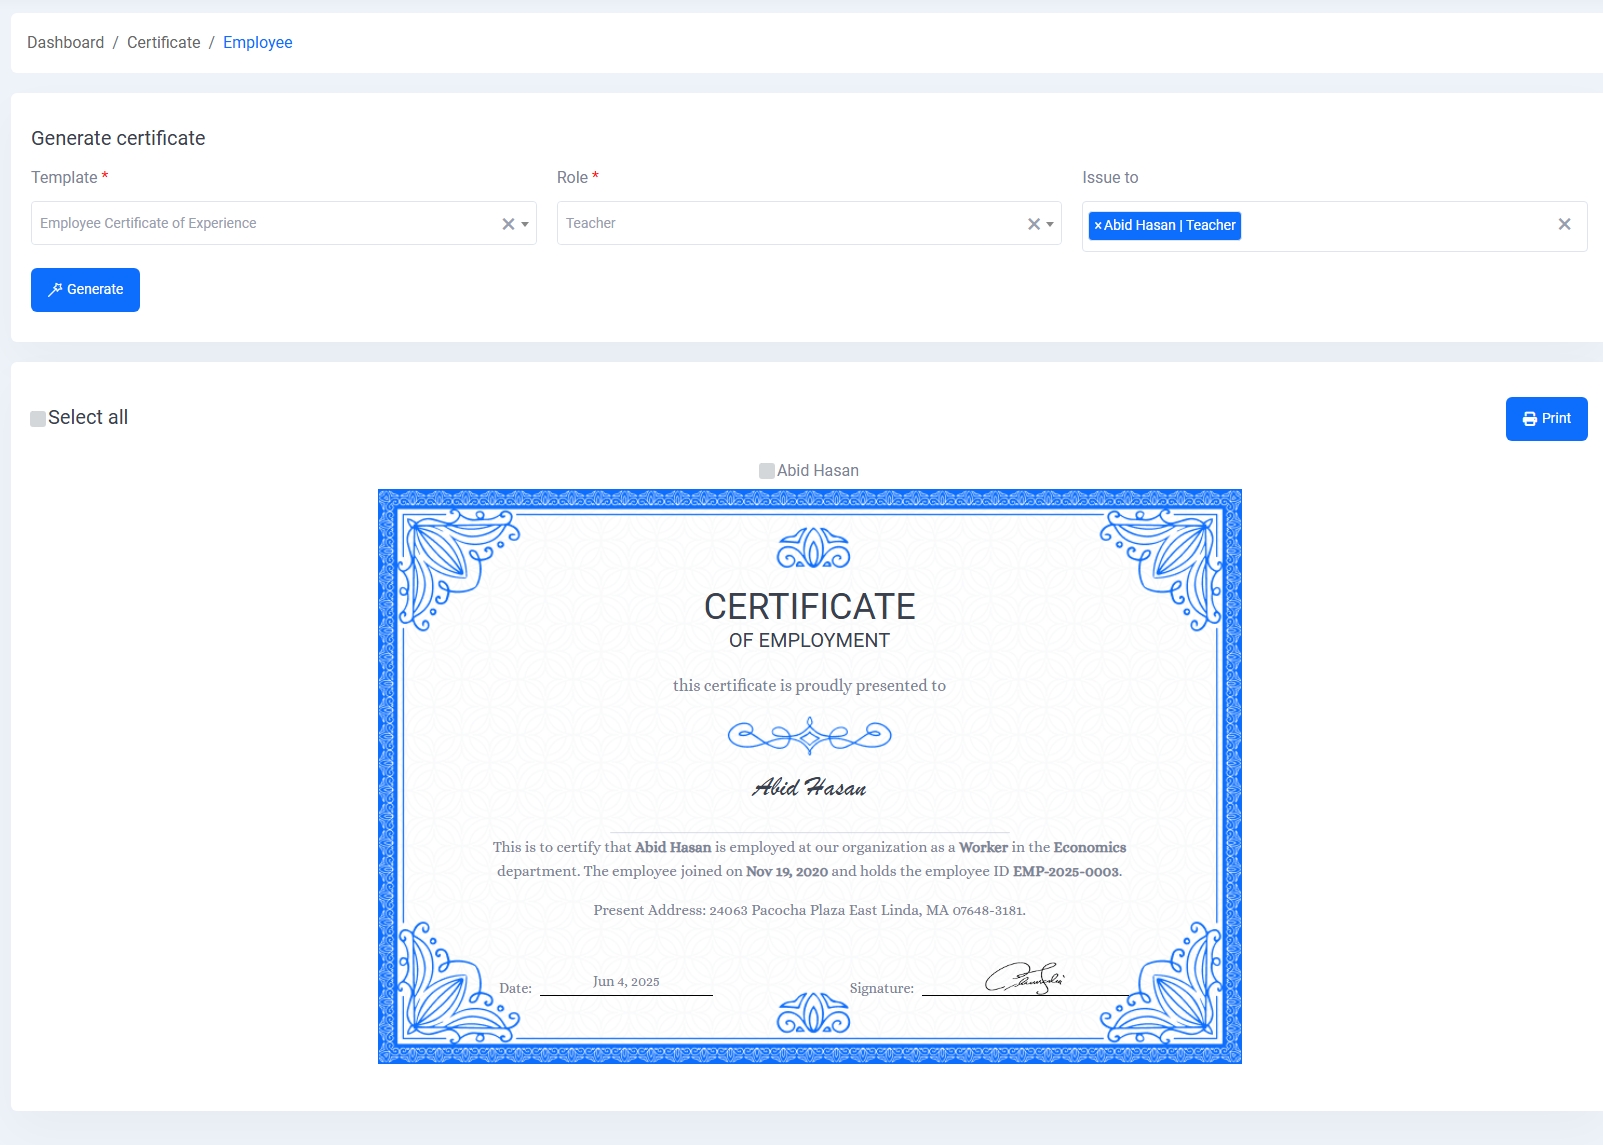
4. Generate Employee Certificate:
Similar to student certificates, this section is used for generating experience certificates for employees by selecting a template and role.
Inventory Management
The Inventory Management module efficiently tracks and controls all school items, including supplies, electronics, stationery, and store stock levels.
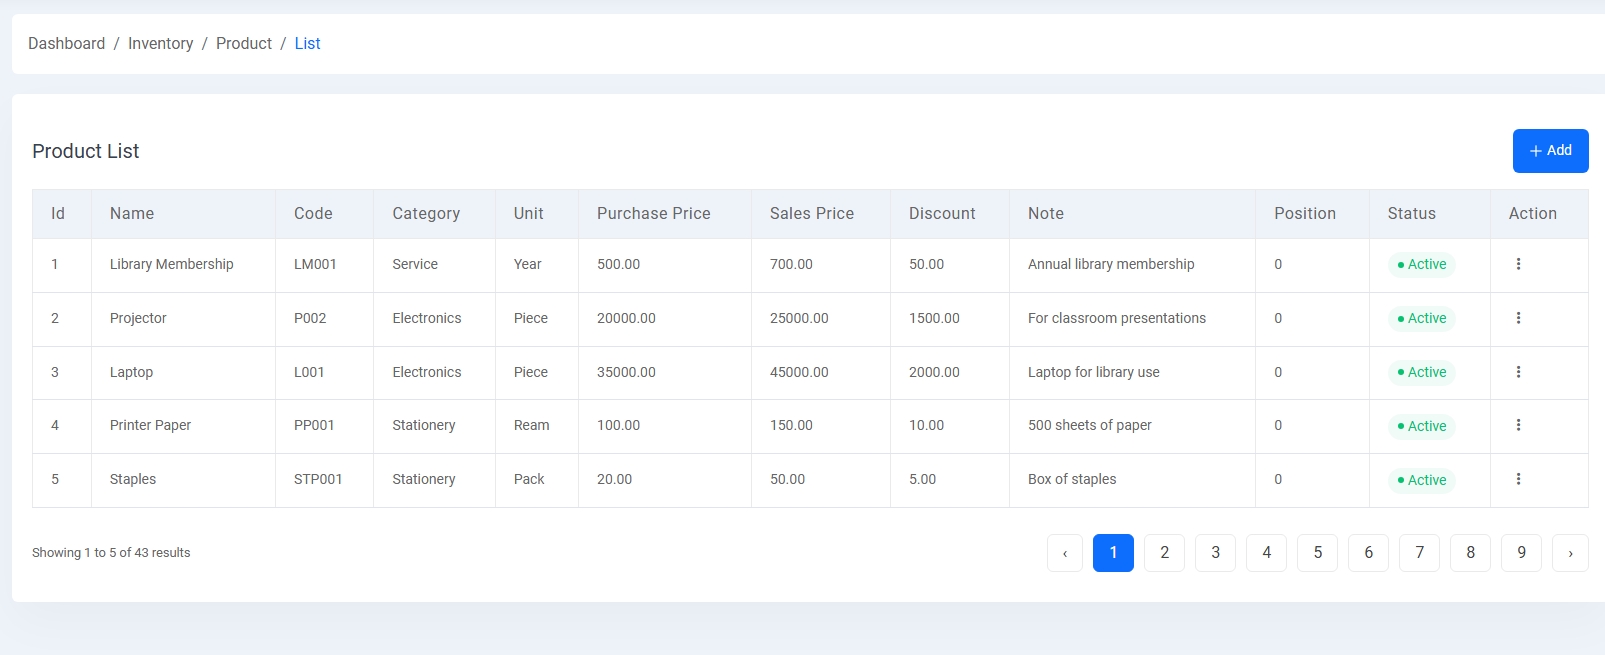
1. Product List:
View all products with information like name, category, unit, code, purchase and sales prices, discounts, and status. Example items include library memberships, projectors, laptops, and more.
2. Supplier List:
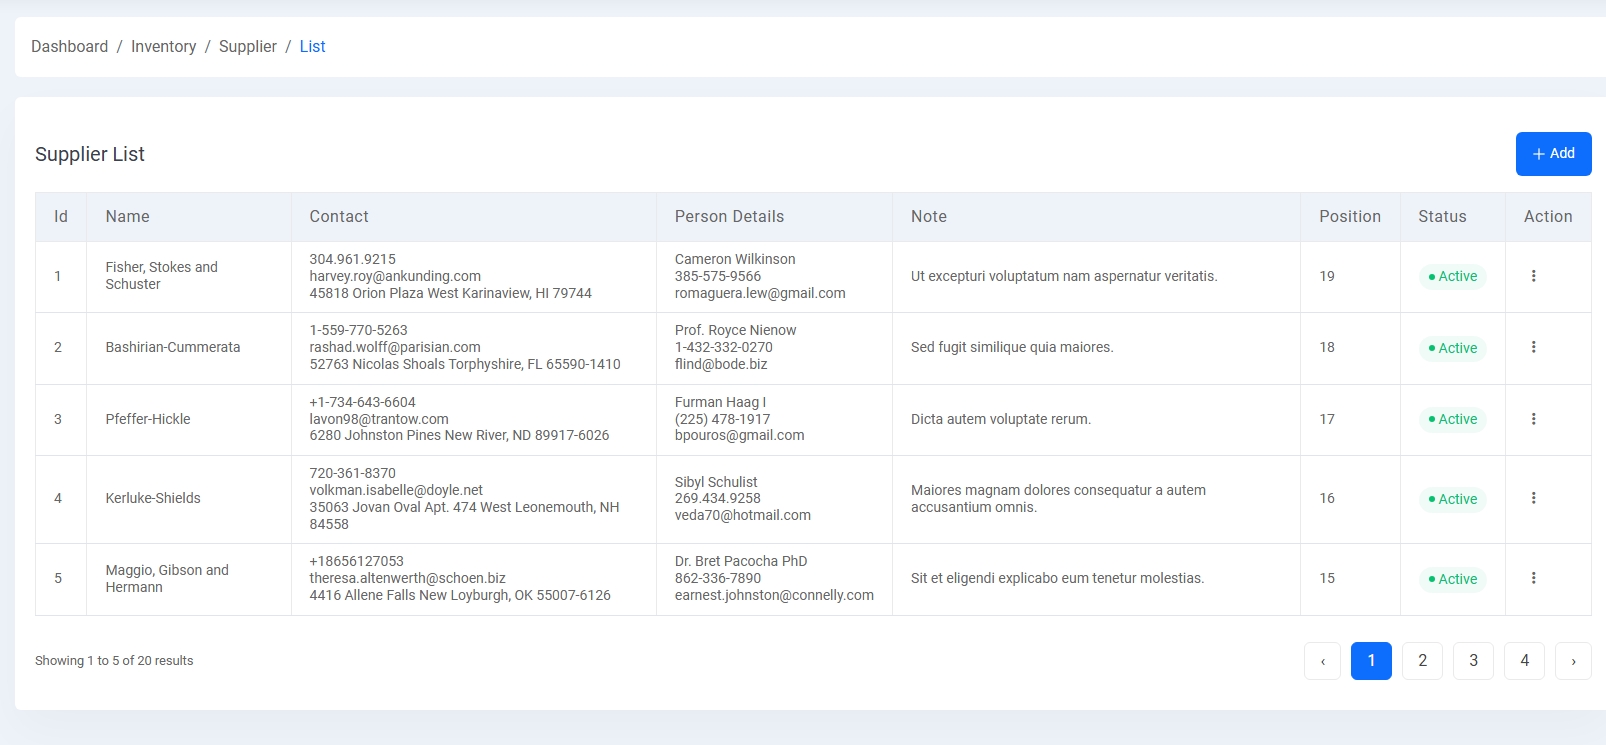
Maintain a list of all product suppliers with contact details and associated person info. Includes address, phone, email, and status management.
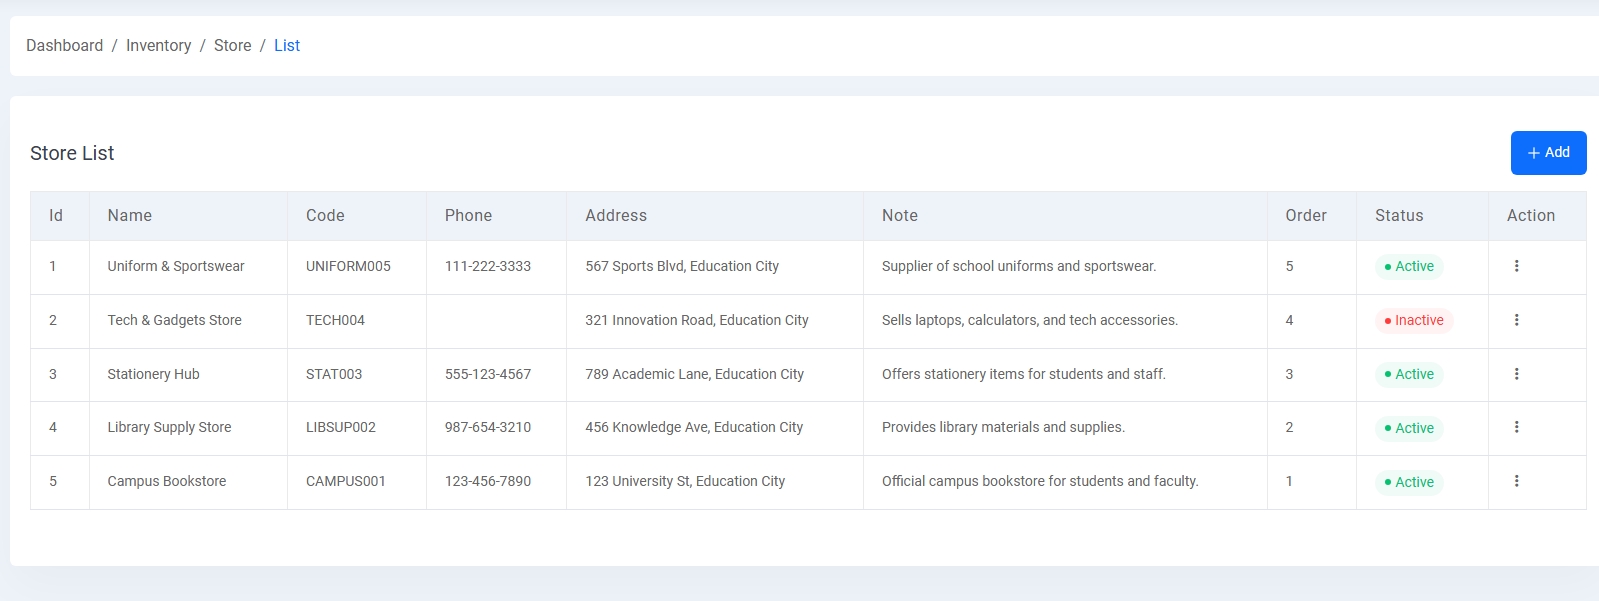
3. Store List:
Create and manage multiple stores (e.g., Uniform Store, Bookstore) with codes, phone numbers, addresses, and active/inactive status tracking.
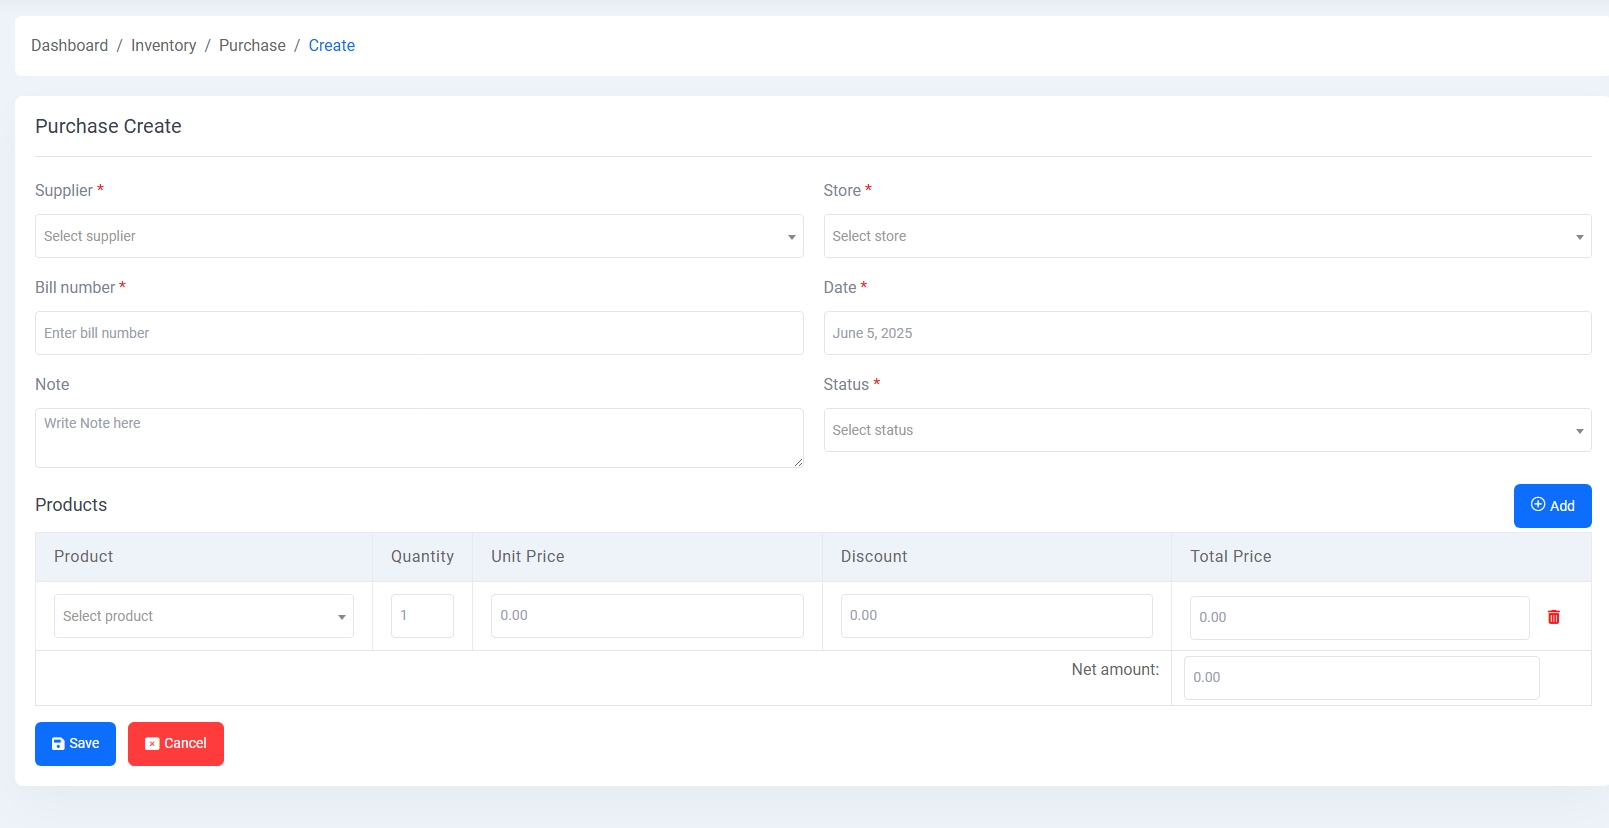
4. Purchase Entry:
Add purchases by selecting supplier, store, date, and status. Add product entries dynamically with quantity, unit price, discount, and total price calculation.
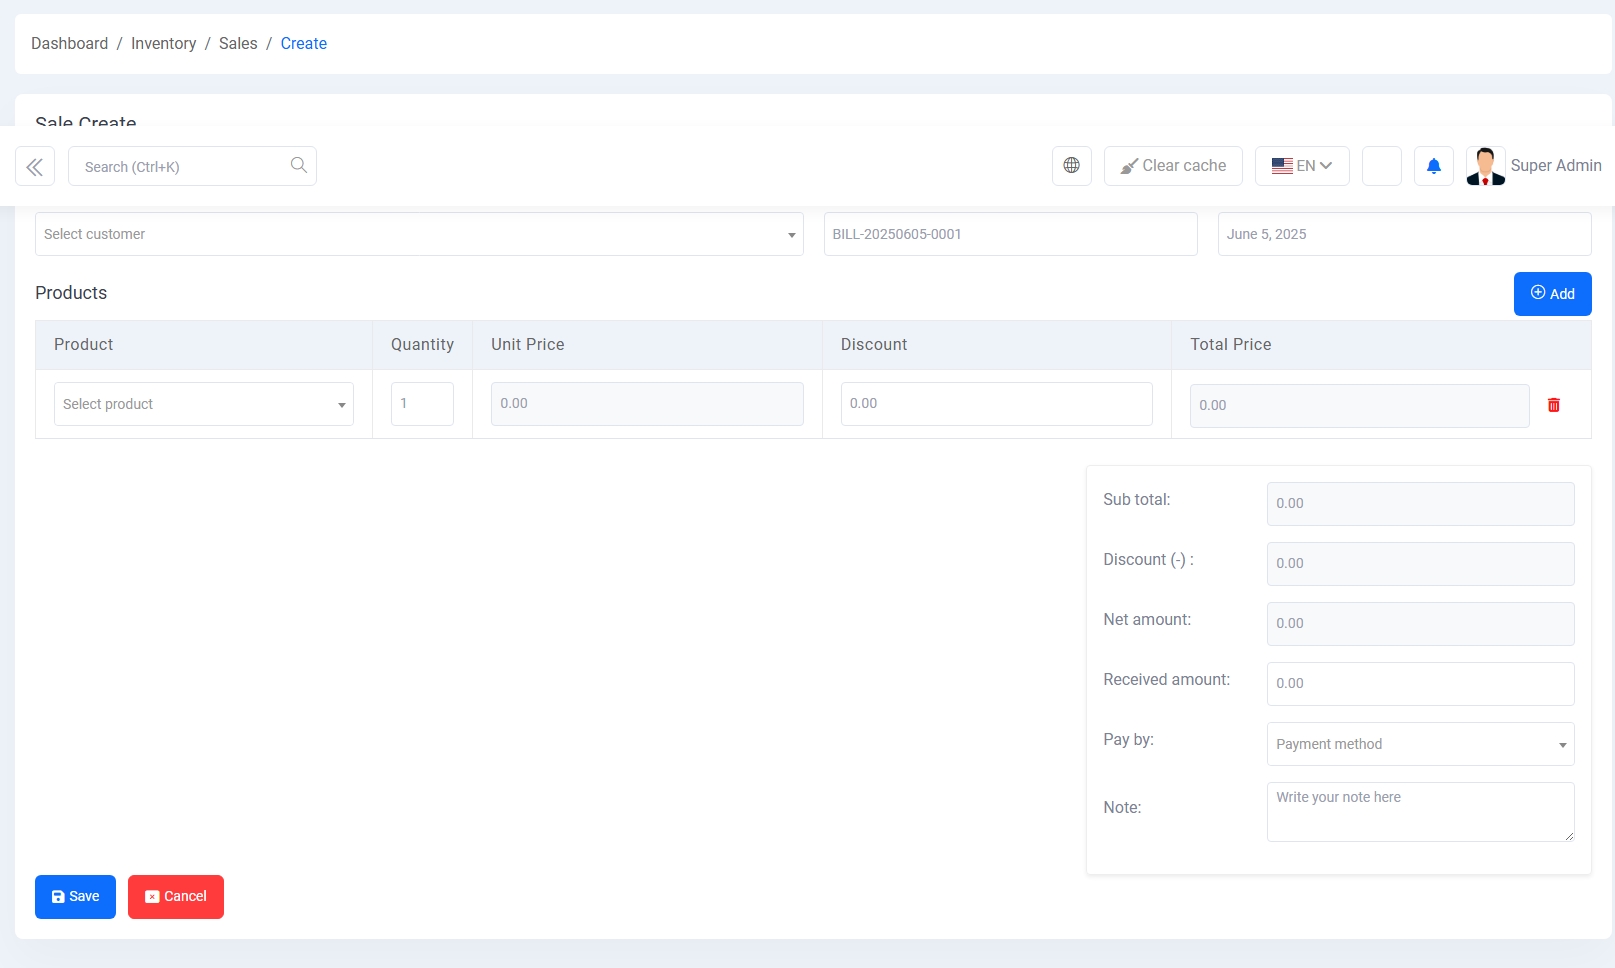
5. Sales Entry:
Generate sales by selecting customer, date, payment method, and adding products dynamically. Automatically calculates total, discount, net amount, and payment info.
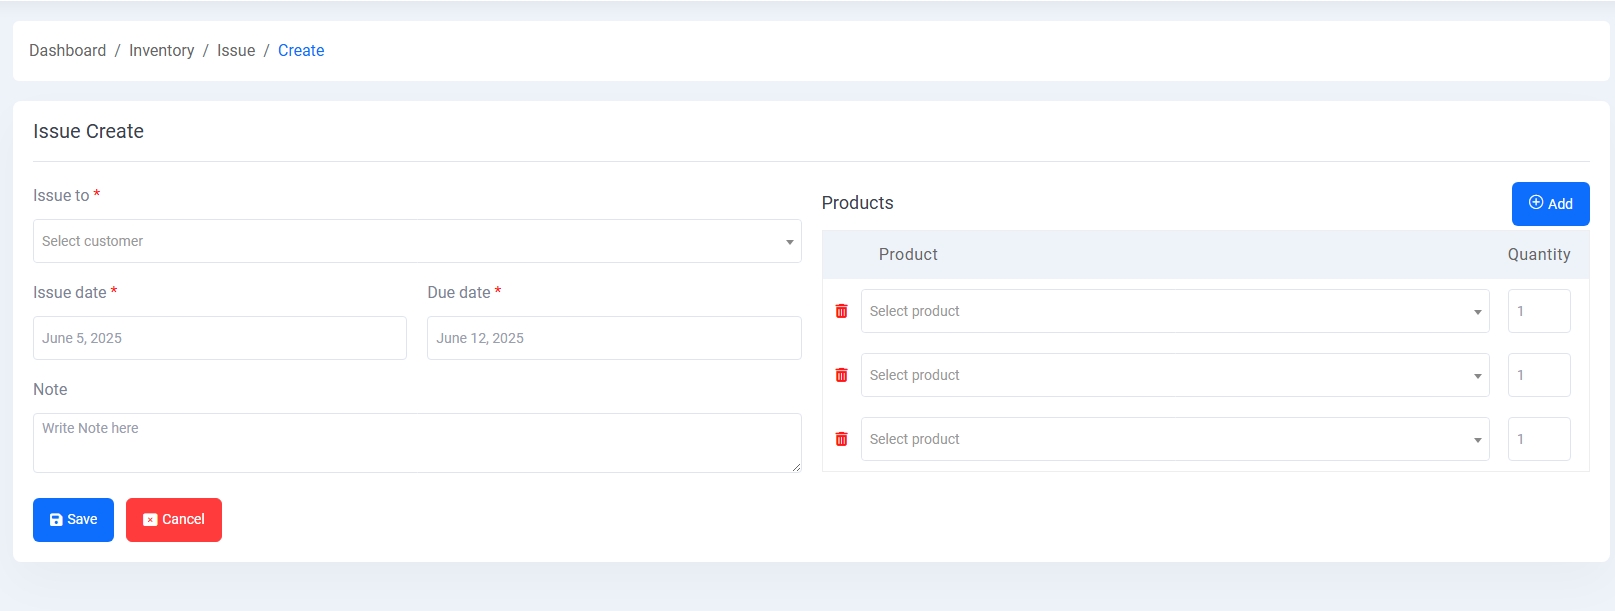
6. Issue Entry:
Manage issuing products to students or staff. Select recipient, issue date, due date, and product quantities to track inventory movement.
Report Module
The Report Module provides comprehensive insights into academic, financial, and inventory-related activities through various reporting tools and charts.
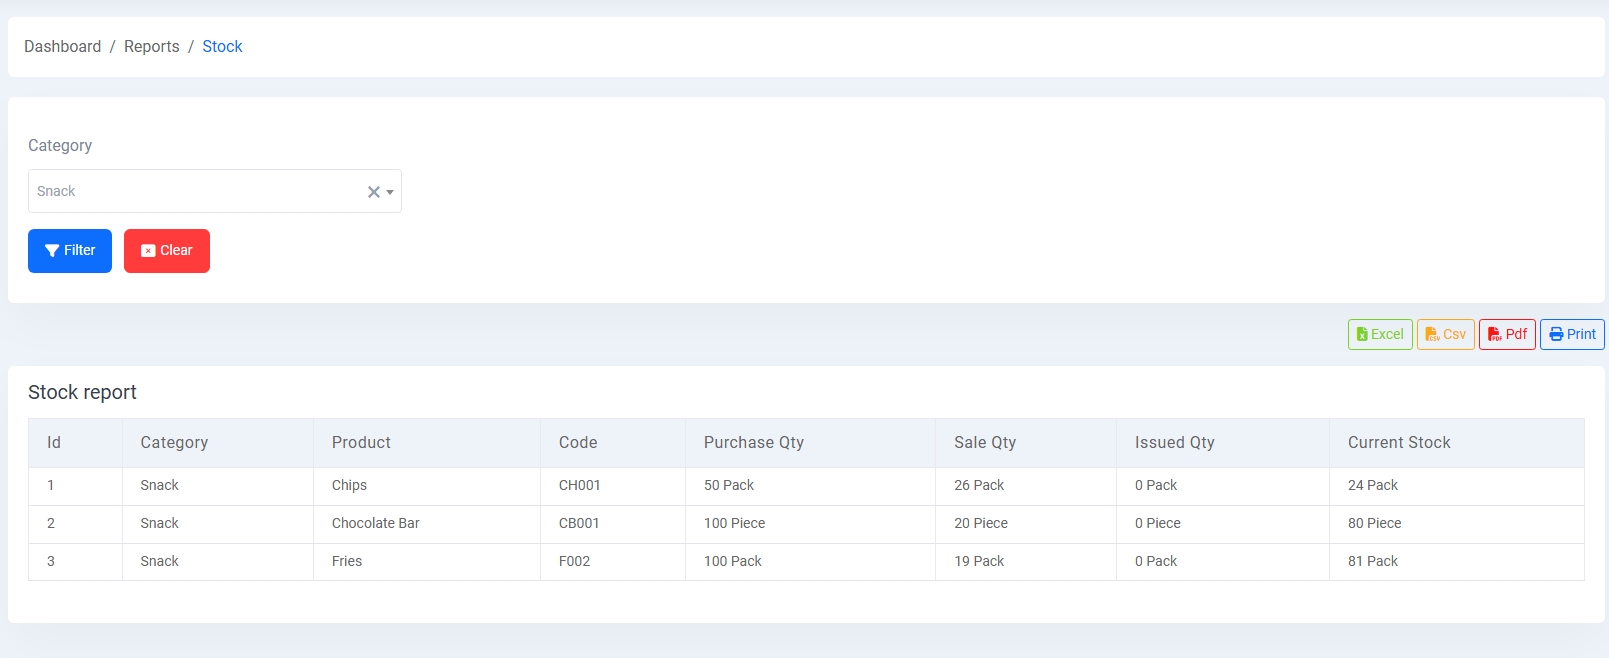
1. Stock Report:
Generate detailed stock reports filtered by product category. It shows current quantity, purchase, sales, and issue stats. Export options include Excel, CSV, PDF, and Print.
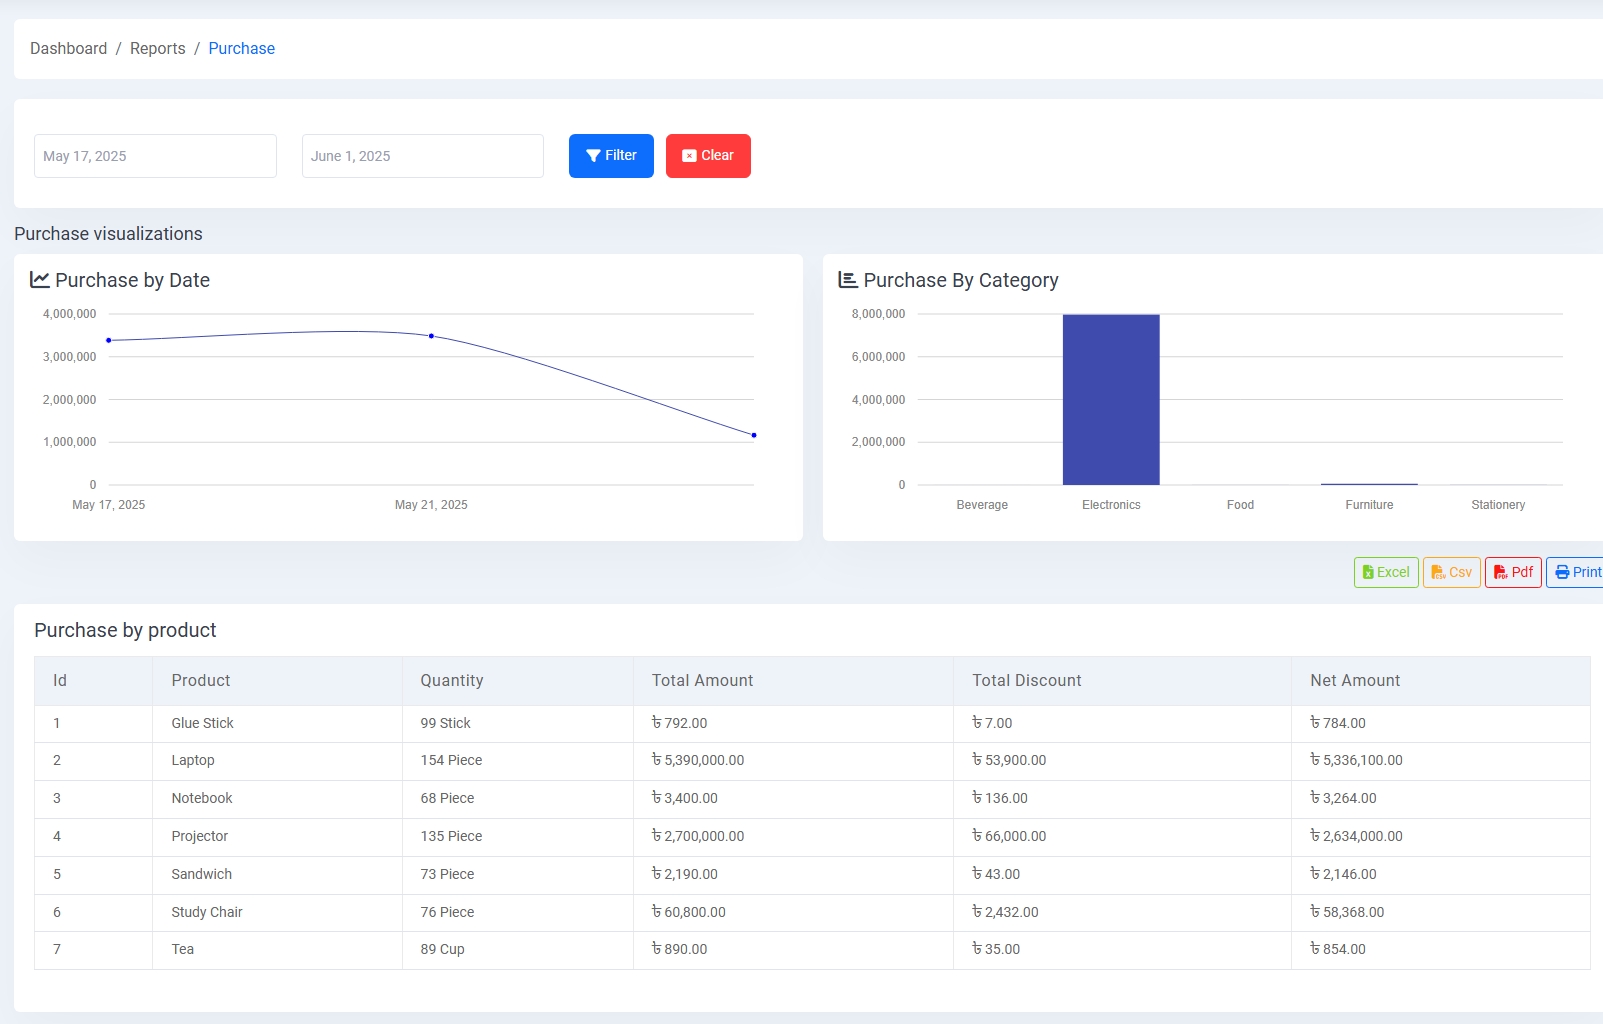
2. Purchase Report:
Visualize purchase trends using bar charts and pie charts categorized by date and product category. View itemized data including invoice number, supplier, and quantity.
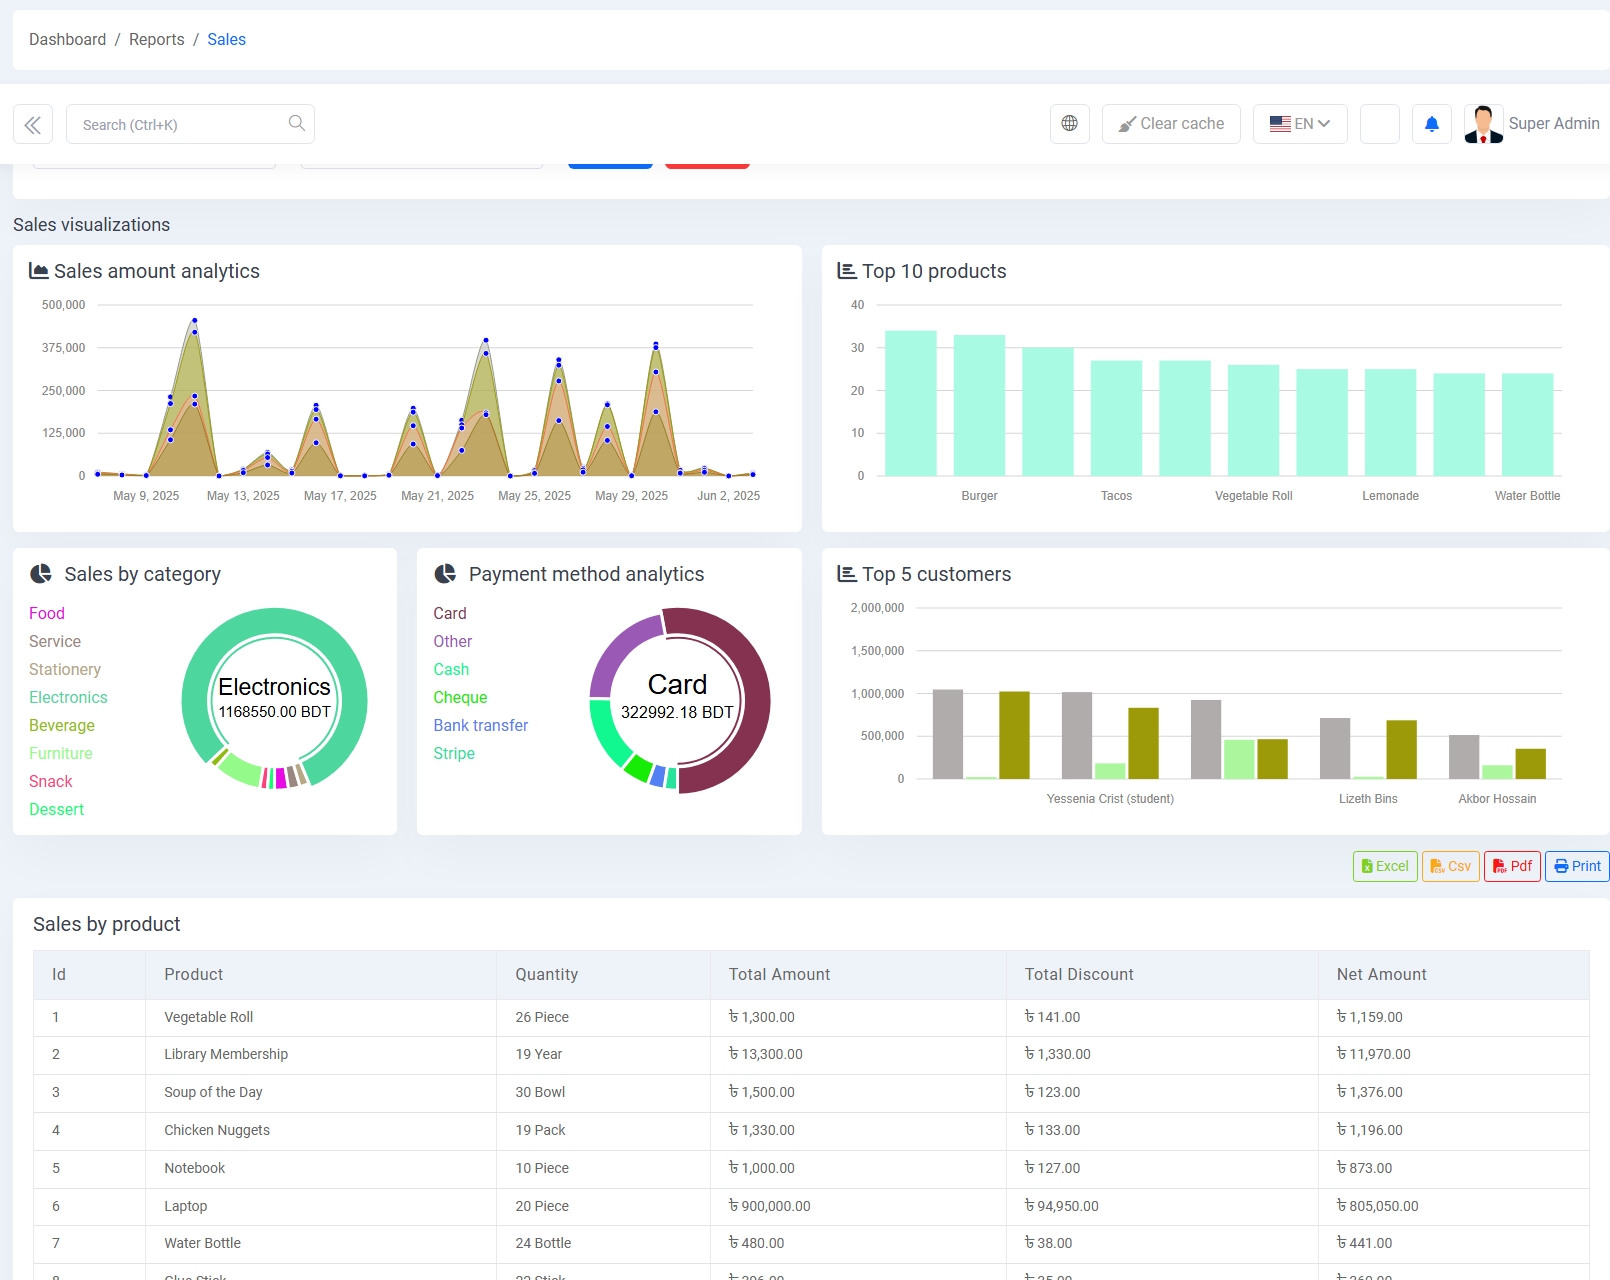
3. Sales Report:
Analyze sales performance with charts for daily sales, top products, sales by payment method, customer-wise sales, and sales by category.
4. Profit Report:
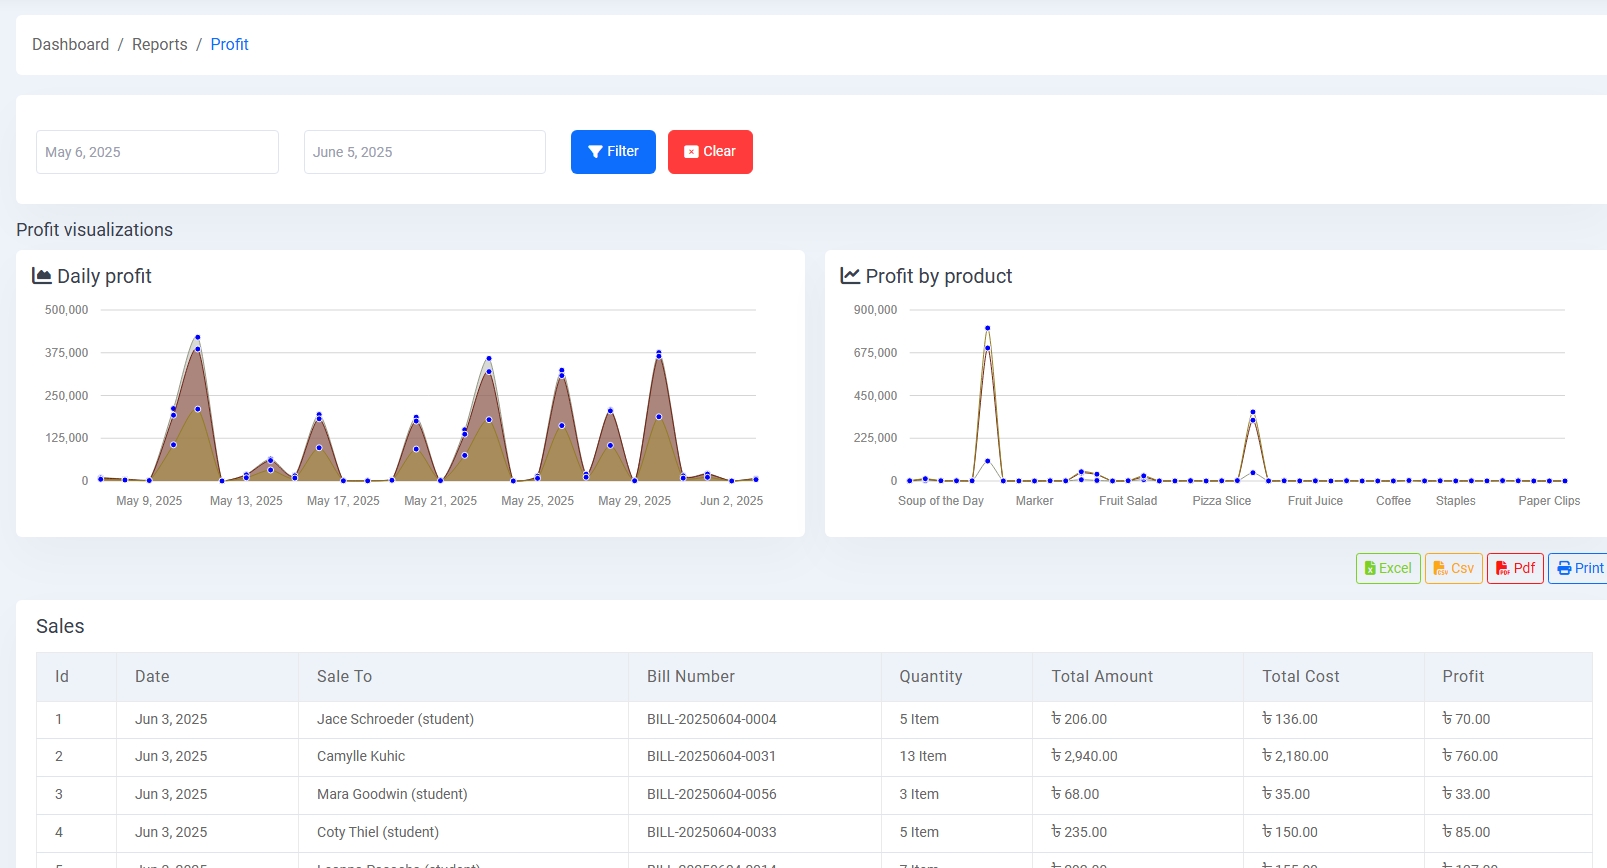
View profit summaries through charts such as Daily Profit and Product-wise Profit. Includes full list of related sales transactions and calculated profit amounts.
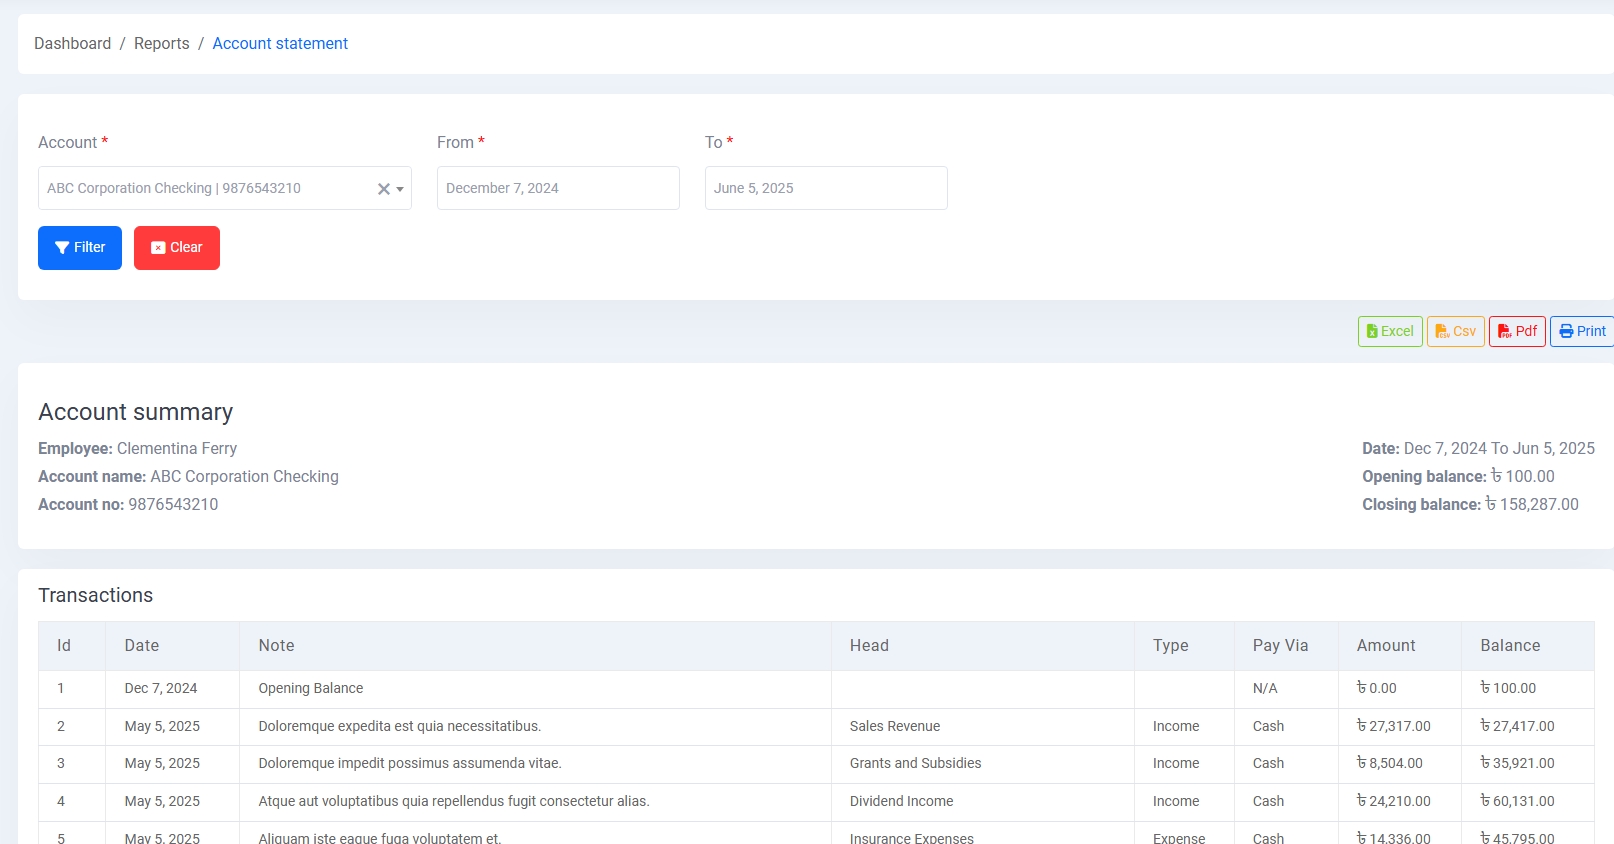
5. Account Statement:
Review financial activity by selecting an account and date range. See debit, credit, balance status, and export reports to multiple formats.
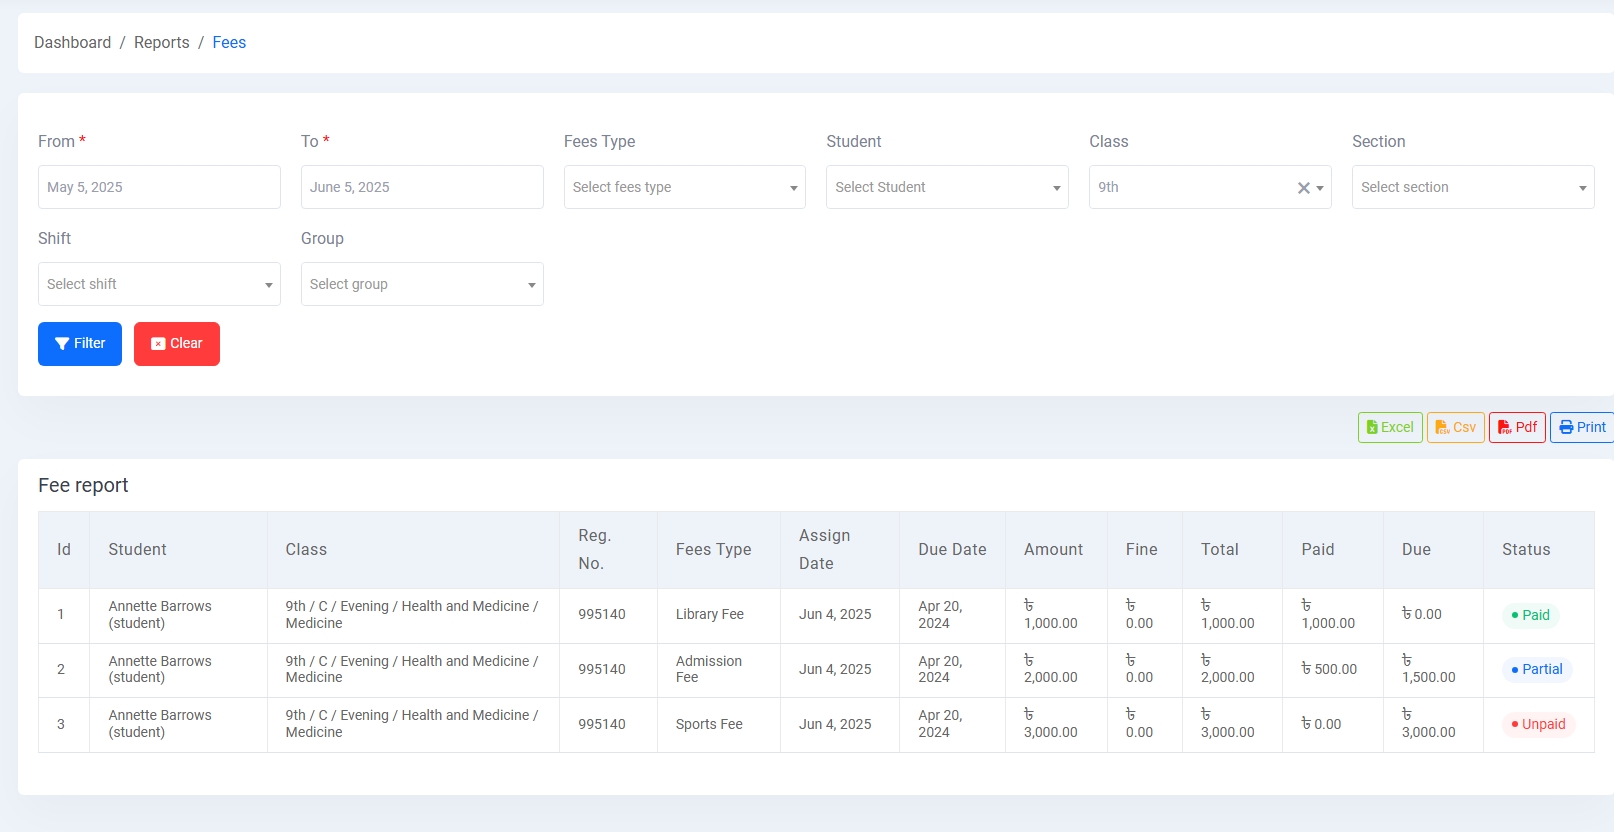
6. Fees Report:
Check student fee reports filtered by class, section, student, or date. It displays fee type, due amount, paid amount, and payment status.
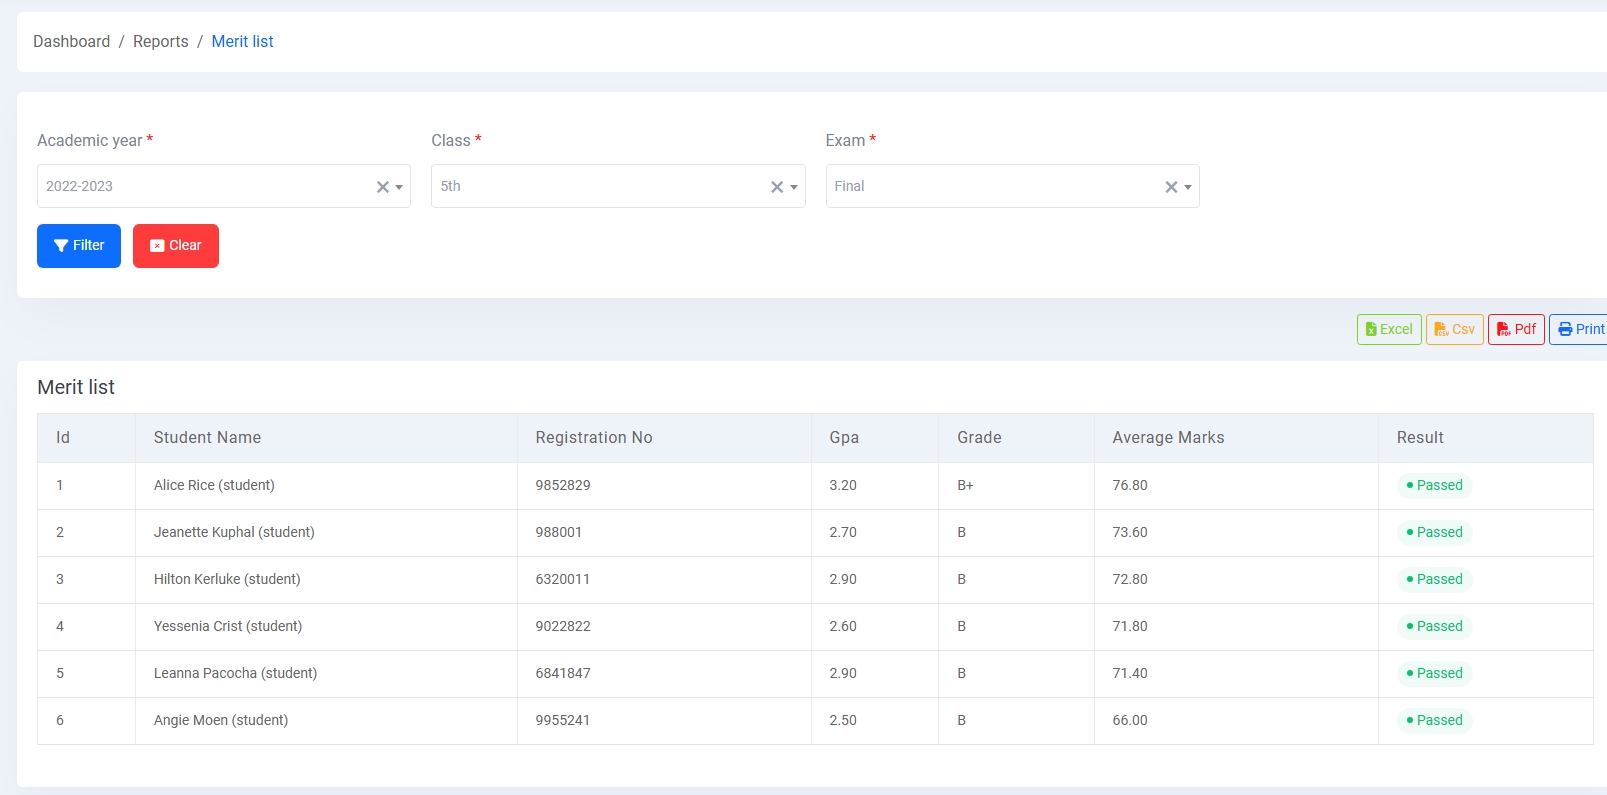
7. Merit List:
Generate academic merit lists by selecting exam, class, and section. It shows GPA, grade, total marks, and ranks students based on performance.
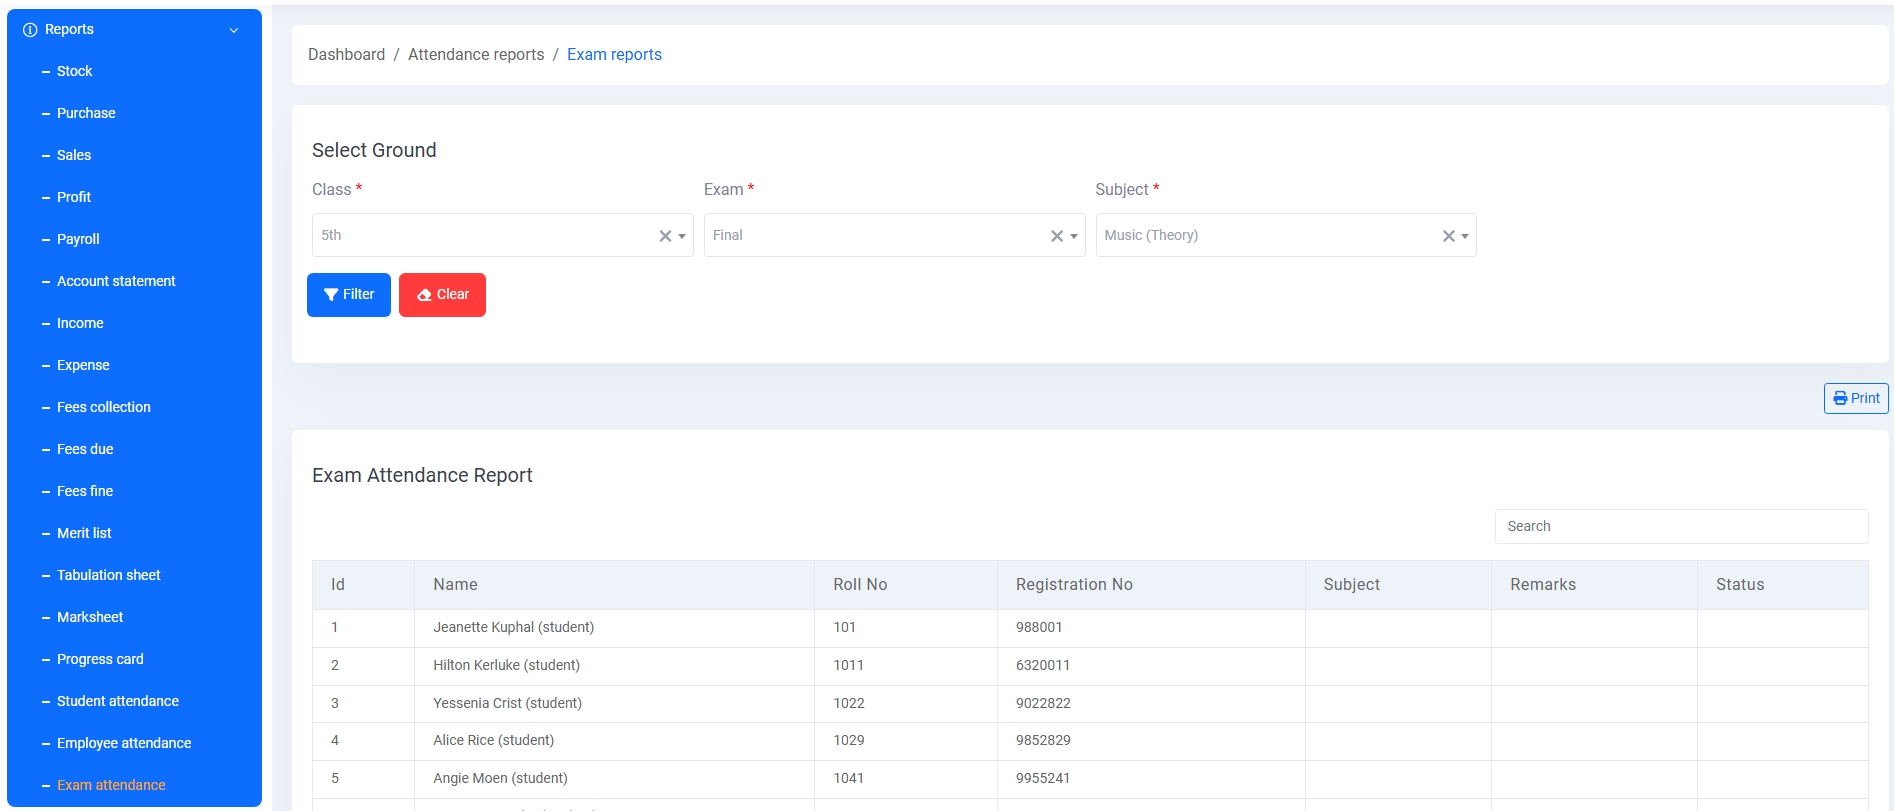
8. Exam Attendance Report:
Track exam attendance status for selected classes and subjects. Displays present, absent, or leave status of each student.
9. Additional Reports:
Access various other reports including Student Attendance Report, Staff Attendance Report, Student Payment Summary, Class-wise Fee Collection, and Transport Route Report. These help admins with academic insights and logistic overview.
Employee Management
The Employee Management module helps efficiently manage all employee data including personal info, work roles, bank details, and statuses. It ensures a centralized and organized HR system for educational institutions.
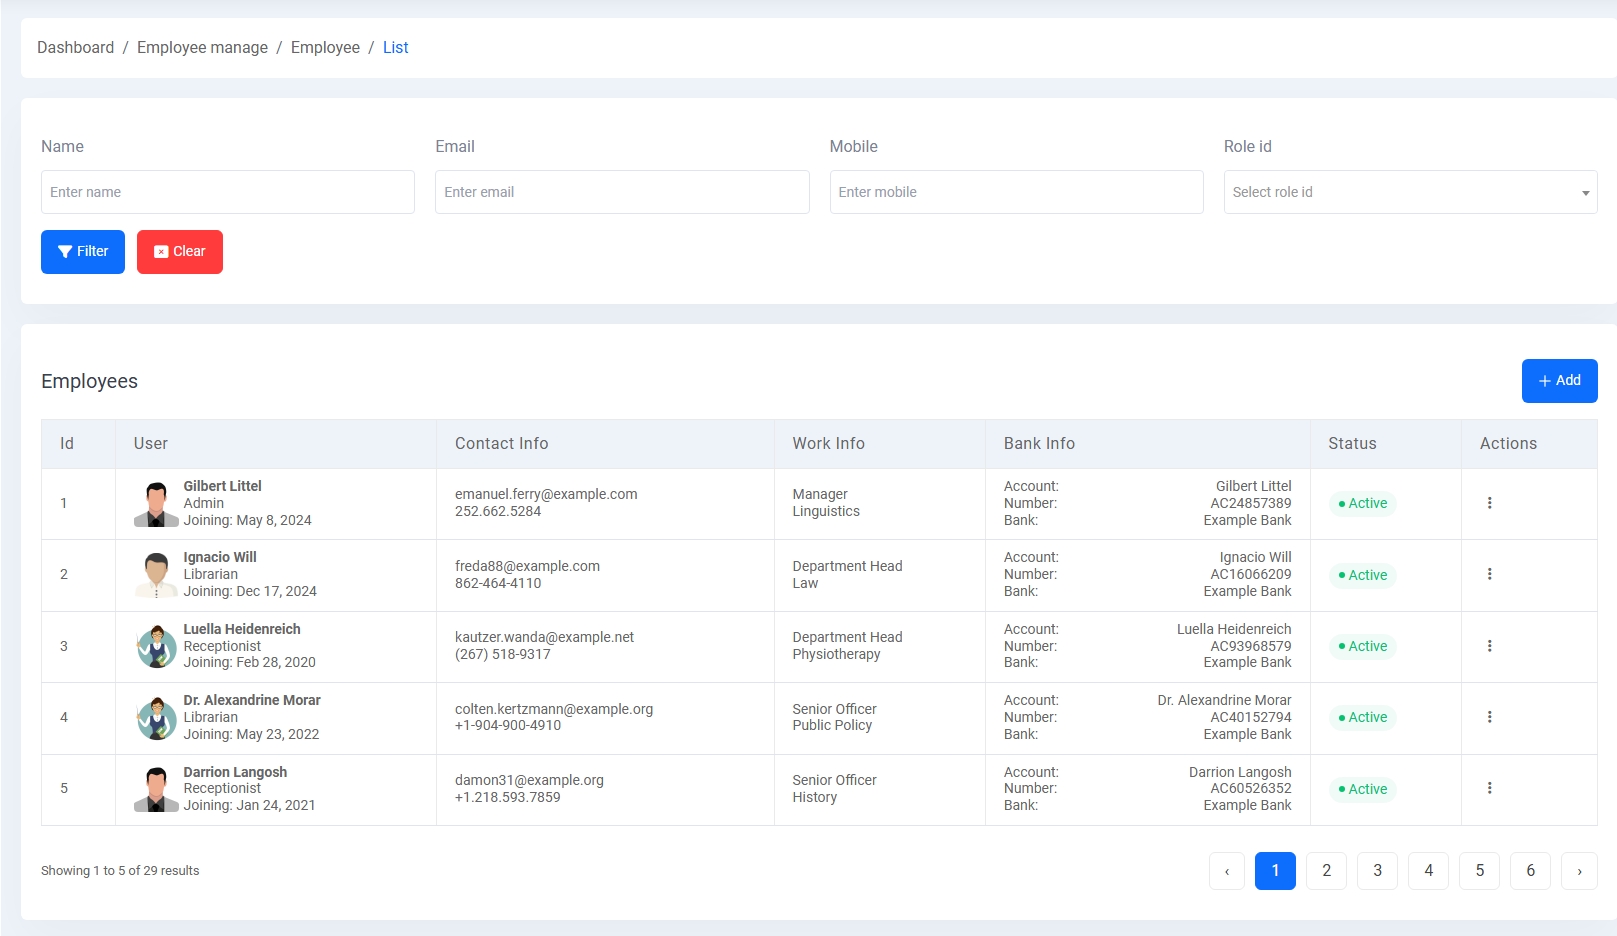
1. Employee List:
Displays a searchable and filterable list of employees with their profile picture, contact info, role, joining date, work department, bank account details, and status (active/inactive). Pagination helps manage large data.
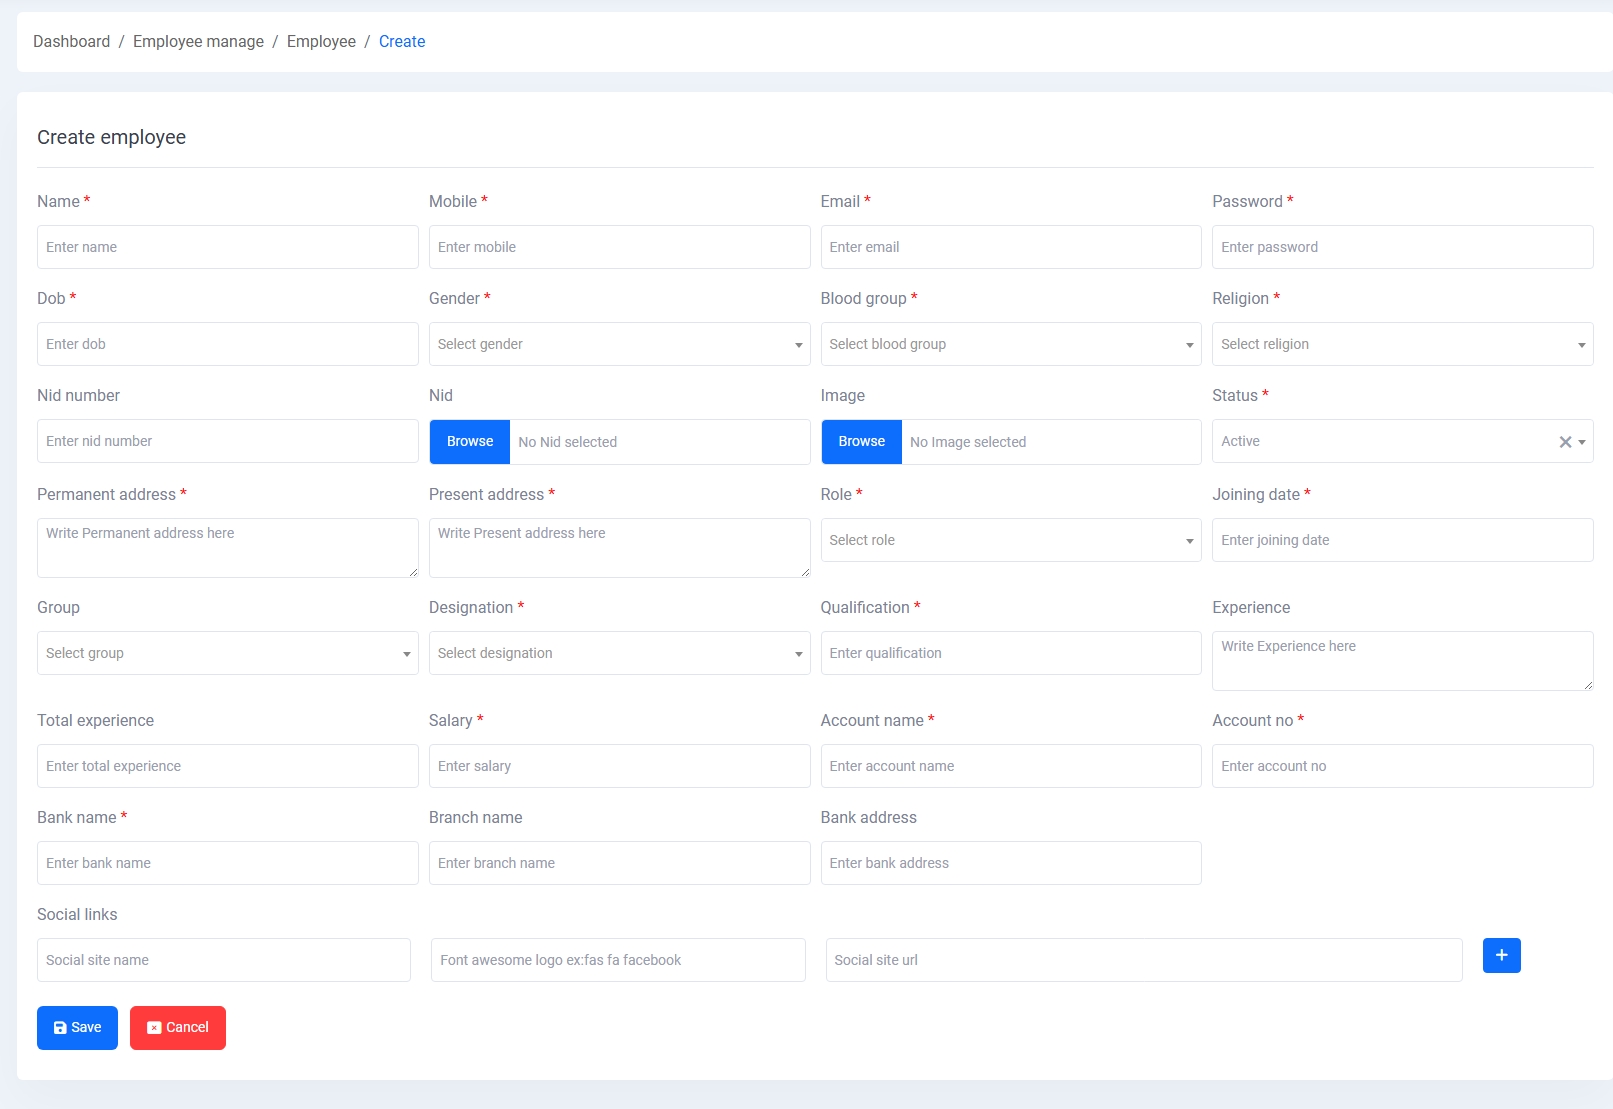
2. Add Employee:
A detailed form for registering new employees with fields like name, mobile, email, password, date of birth, gender, blood group, religion, addresses, designation, experience, salary, joining date, account and bank info, role, NID upload, profile image, and social links. Each required field ensures proper validation and HR completeness.
Role Management
The Role Management module allows administrators to define roles and assign permissions to control access throughout the system.
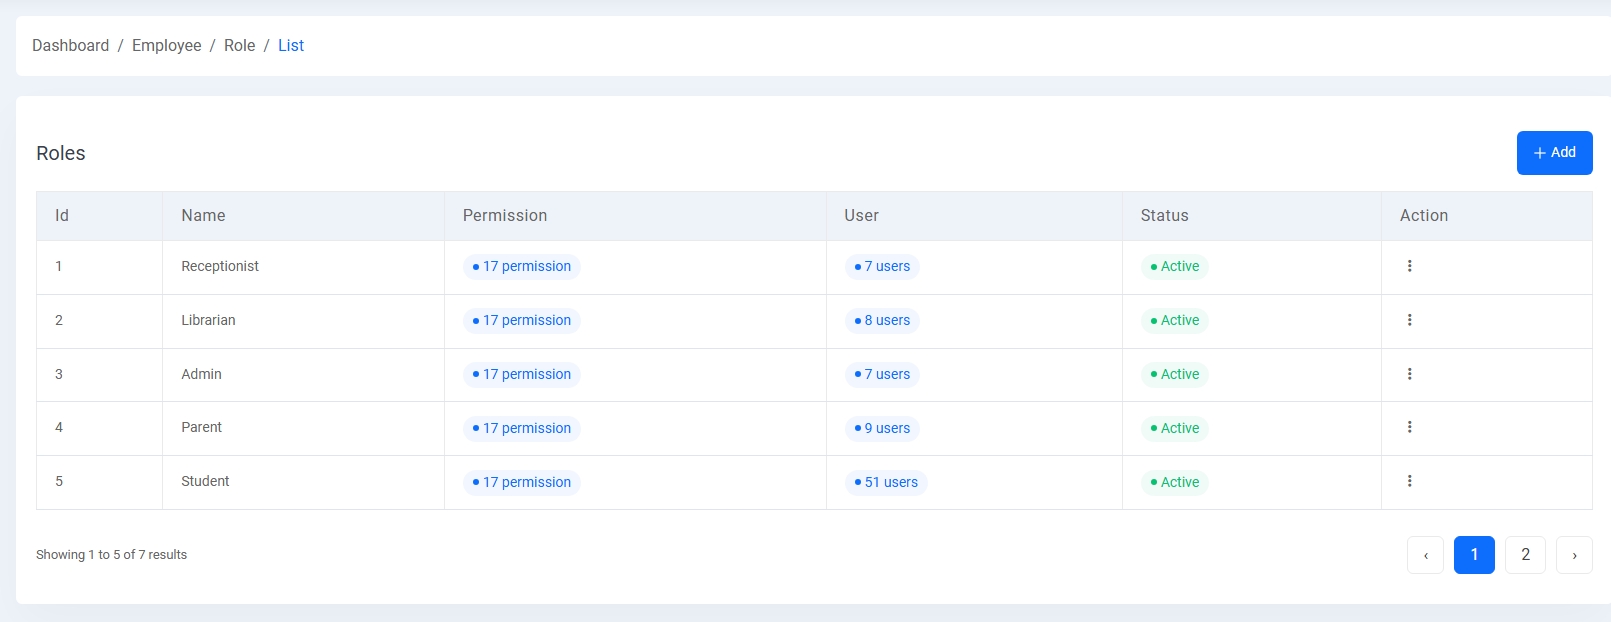
- Role List: Displays all existing roles with name, slug, number of permissions, status, and action buttons for editing or deleting.
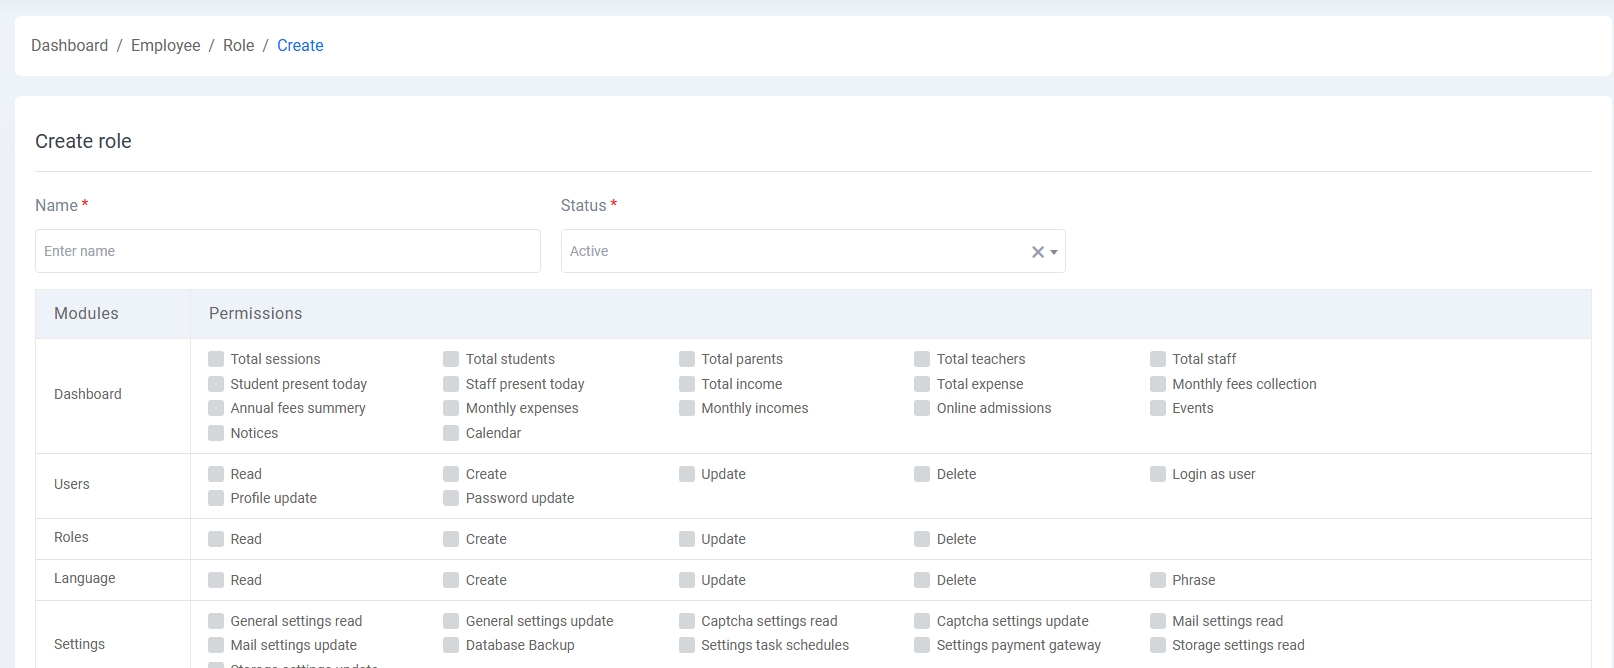
- Role Create: Form to define a new role with a name, status toggle, and a permission matrix where specific actions (Read, Create, Update, Delete) can be assigned per module.
This module supports robust access control by enabling fine-grained permission assignments to user-defined roles.
Payroll Management
The Payroll module simplifies salary generation, payment processing, and payslip management for school staff, ensuring accuracy and transparency.
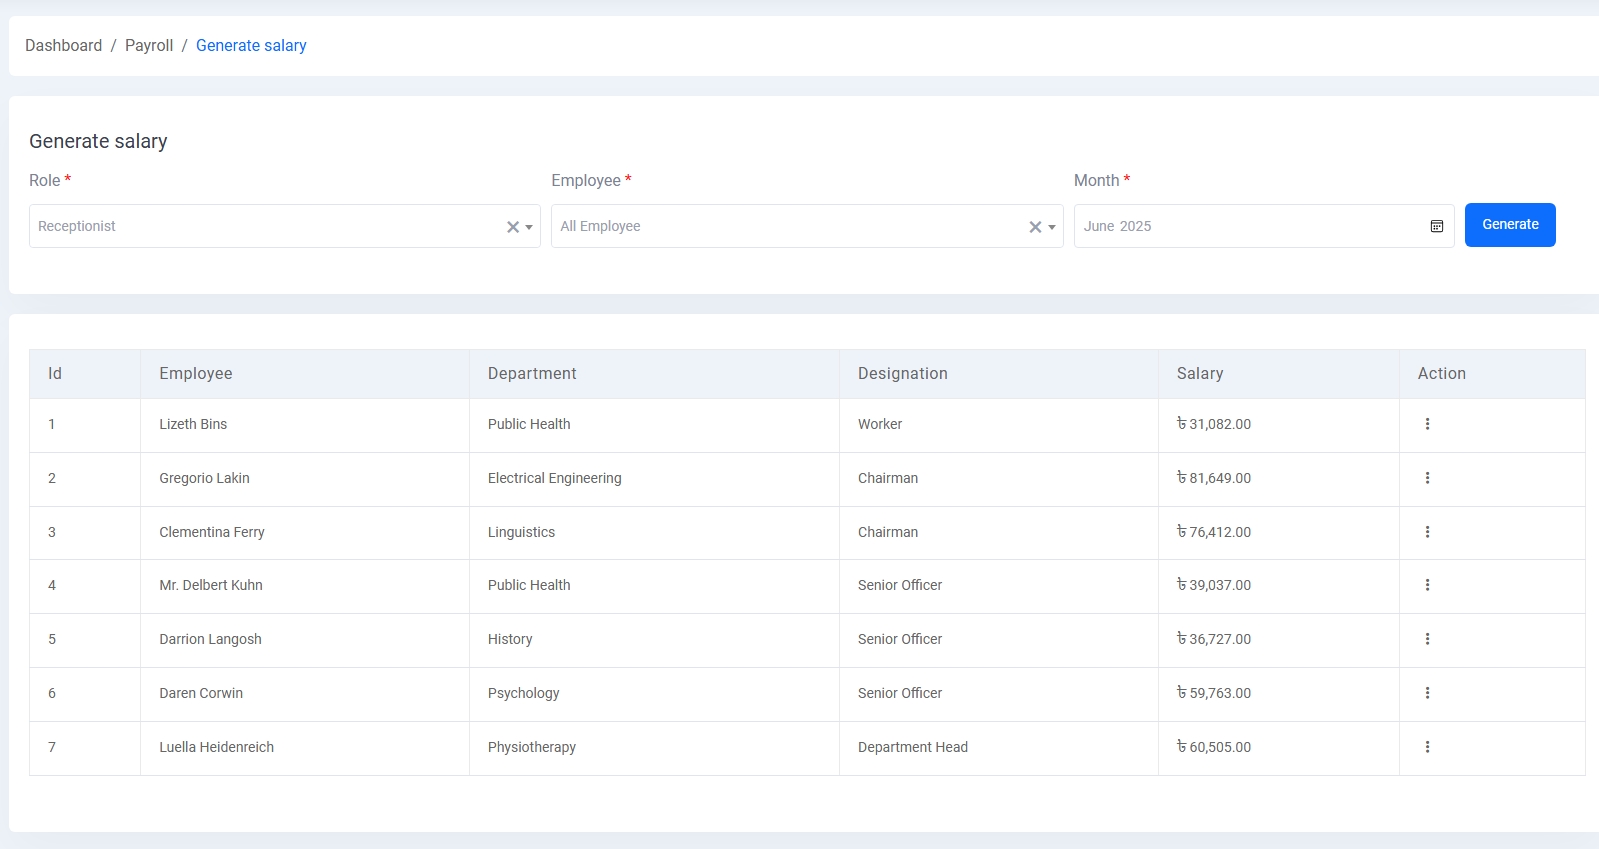
1. Generate Salary:
Select a role, employee, and month to automatically calculate the salary based on predefined settings. Displays employee list with department, designation, and monthly salary.
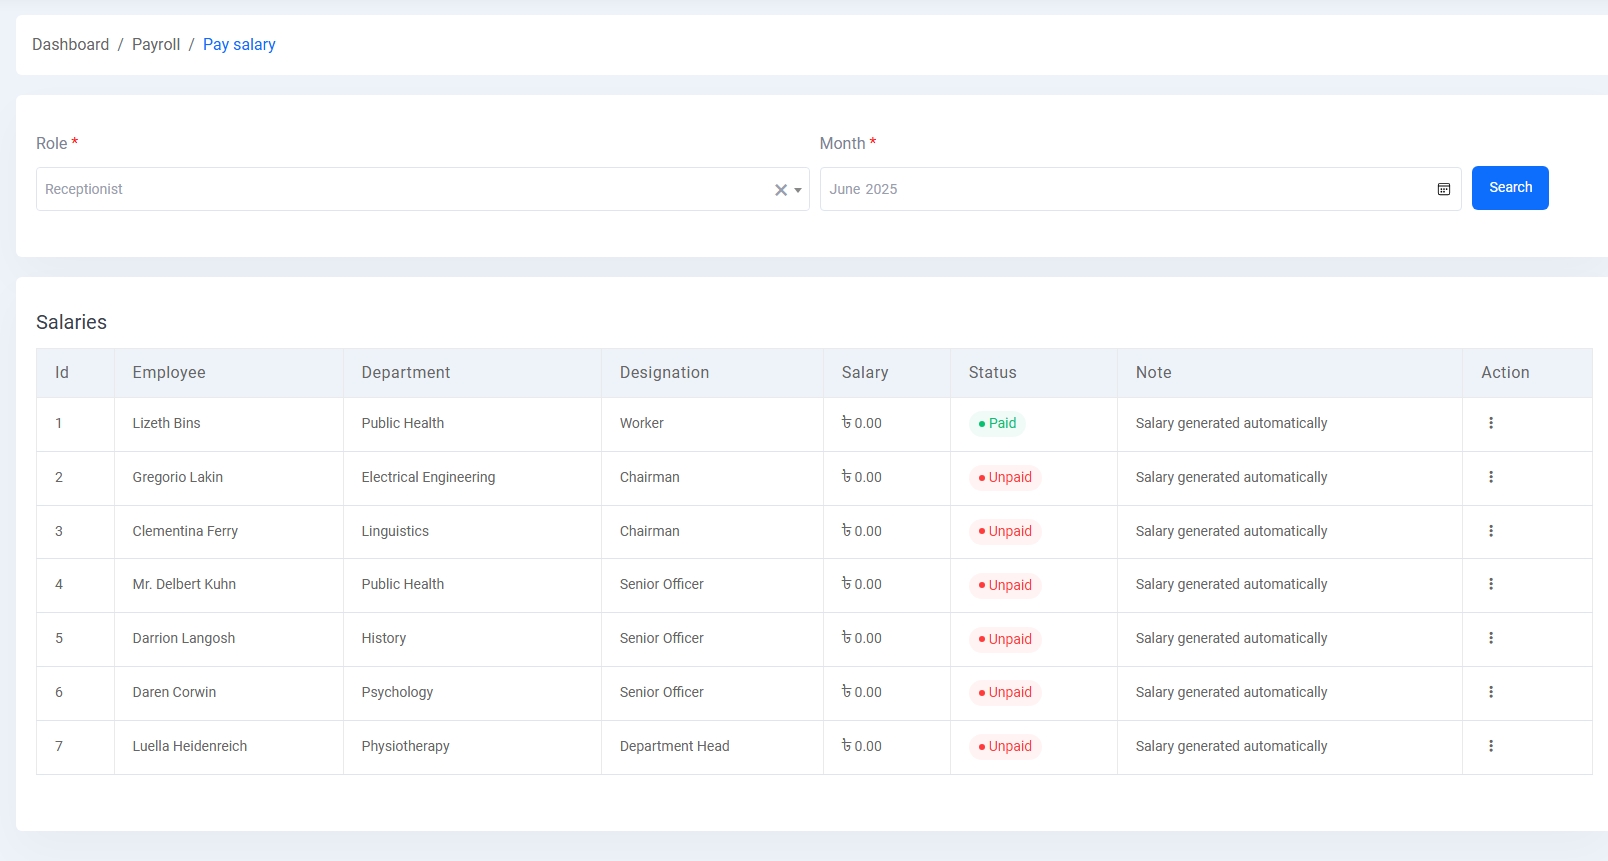
2. Pay Salary:
View the salary status (Paid/Unpaid) of employees. You can filter by role and month, and update payment status for each entry.
3. Edit Salary:
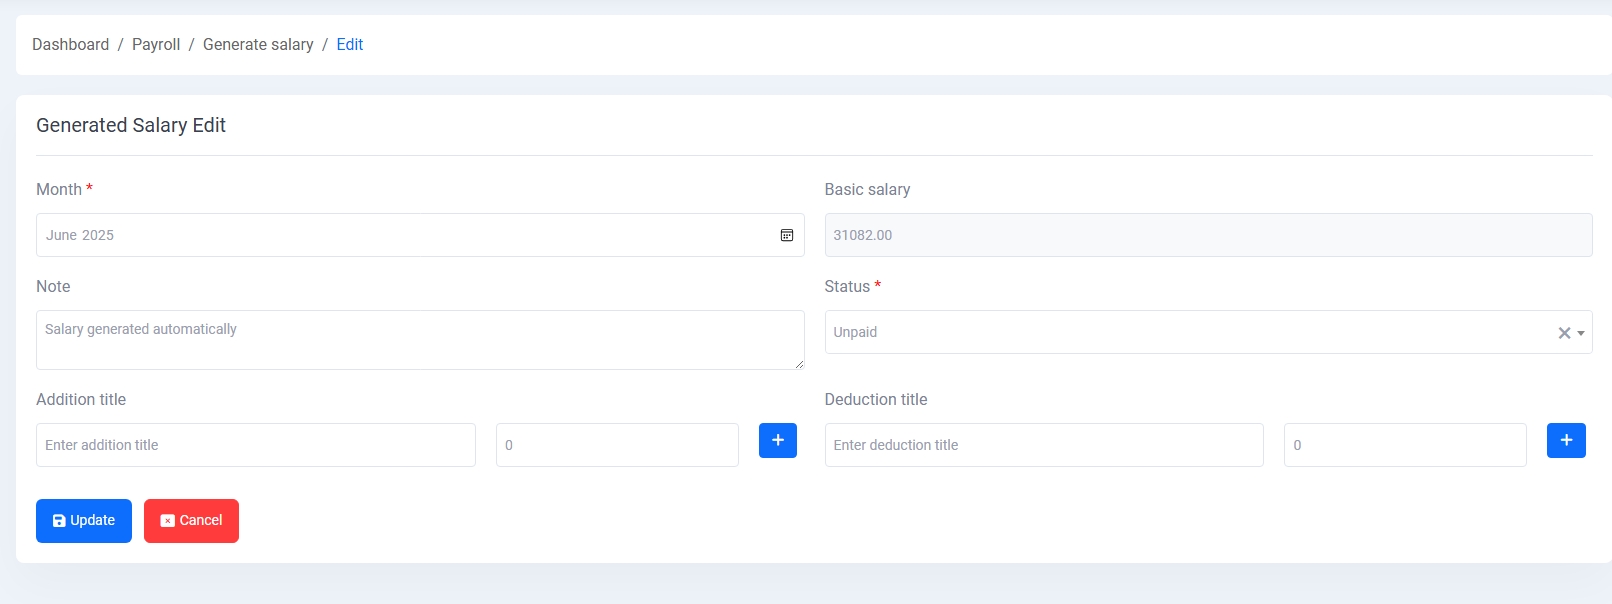
Modify generated salaries by adding bonuses (addition title) and deductions (deduction title). Change payment status and add internal notes for transparency.
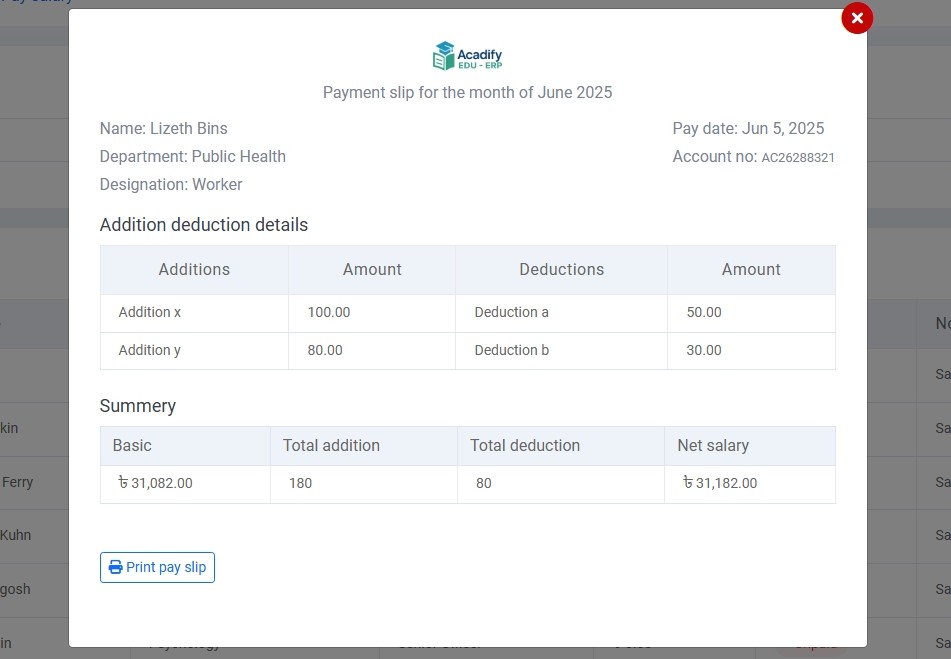
4. Salary Slip:
Generate and view a detailed payslip for each employee, including department, designation, account number, basic salary, additions, deductions, and net payable amount. Includes option to print the slip.
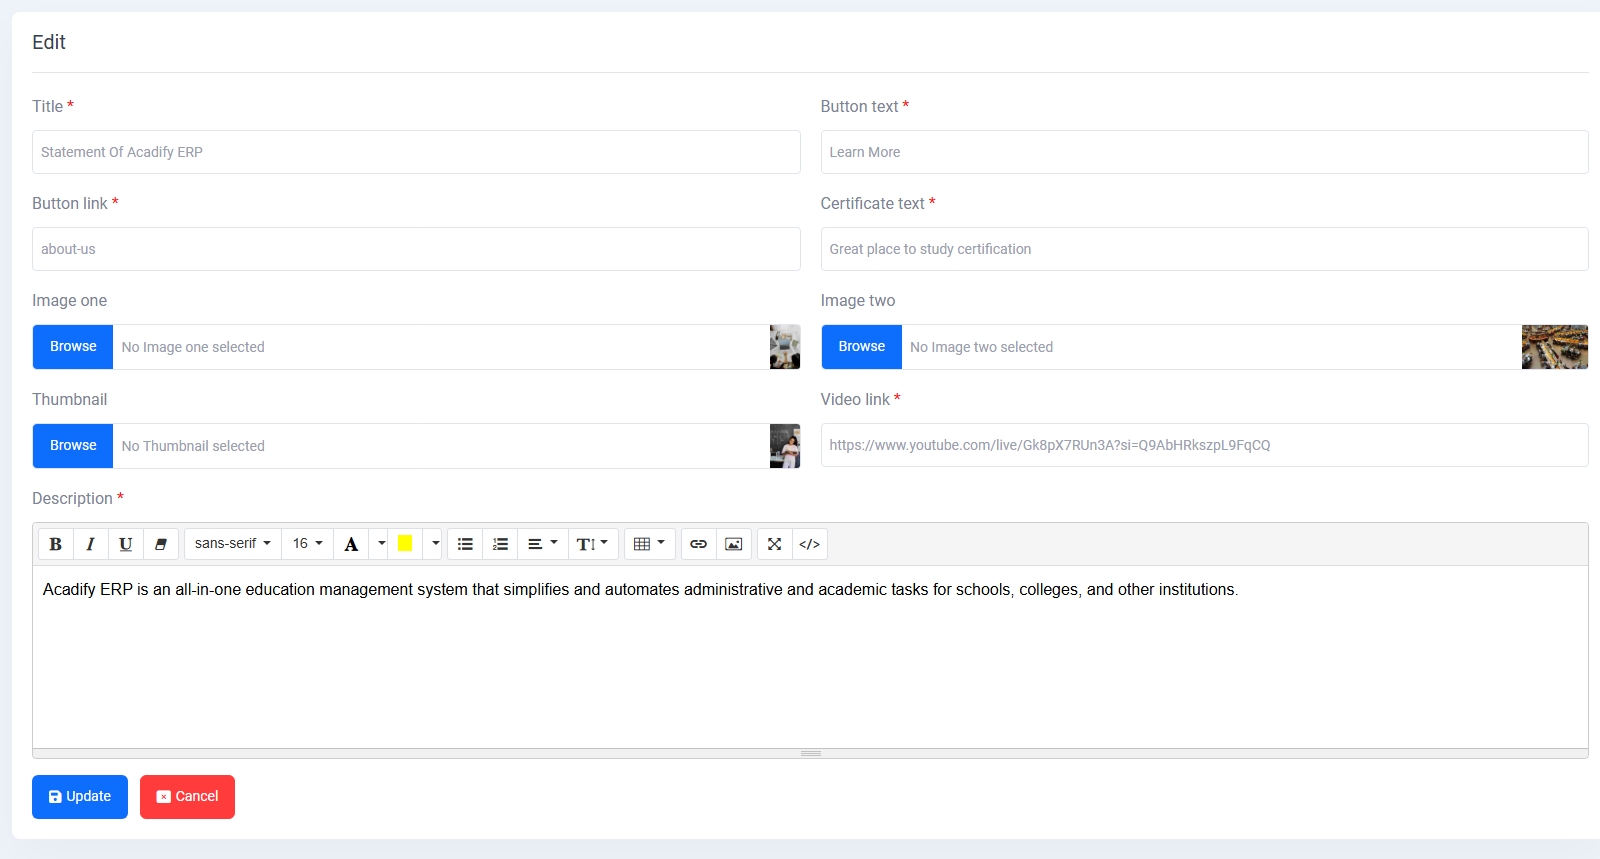
Website Sections
The Website Sections module provides control over all modular content areas of the public-facing website, allowing administrators to manage, edit, and update key display blocks individually.
Available Sections Include:
Edit Options:
- Each section includes a form tailored to its type, with content like headings, descriptions, image uploads, slides, or embedded video URLs.
- All updates are saved via the Update button, and changes reflect directly on the public site.
This module ensures non-technical admins can manage website content layout and information dynamically without coding.
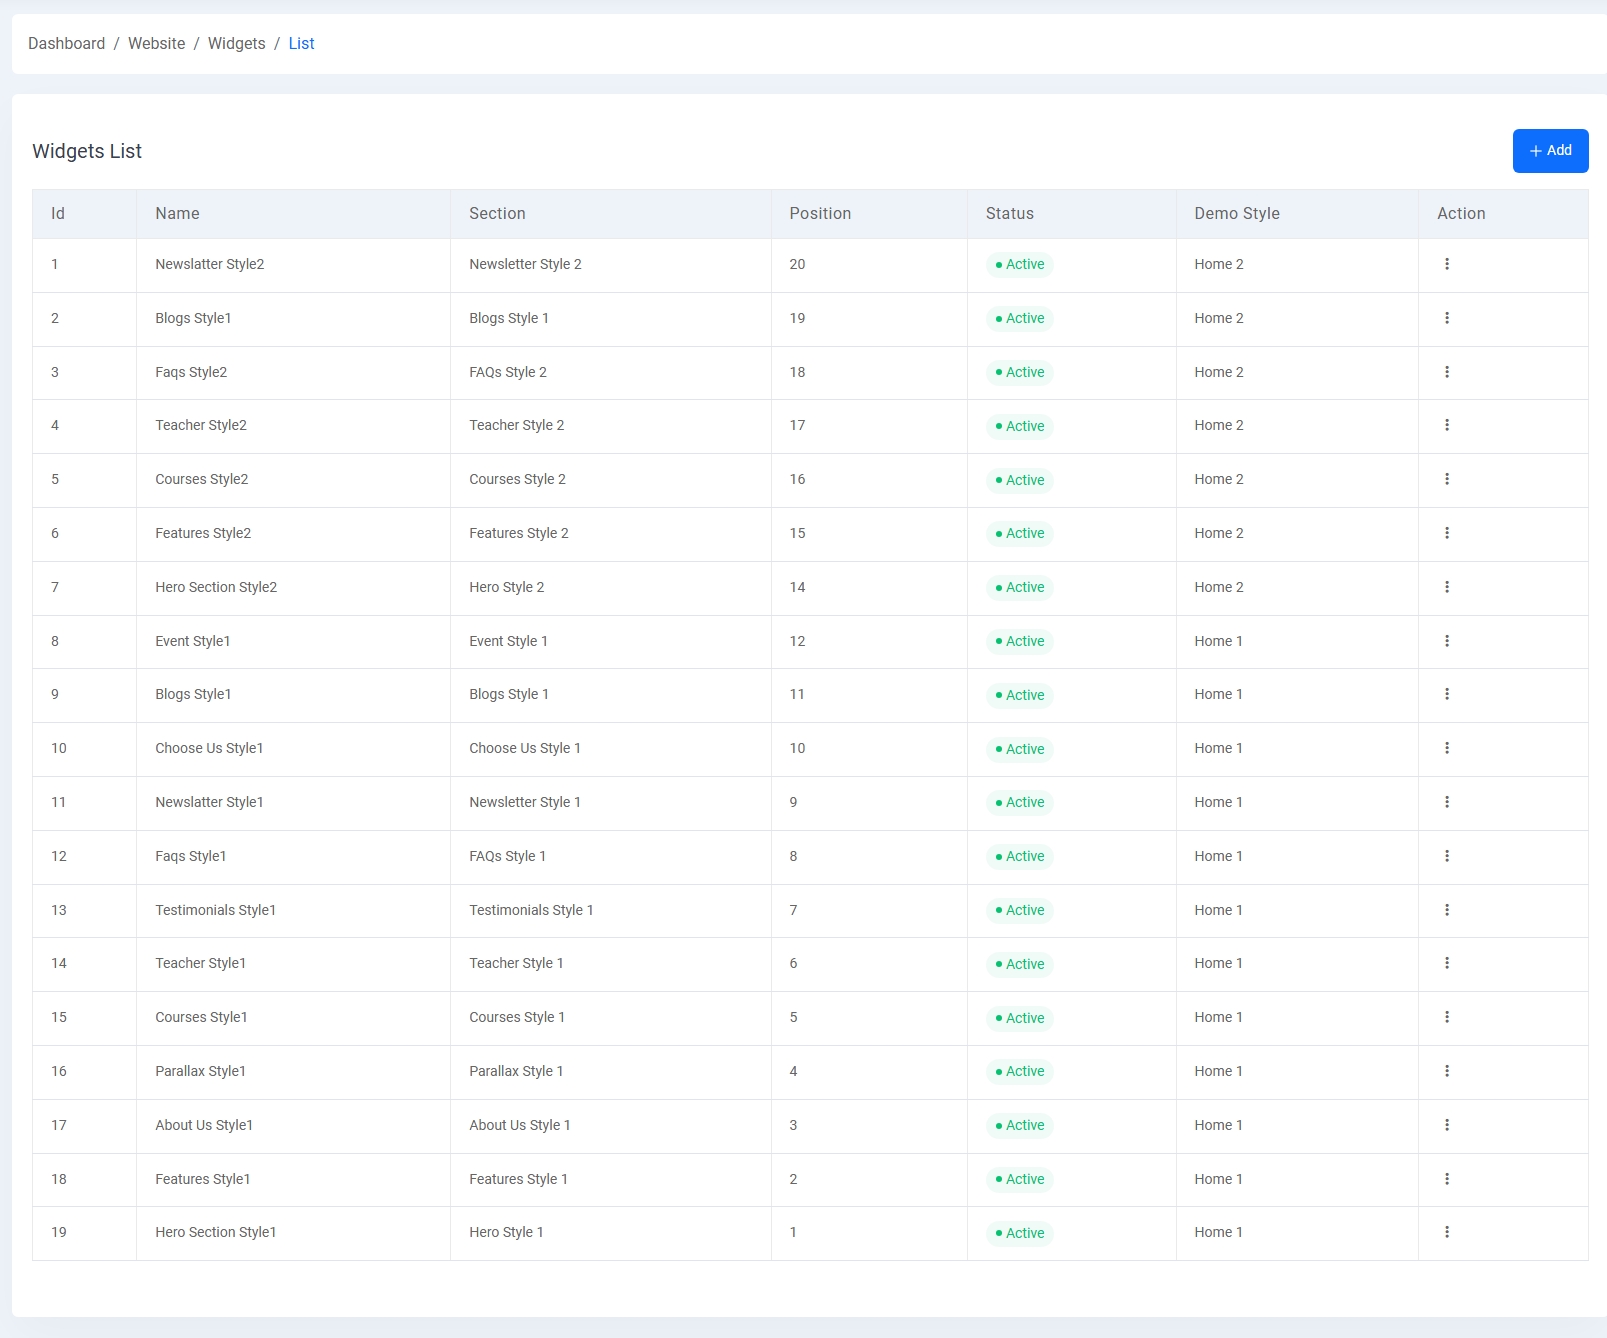
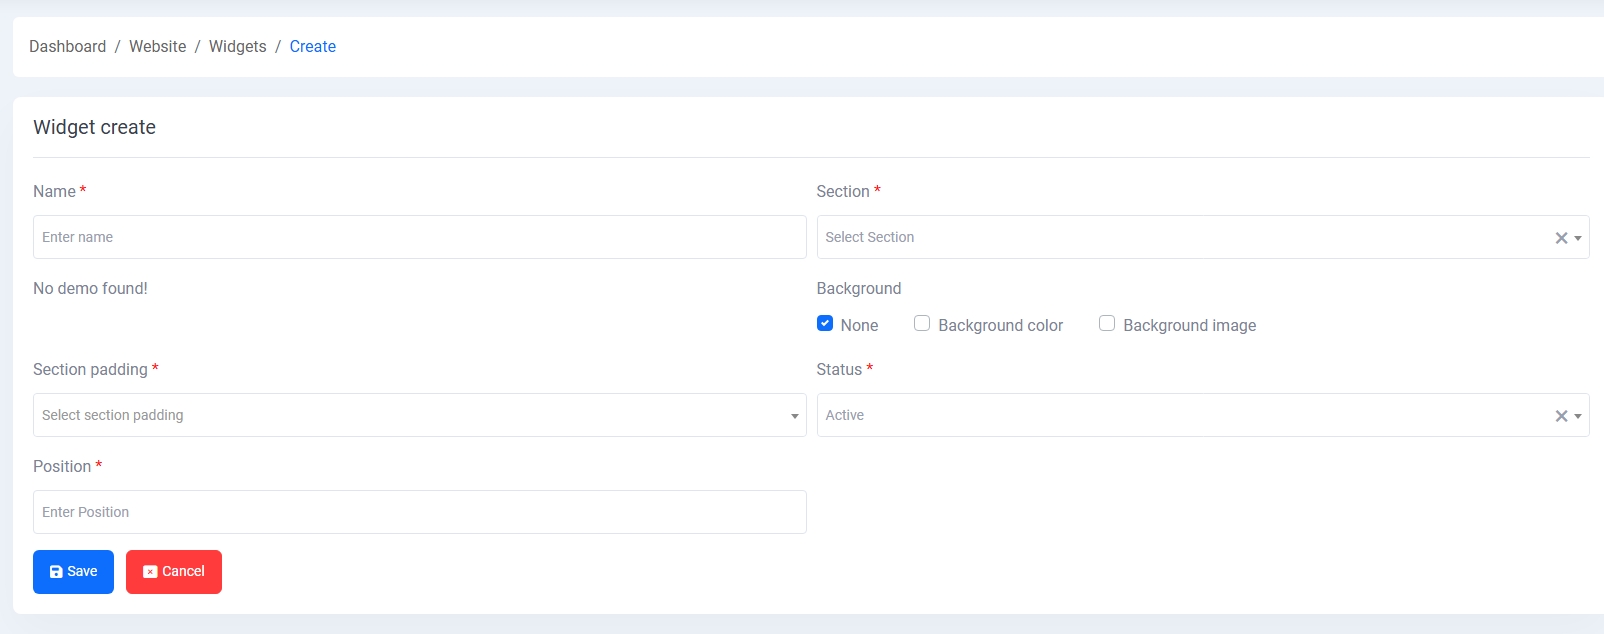
Widget Management
The Widget Management module allows administrators to customize and control individual UI components across various website sections using multiple styles, positions, and layout options.
- Widget List: Displays all configured widgets, showing name, section, display order (position), activation status, associated demo style (e.g., Home 1, Home 2), and actions for editing or deleting.
- Widget Create: Admins can define a new widget by setting:
- Name and associated section
- Background option (none, color, or image)
- Section padding and display position
- Status toggle for activation
- Widget Edit: Offers pre-filled input fields along with demo preview (if available) for quickly modifying background style, padding, order, or visibility.
This feature empowers flexible design control, enabling modular and reusable content blocks (widgets) to be independently created, styled, and positioned across the website layout.
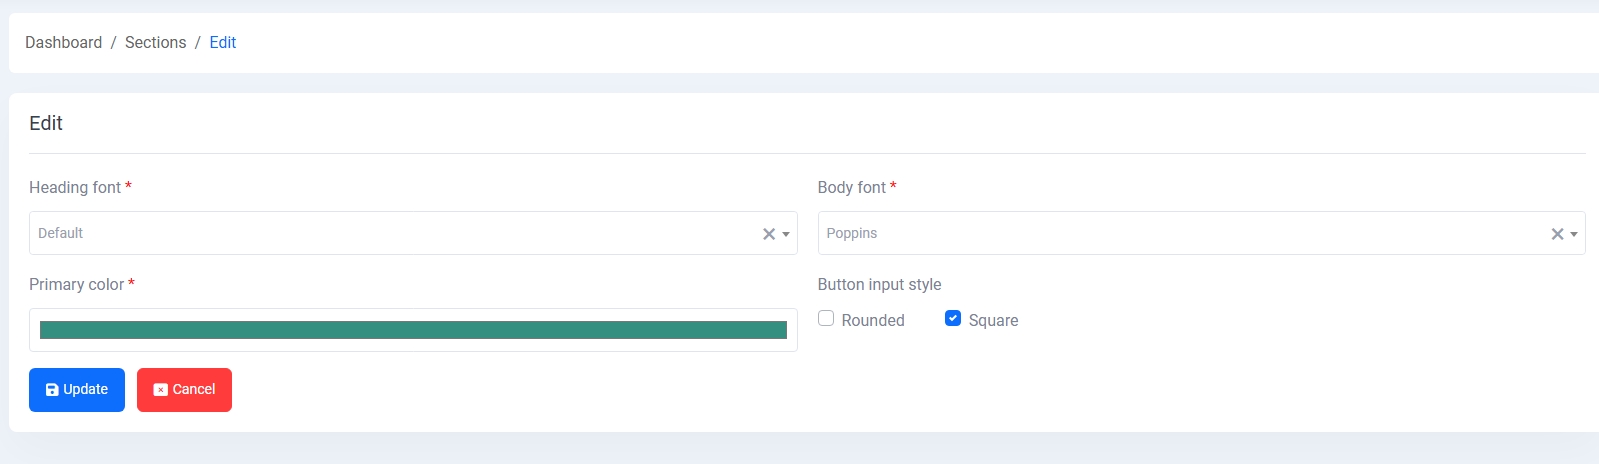
Theme Appearance
The Theme Appearance section enables administrators to personalize the website’s visual identity by selecting fonts and primary color schemes.
- Heading Font: Choose a Google Font for all major headings across the site.
- Body Font: Select a complementary font for body text for consistency and readability.
- Primary Color: Define the main theme color used in buttons, highlights, and UI elements.
This customization tool ensures branding alignment and visual consistency throughout the web platform.
Blog Management
The Blog Management module allows administrators to create, update, and maintain blog articles for the website. It provides a clean interface to manage article metadata, authorship, content formatting, and display settings.
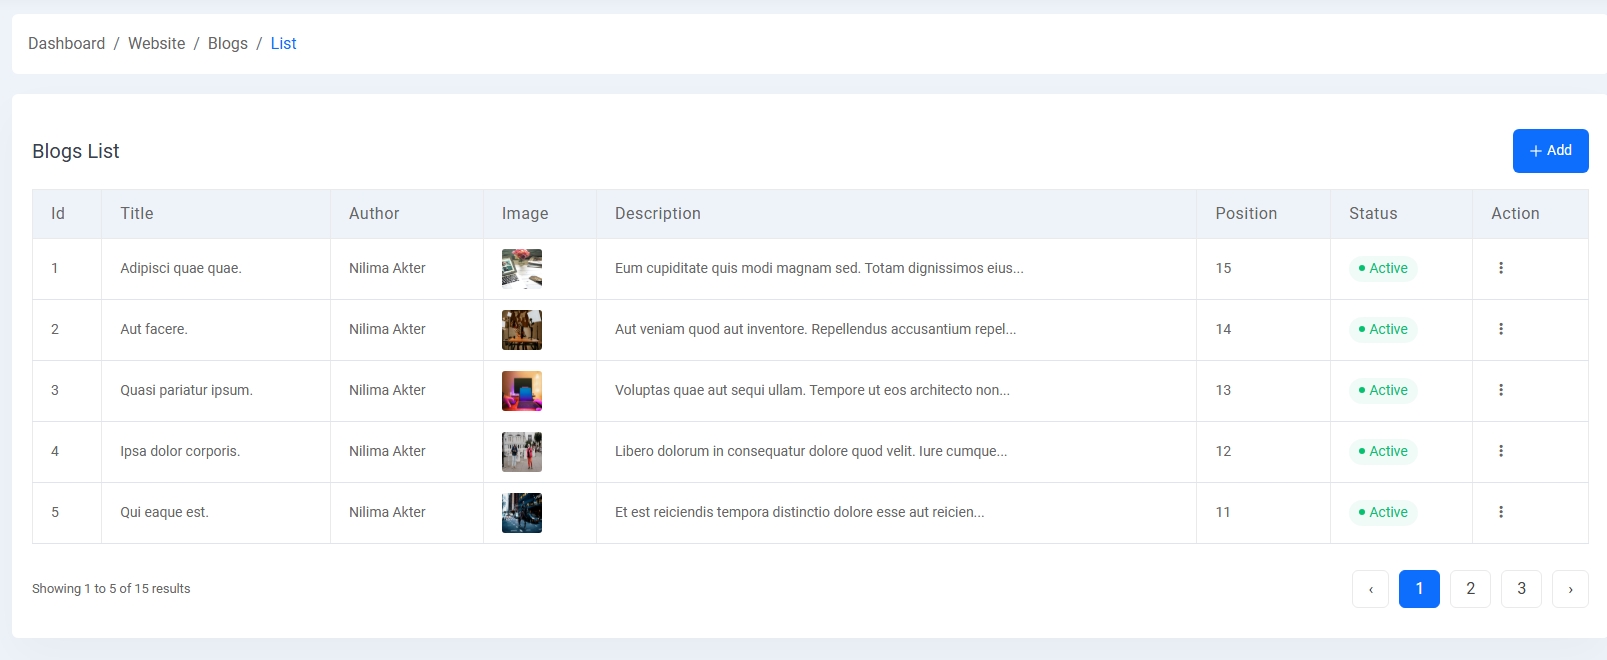
- Blog List: Displays a paginated table of all blog posts showing:
- Title and Author
- Thumbnail image
- Short content preview
- Ordering position
- Status toggle
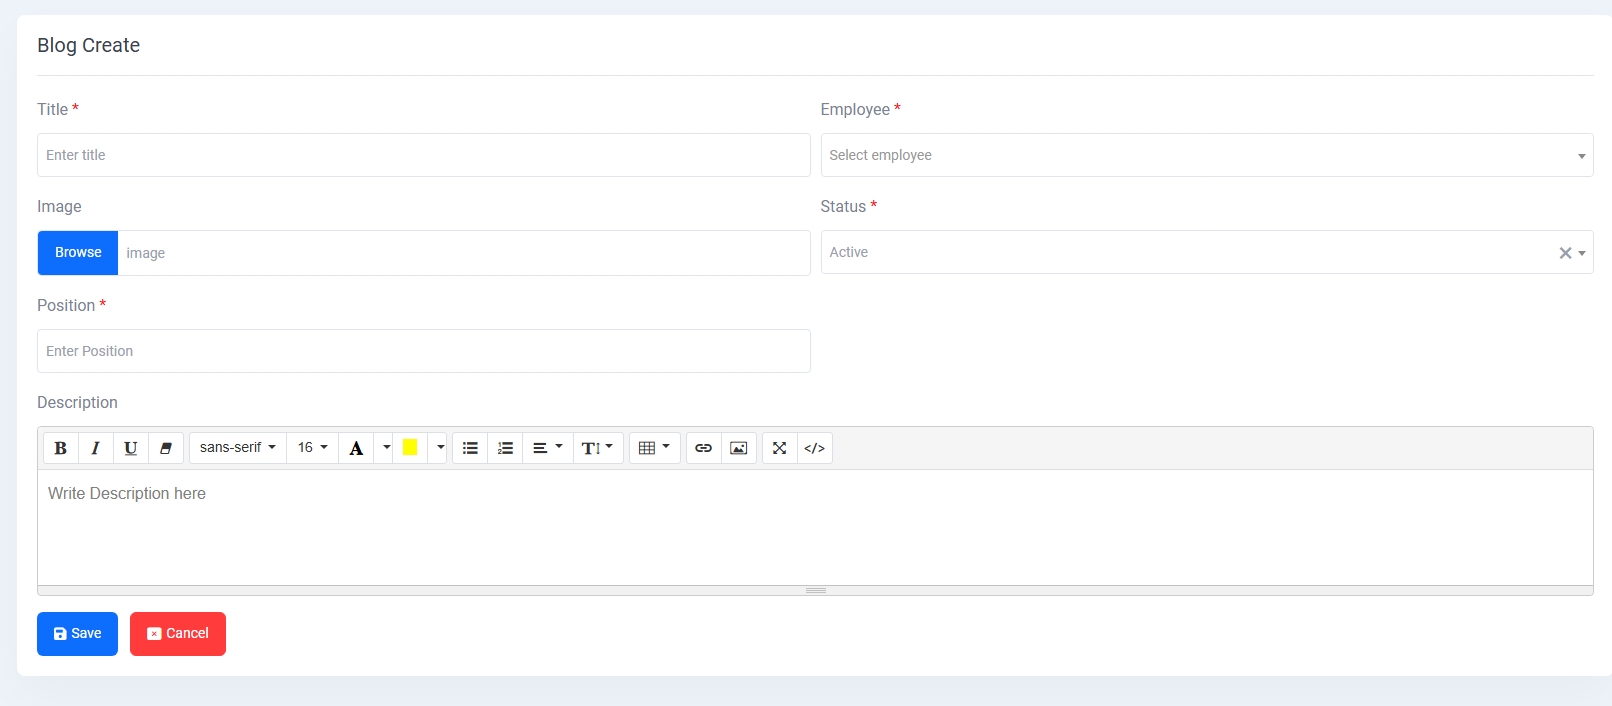
- Blog Create: Provides a form for admins to:
- Enter title and assign an employee as author
- Upload a cover image
- Set display position (ordering)
- Define post status (Active/Inactive)
- Write content with a rich text editor supporting formatting, links, images, and tables
- Blog Edit: Opens the same form pre-filled with existing content for fast updates.
This system supports efficient content publishing, allowing teams to keep their website's blog section informative and engaging without developer assistance.
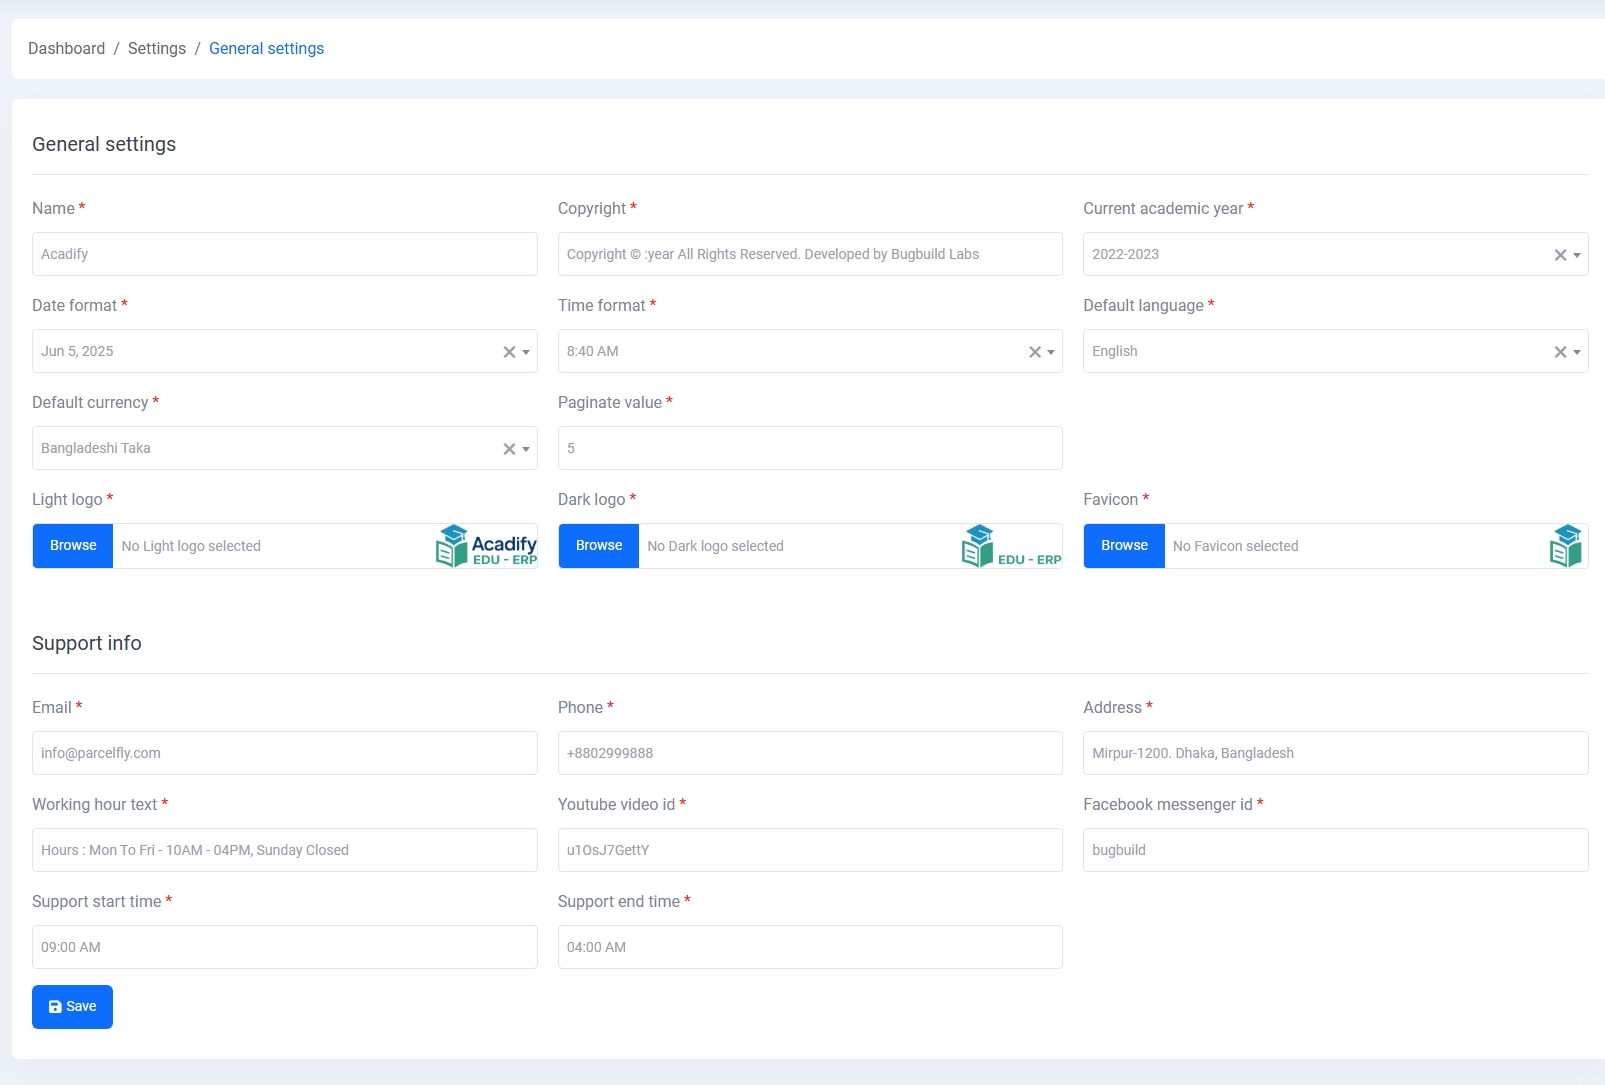
General Settings
The General Settings module provides a centralized panel to configure essential global preferences for your ERP system. It ensures that the system aligns with institutional branding, localization, and communication needs.
1. System Branding:
- Name: Define the system or institute name that will appear across the platform.
- Light & Dark Logo: Upload institution logos for both light and dark theme modes.
- Favicon: Upload a favicon that will be displayed in the browser tab.
2. Localization Settings:
- Date Format: Choose the desired date format (e.g., Jun 5, 2025).
- Time Format: Select a preferred 12-hour or 24-hour format (e.g., 8:40 AM).
- Default Language: Set the system’s default interface language.
- Default Currency: Choose the operating currency (e.g., Bangladeshi Taka).
3. Academic Preferences:
- Current Academic Year: Set the running academic session for the entire system.
- Paginate Value: Define how many items to show per page in lists/tables (e.g., 5).
4. Legal & Attribution:
- Copyright Text: Customize the copyright message to reflect system ownership or developer credit.
5. Support & Contact Information:
- Email: Provide the primary support email address.
- Phone: Add the official contact number for communication.
- Address: Mention the full address of the institution or organization.
- Working Hour Text: Set the official working hours for display.
- YouTube Video ID: Provide a YouTube video ID for tutorials or branding.
- Facebook Messenger ID: Insert Messenger ID for direct support integration.
- Support Start Time: Set the starting hour of technical support availability.
- Support End Time: Set the ending hour for support availability.
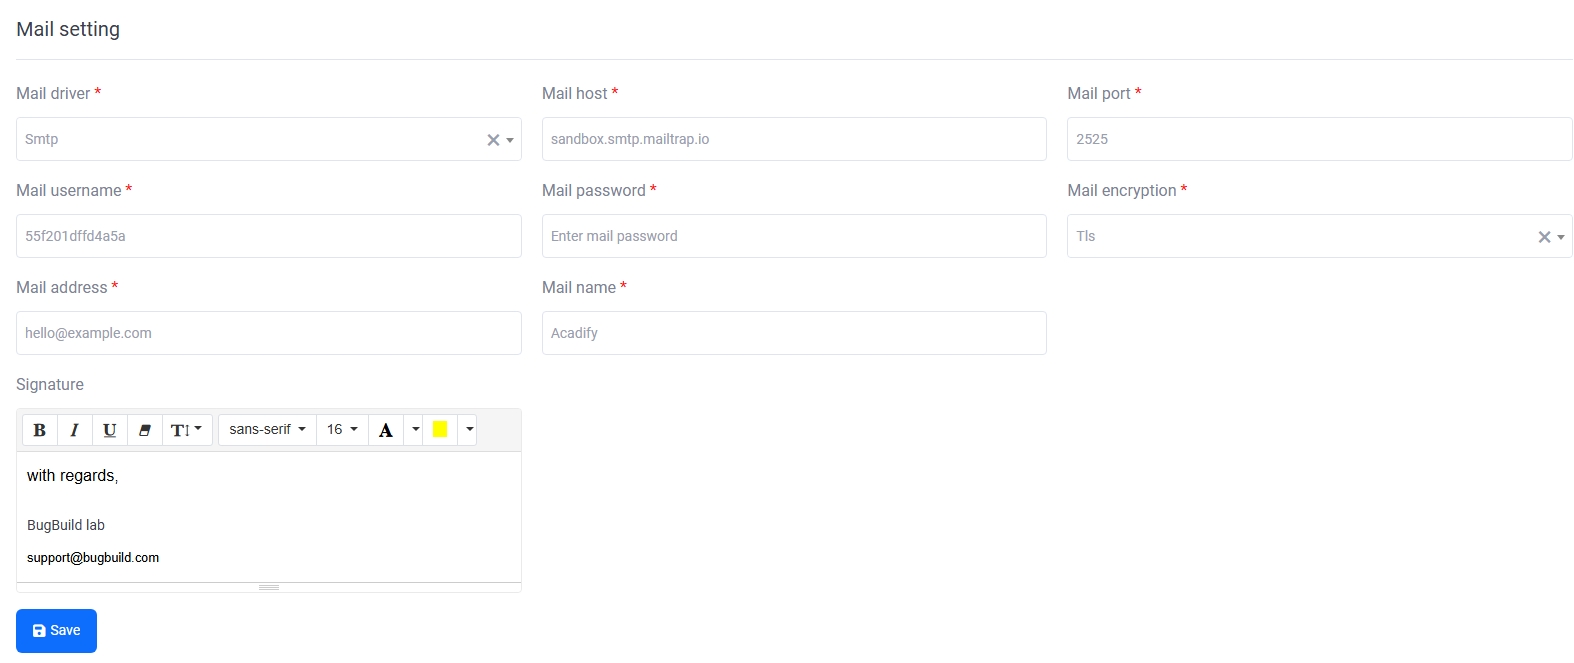
Mail Settings
The Mail Settings panel is used to configure email delivery using SMTP or other supported drivers and includes fields for host, port, encryption type, authentication credentials, and a customizable signature for outgoing emails.
- Driver & Host: Define the mail driver (SMTP) and mail server host (e.g., Mailtrap).
- Port & Encryption: Specify port number and encryption method (TLS/SSL).
- Authentication: Enter mail username, password, and sender address.
- Sender Identity: Configure the sender’s name and signature with optional formatting.
- Test Functionality: A test email can be sent to verify configuration before going live.
All changes are saved with the Save Changes button, and the system includes a test email feature to validate setup.
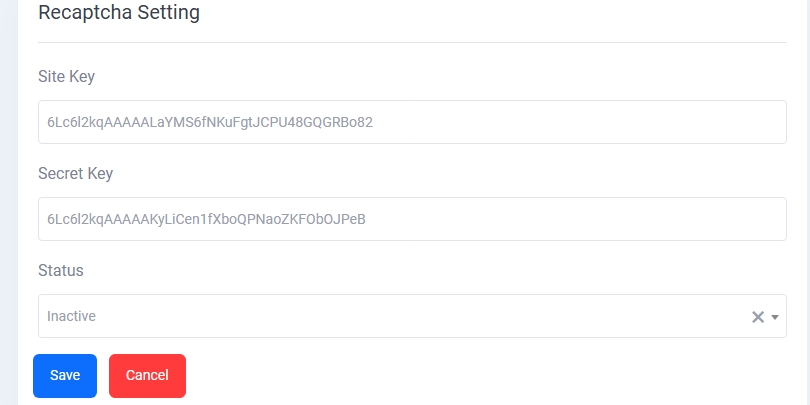
Recaptcha
The Recaptcha configuration section is used to protect the application from spam and abuse using Google’s reCAPTCHA system. Admins must provide a valid Site Key and Secret Key obtained from the Google reCAPTCHA admin console.
- Site Key: This is used in the frontend integration of reCAPTCHA.
- Secret Key: Used in the backend to verify the user’s response.
- Status Toggle: Enable or disable reCAPTCHA functionality site-wide.
Clicking the Save Changes button will apply the new reCAPTCHA settings immediately.
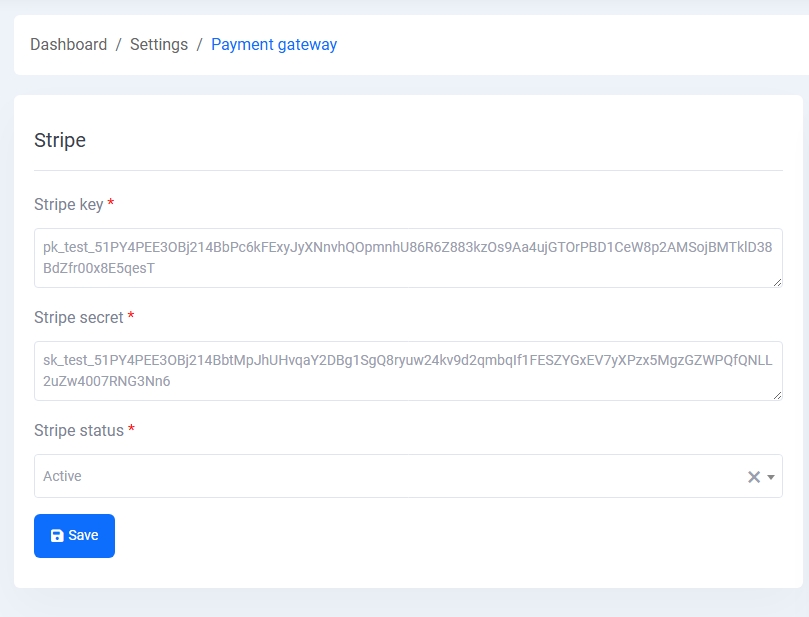
Payment Gateway Settings
The Payment Gateway Settings module allows administrators to configure and manage different payment methods like Stripe and manual bank transfers for seamless transactions.
1. Stripe Payment Configuration:
Integrate Stripe by entering the Stripe public key and secret key. You can activate or deactivate the Stripe gateway using the status dropdown. This ensures secure and live integration for processing digital payments.
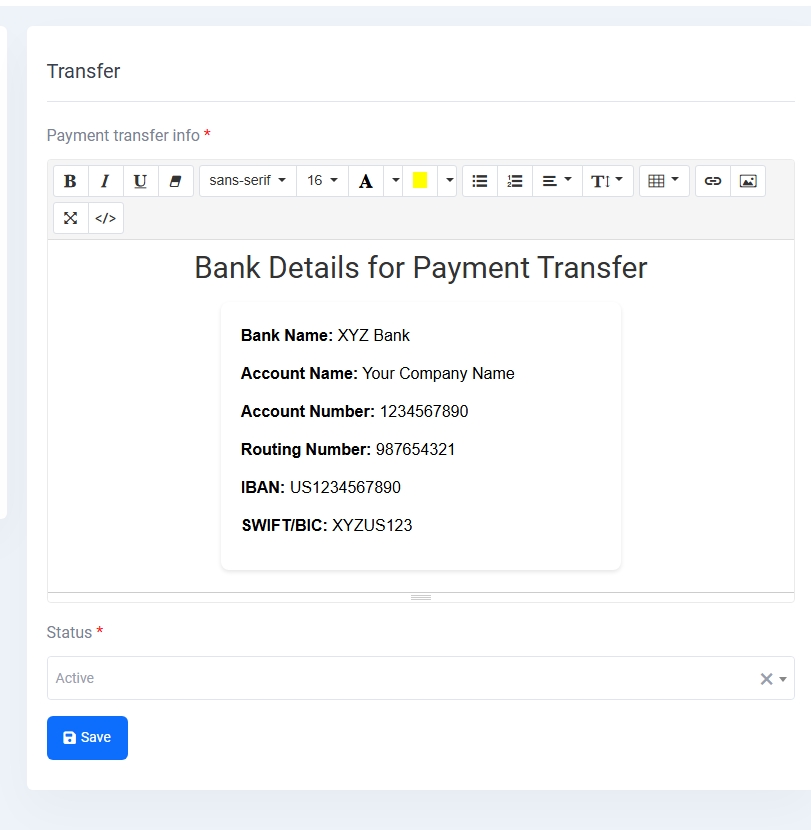
2. Bank Transfer Details:
Enable payment via direct bank transfer by providing essential bank information such as bank name, account number, routing number, IBAN, and SWIFT/BIC. A rich text editor allows easy formatting of instructions for users, along with an activation toggle.
Transmission Module
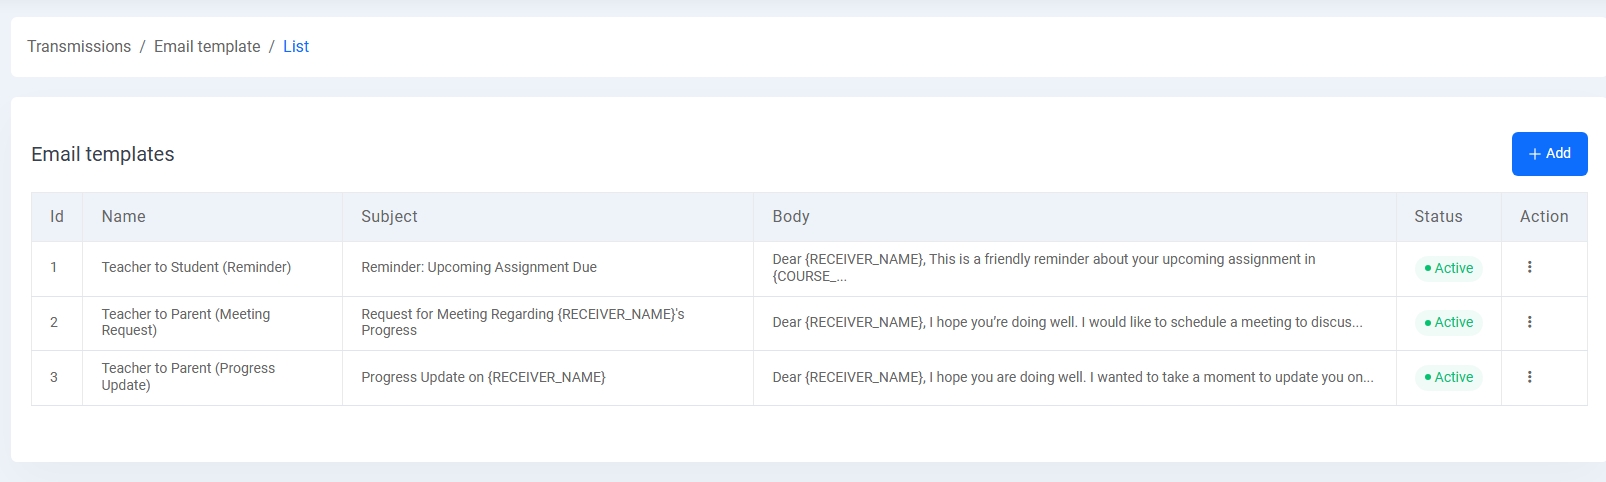
The Transmission Module enables the management and sending of emails and SMS notifications efficiently using dynamic templates and role-based filters.
1. Email Template List:
View all predefined email templates with fields such as name, subject, body, and status. These templates include messages like assignment reminders and progress updates from teachers to students and parents.
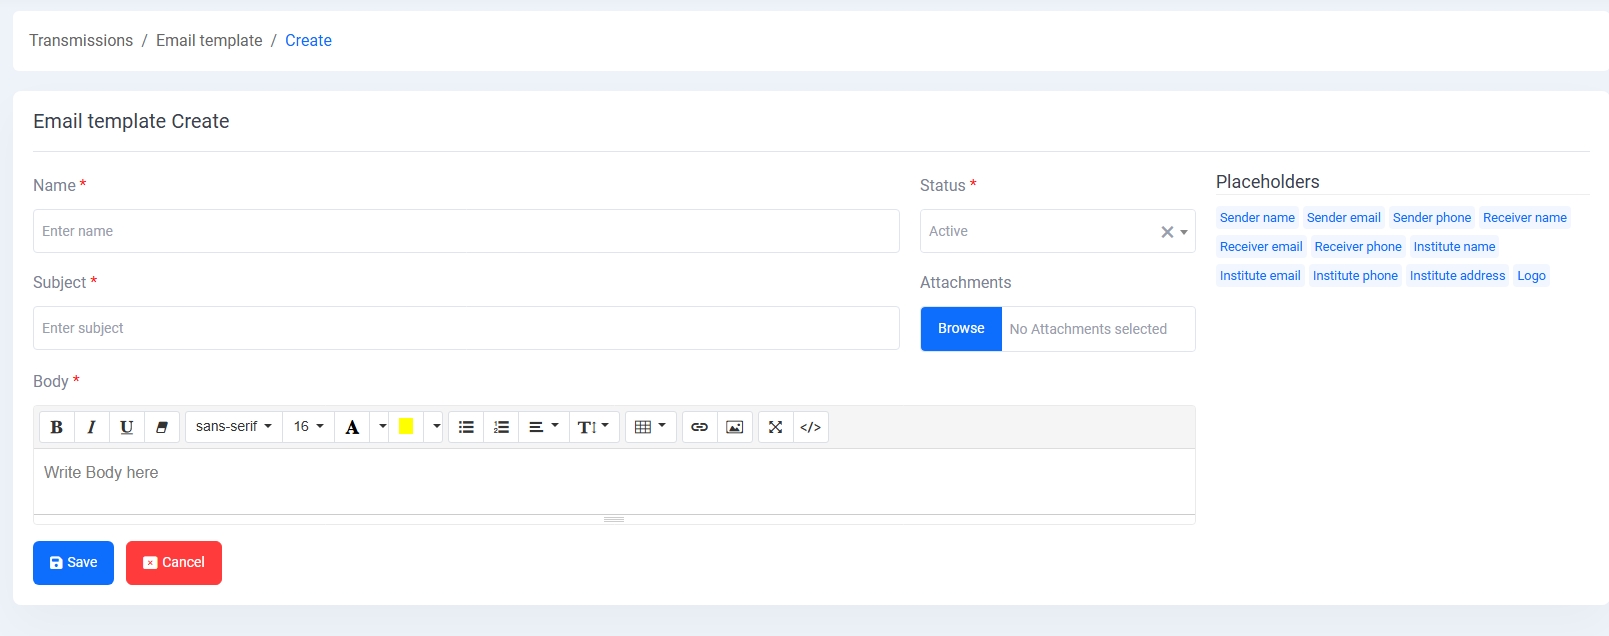
2. Create Email Template:
Add new email templates by defining name, subject, body with rich formatting tools, placeholders (e.g., {SENDER_NAME}, {RECEIVER_NAME}), and optional attachments. Set status as active or inactive.
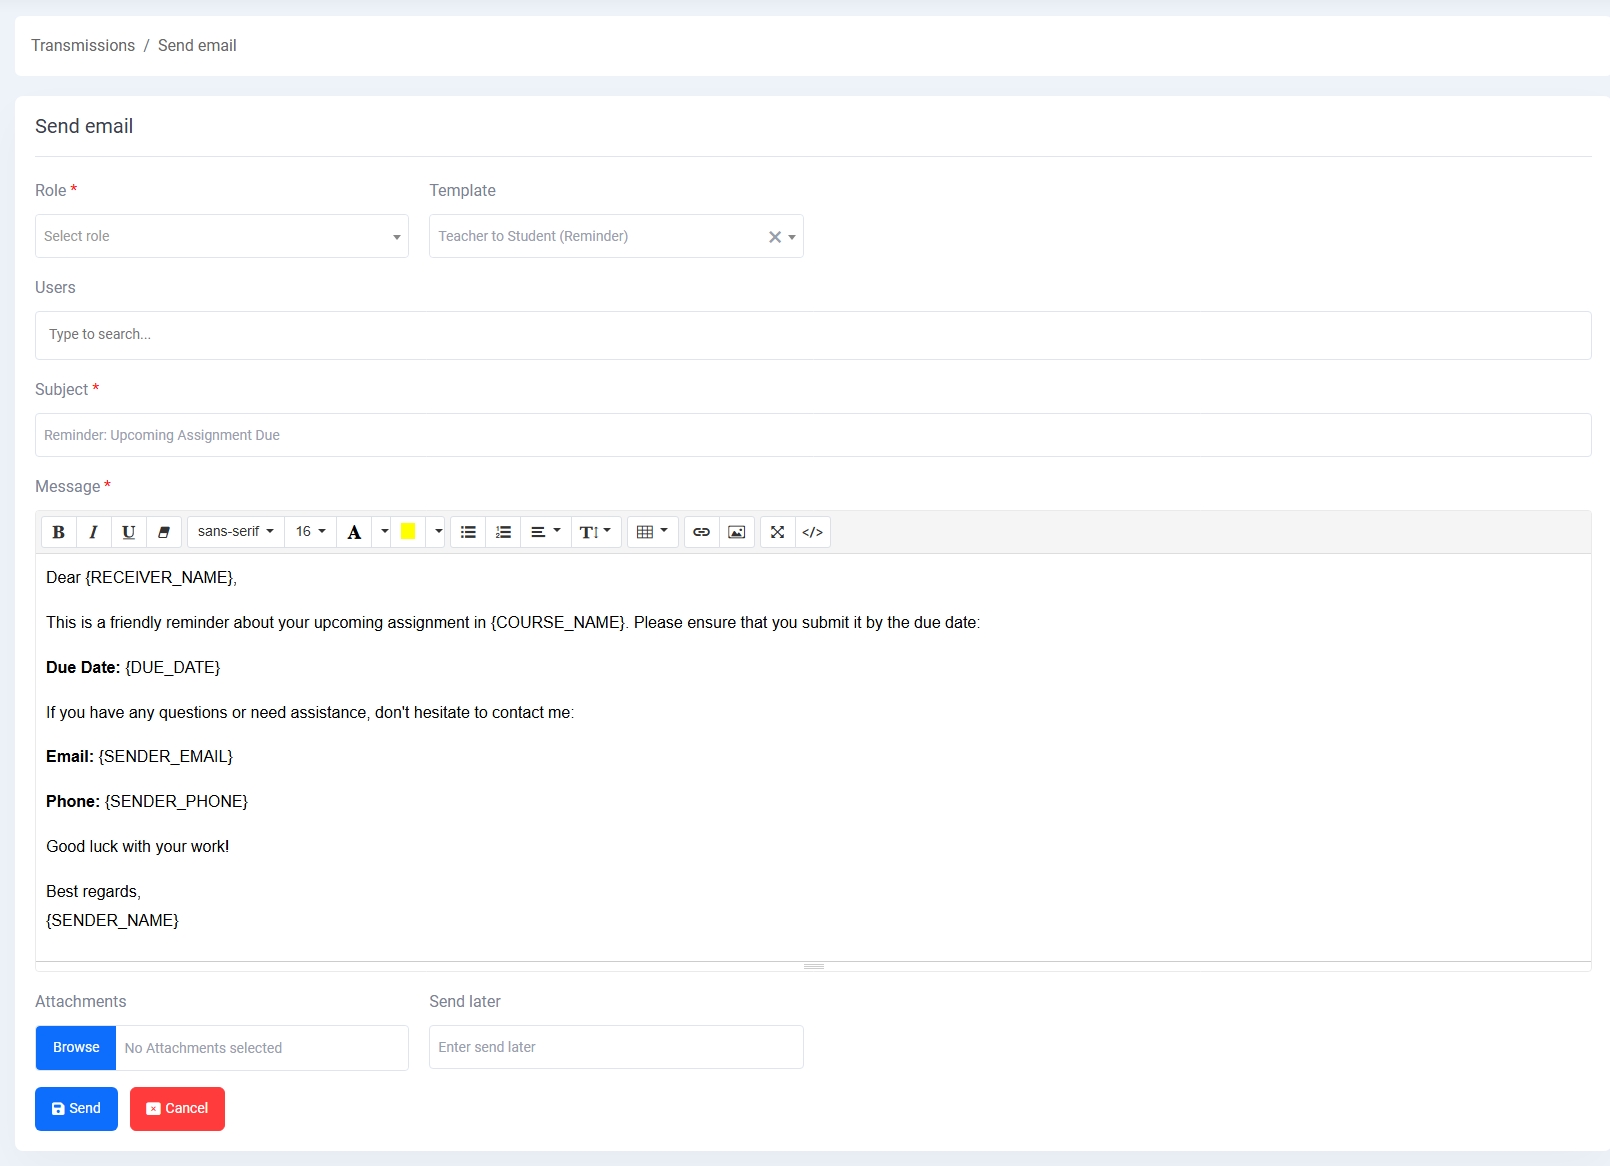
3. Send Email:
Select a role and template, search users dynamically, and preview the message before sending. Includes fields for subject, message body, optional attachments, and scheduled send time.
4. SMS Template List:
Lists all SMS templates with fields like name, message, and status. Useful for quickly sending role-specific notifications like fee reminders, payroll info, and feedback requests.
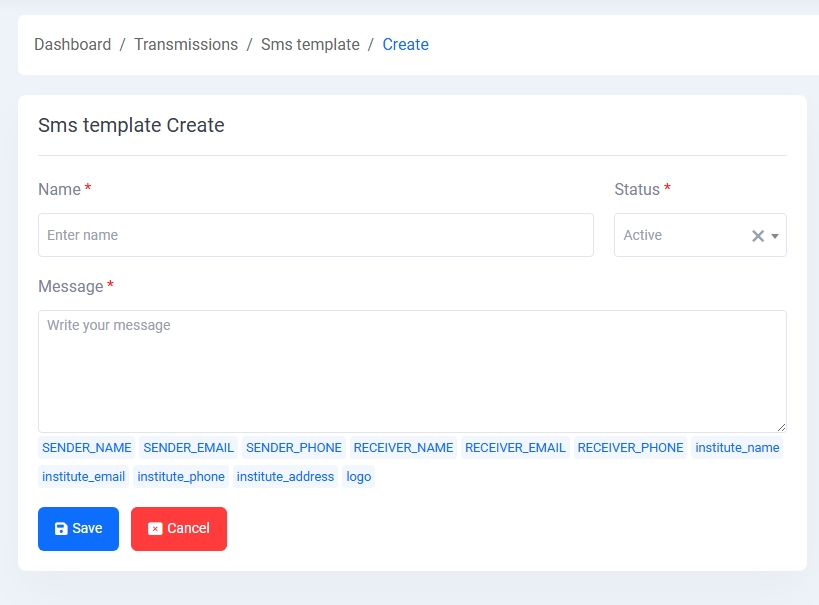
5. Create SMS Template:
Define reusable SMS templates by entering name, message body, and inserting dynamic placeholders. Set the template as active/inactive for controlled usage.
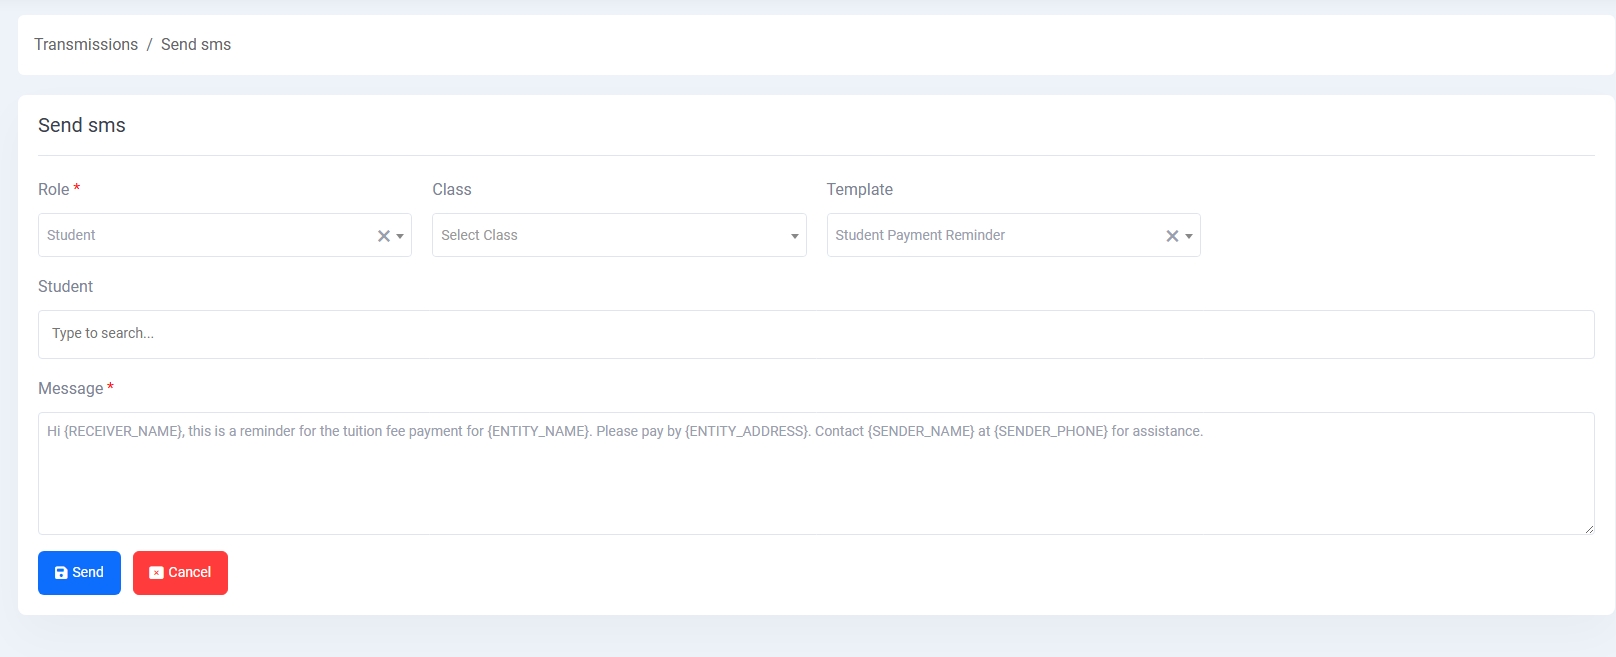
6. Send SMS:
Choose a role, class, and template. Filter students and send personalized SMS using predefined templates. Supports dynamic placeholder replacements (e.g., {RECEIVER_NAME}, {SENDER_PHONE}).

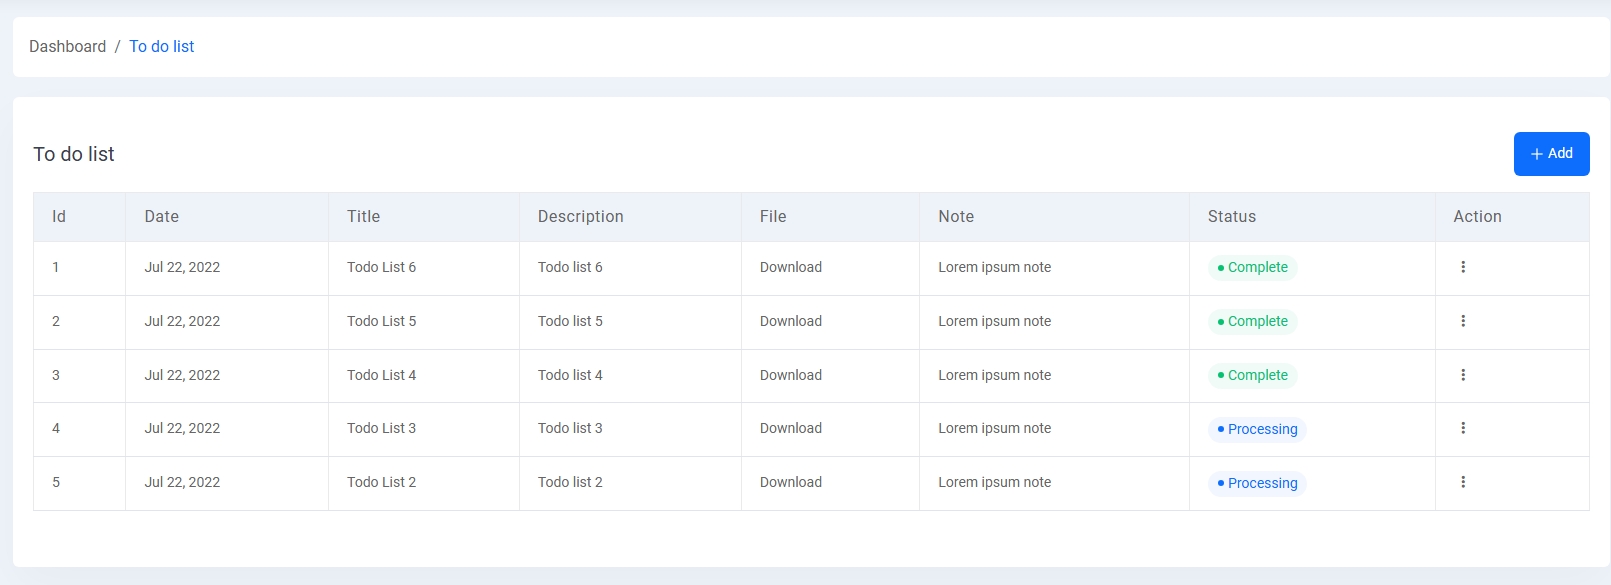
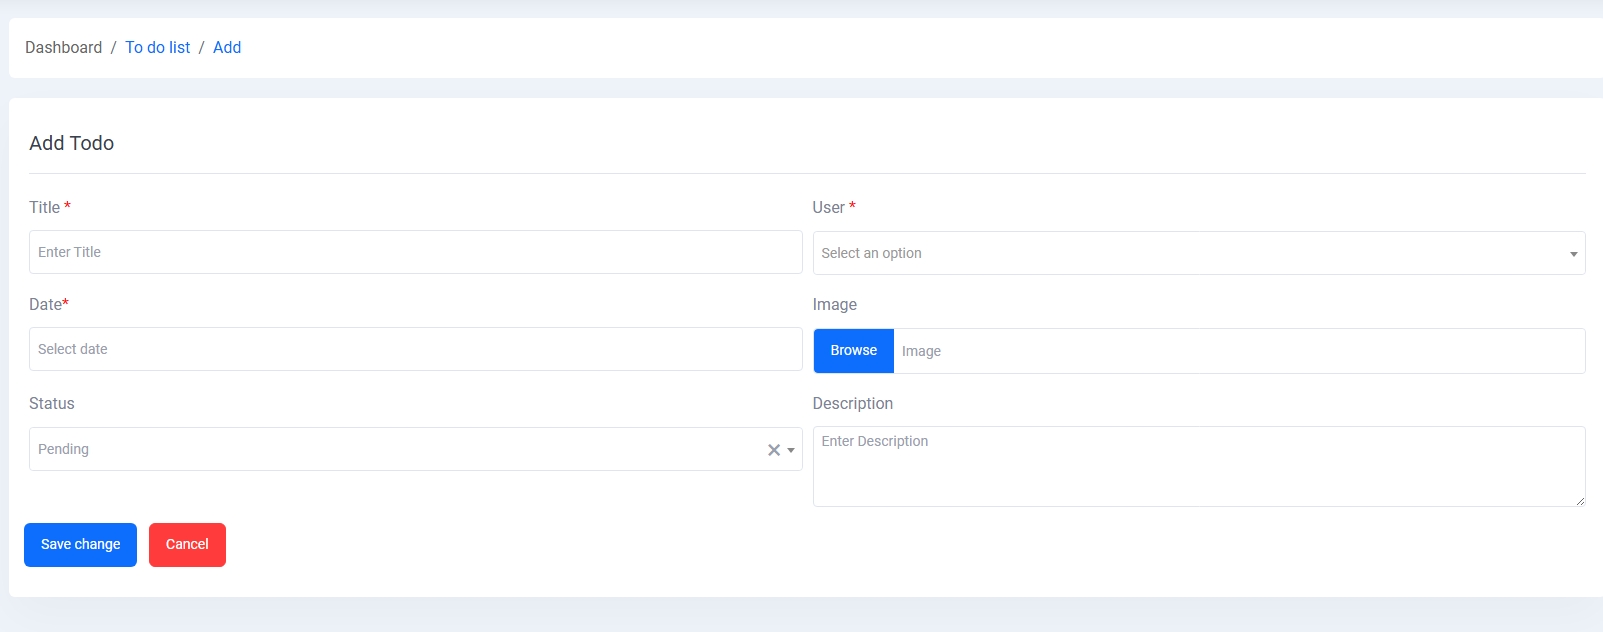
Todo List
The Todo List module allows administrators or users to manage and track daily tasks efficiently. Tasks can be listed, created, edited, or deleted from this interface.
Main Features:
- Task Listing: Displays a table with task ID, title, assigned user, date, file attachment (if any), description, current status, and actions.
- Status Indicators: Tasks are labeled with colored tags such as Completed, Processing, or Pending for quick identification.
- Status Update: An update button allows dynamic task status changes.
- Action Buttons: Includes edit and delete options for each row.
- Task Creation: Provides a form to input task details such as title, assigned user, date, file upload, and a description box.
- Validation: Required fields are marked with asterisks (*) and include user-friendly placeholders.
- Save & Back: Once filled, the task can be saved or canceled using the respective buttons.
This module enhances productivity by offering a clean UI to manage tasks and keep records up to date.
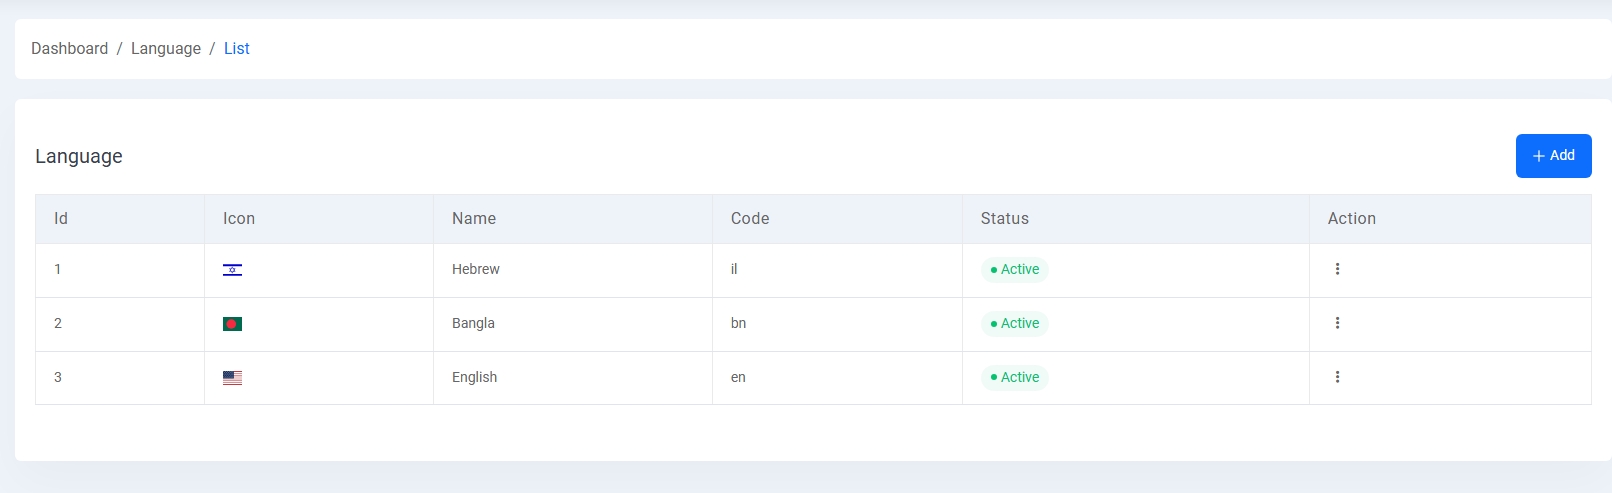
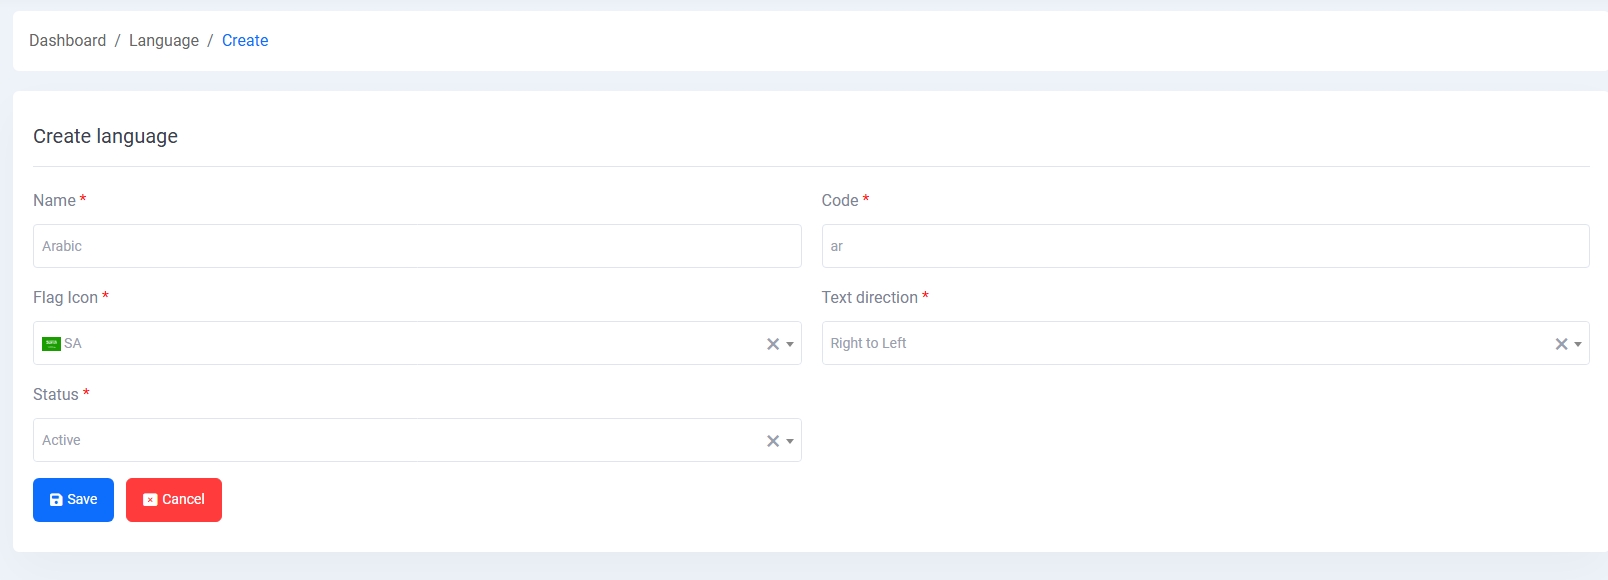
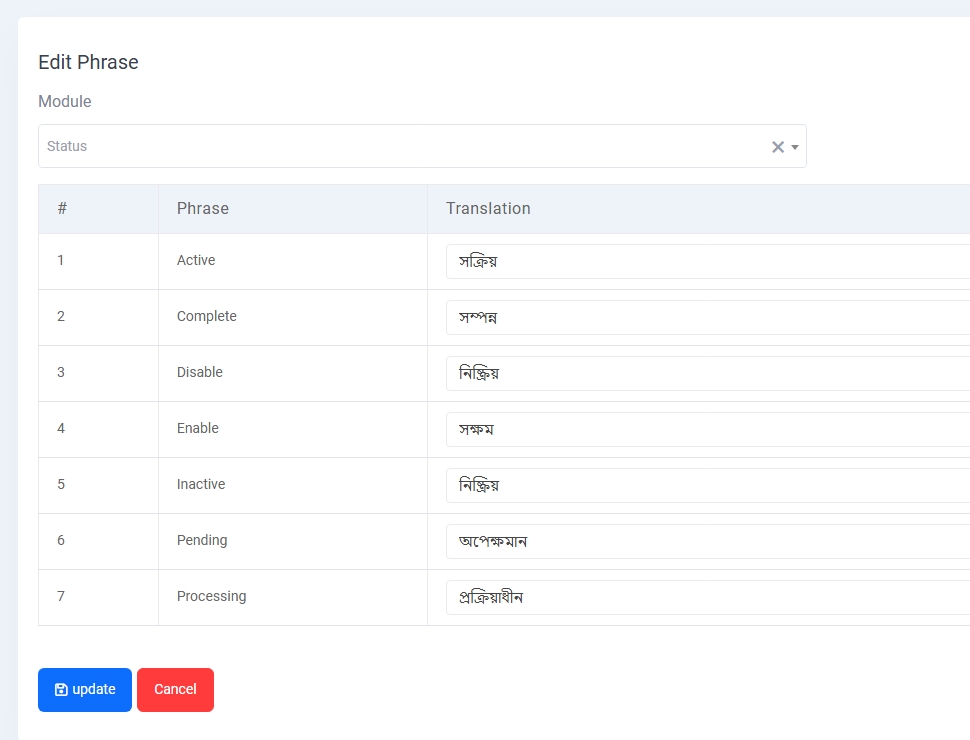
Language Management
The Language Management module enables administrators to manage localization across the system by defining supported languages and translating phrases in different modules.
Module Features:
- Language Create: Form to add a new language with required fields:
- Language Name
- Language Code
- Flag Icon (dropdown)
- Text Direction (e.g., Left to Right, Right to Left)
- Status toggle (Active/Inactive)
- Language List: Displays all configured languages with their flag, name, code, and current status. Each entry includes action buttons for editing or deleting.
- Edit Phrase: Enables translation of application terms per module. Each phrase has a technical key and its translated value, which can be updated inline.
This feature is crucial for multilingual applications, ensuring users receive content in their preferred language.
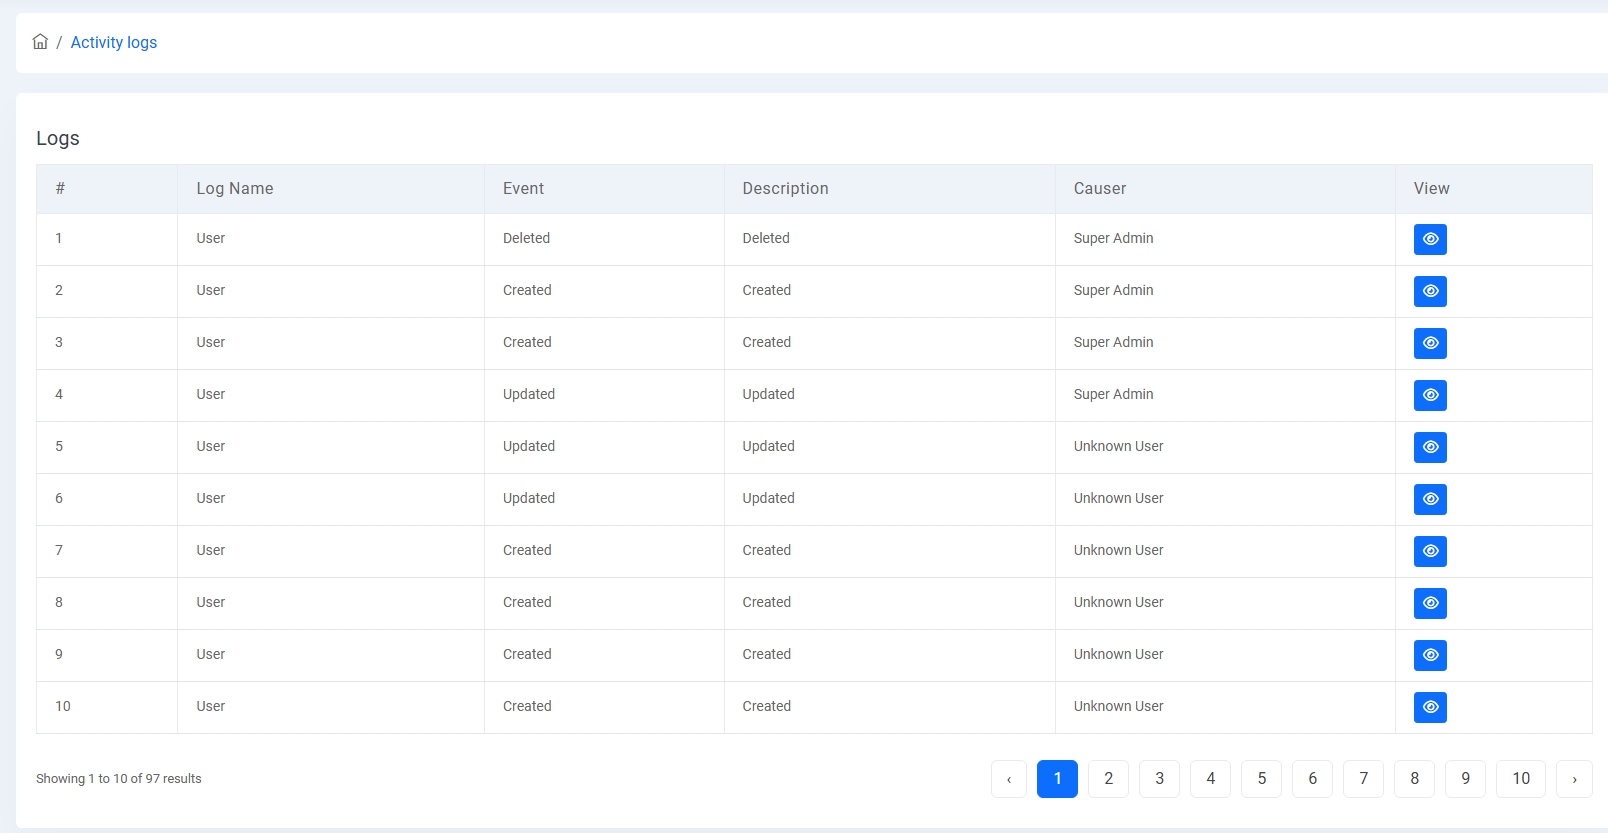
Activity Logs
The Activity Logs module is used to track every user activity across the system in a transparent and chronological manner.
1. Logs Table:
Lists logs with columns like Log Name, Event (e.g., Created, Updated, Deleted), Description, Causer (user who performed it), and a quick action view button to inspect individual log entries.
2. Causer Identification:
Identifies whether the activity was performed by an authorized user like "Super Admin" or by an "Unknown User", improving traceability of all operations.
3. Pagination & Sorting:
Supports pagination to browse through historical data effectively and keep audit logs lightweight and well-managed.
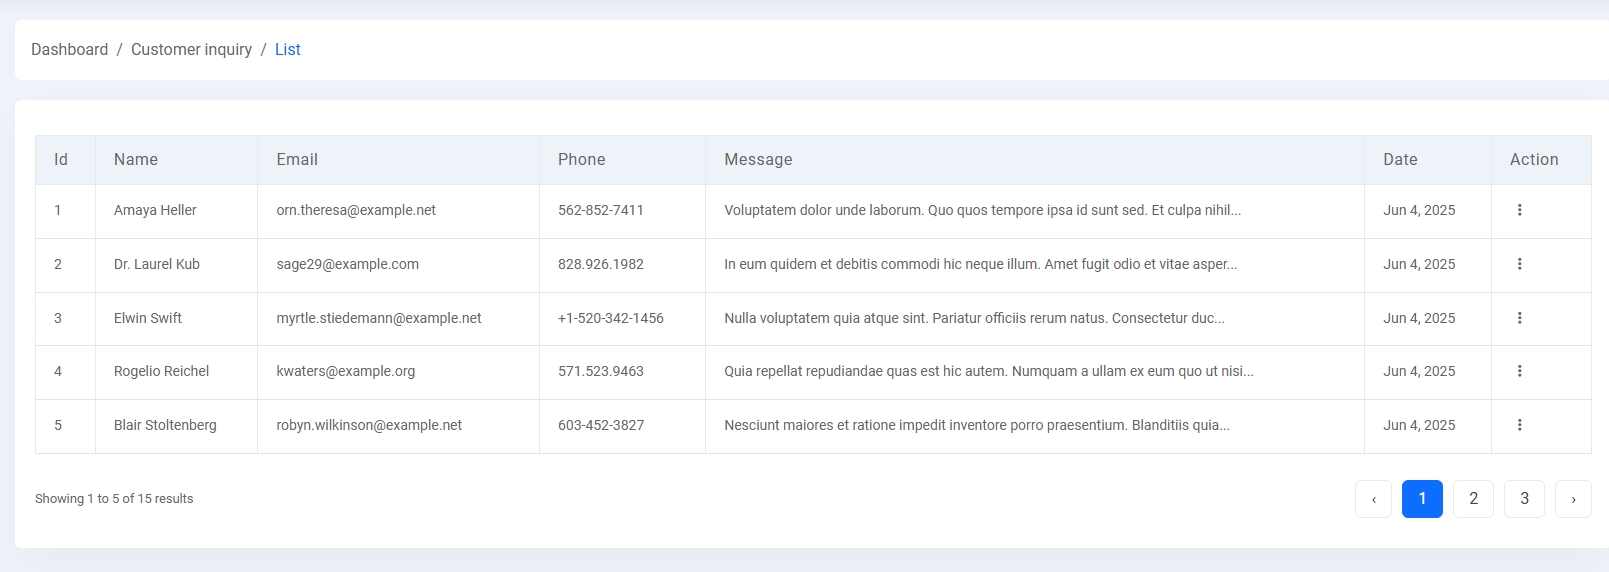
Customer Inquiry
The Customer Inquiry module allows the admin to manage inquiries submitted by users or visitors through a contact form or inquiry page.
1. Inquiry List:
Displays a paginated table of all inquiries including name, email, phone number, message, and date of submission. Admin can view detailed message data by clicking the action icon.
2. Inquiry View Modal:
When clicking the action icon, a modal window opens showing full details of the inquiry such as name, email, phone, date, and complete message content in a neatly structured layout.